


June 09, 2018
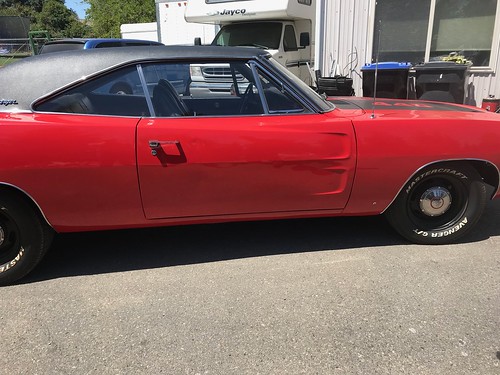
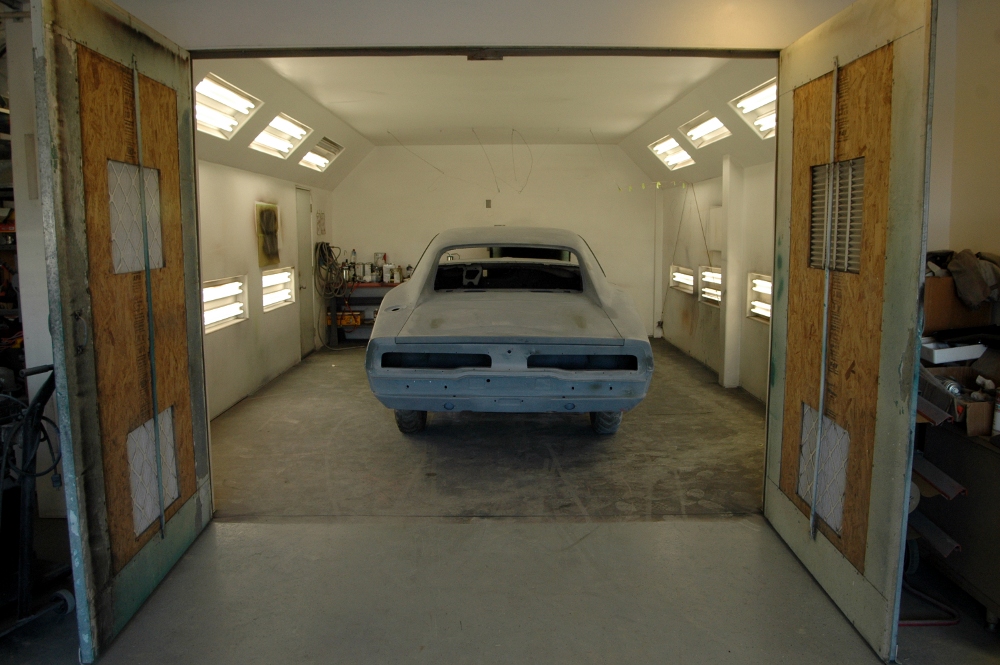
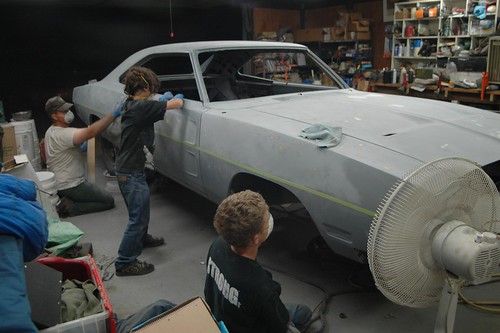
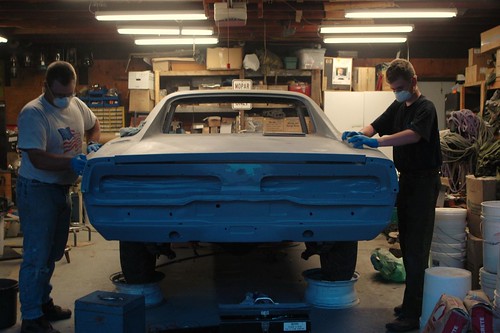
Charger at the body shop
A little later than I thought, but finally an update.
Mopar Ed was very busy so it has taken longer than he planned to get a space for my car in his shop.
However Friday was the day, and I was able to get my Charger down to his shop (about 1 1/4 hours from my house).
Not sure how long it will take to get the bodywork and paint done but if it is done in the next 3 weeks I'll be really happy.
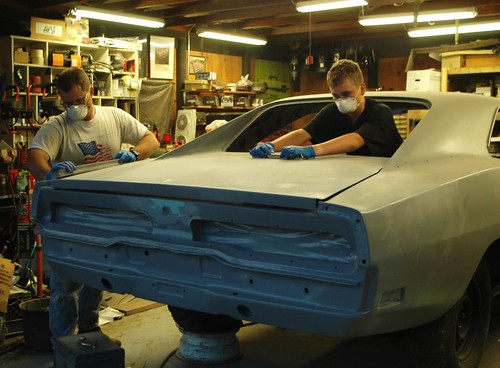
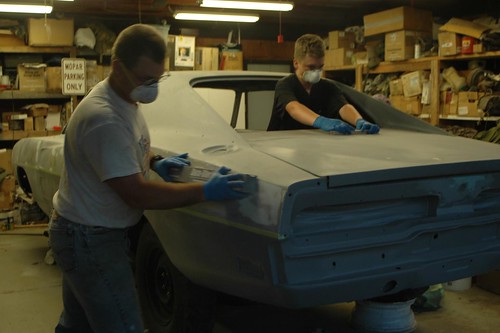
I was able to take one of my suction pullers to the worst part of the dent and it sprang back surprisingly well, but still requires attention to get the door back to being perfect. But it was less embarrassing when driving past someone who happened to be looking.
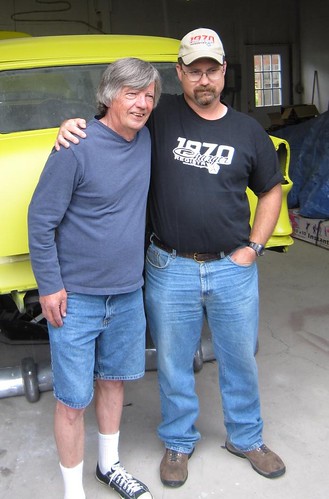
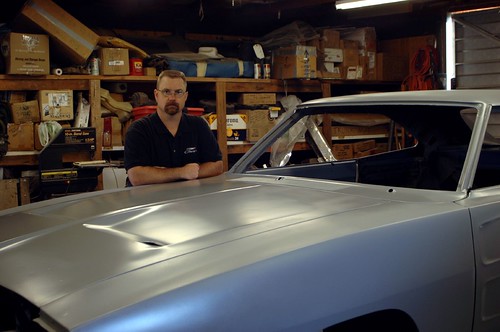
Here is "Mopar Ed" himself after having taken a look at the work he has before him.
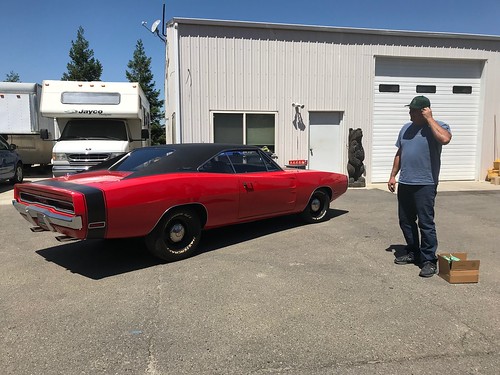
So long for now Charger, I'll see you again soon!
Stay tuned for another update hopefully soon, - Completion!
Posted in 2004-present | Family Helpers | Reassembly | body | primer and paint | link to this page | | Comments (0)
April 15, 2018
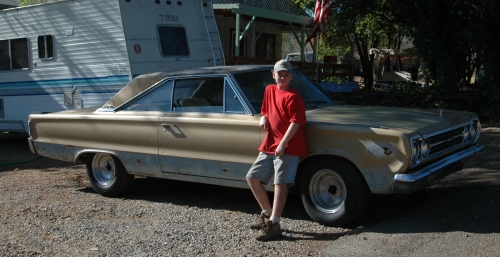
Shopping cart vs 70 Charger
Well it has been a while since I have had anything new to post here. But sadly, now I do...
The Saturday before Easter since our kids were about to head back to college after their Spring Break at home we decided to go to the next town over for lunch. Since it was a nice day, I decided we'd head over in the Charger to make it an even more special occasion.
After lunch we stopped off at the store where I carefully chose a parking spot at the end of a row figuring that with nobody parking next to us the car would be a bit safer.
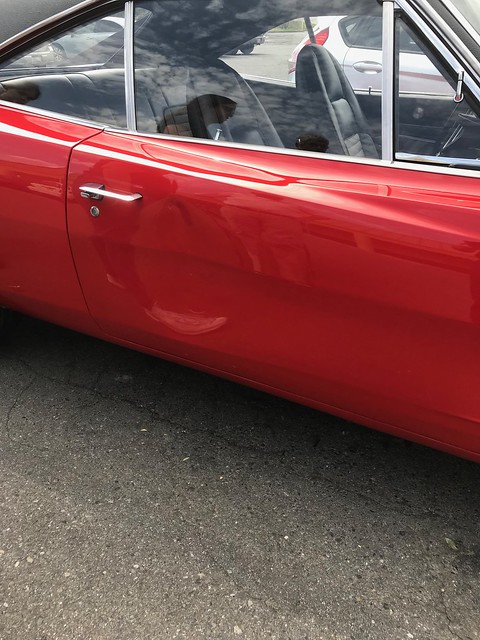
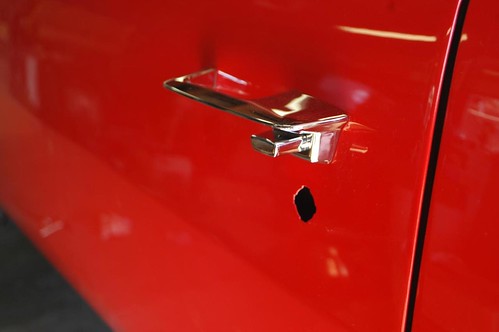
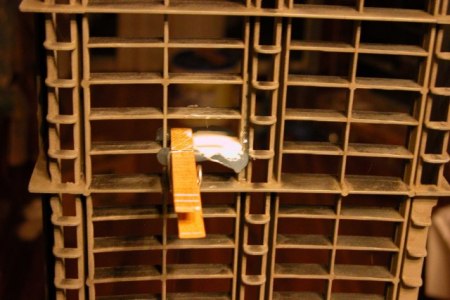
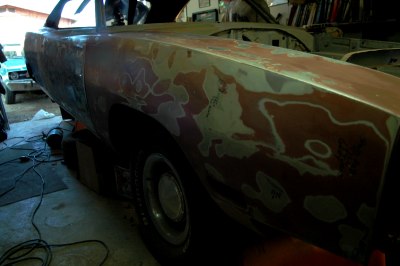
After we came out of the store I was putting a couple of things in the trunk and I heard a "THUNK" sort of noise. I also immediately heard my daughter totally losing it on somebody. I shut the trunk and came around to the passenger side where people were starting to gather. What greeted me was a pretty large dent in my passenger door.
When I got everyone calmed down (I was in shock and disbelief myself), I got the older guys information and found out that he had just helped his wife into his vehicle, loaded her walker, and when he turned around to grab his groceries, his loaded shopping cart had rolled downhill into the side of my Charger.
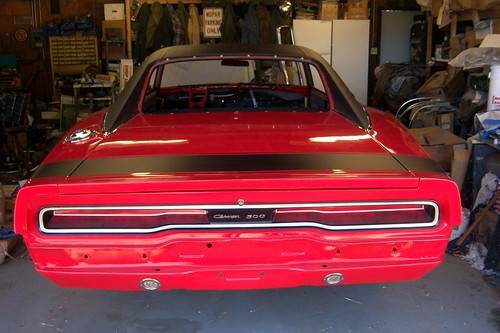
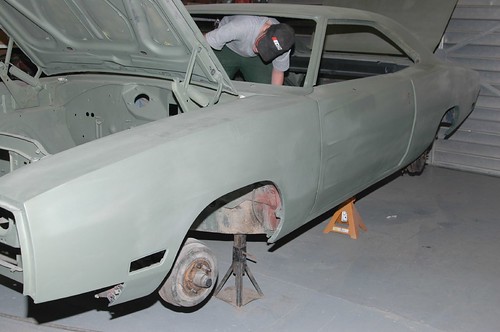
The dent is uglier than this picture makes it look. It is pushed in far enough that my door gap is noticeably off in the rear although it opens and shuts fine.
So far my collector car insurance company has been very helpful. The adjuster who came out a couple days after the incident to document everything at my house was very complimentary. He sees a lot of cool cars and he thought he had not encountered one as nice as mine in a long time.
I talked to "Mopar Ed" (the gentleman who painted my Charger) a week ago Friday and he will be making an opening in his schedule for me in early May after he is done with Spring Fling in Van Nuys, and Mopars at the Strip in Las Vegas.
I think the door will survive and not need replacement or an excessive amount of filler. But we'll see. I will update this blog as repairs are underway and completed.
Keep an eye on your beauties when you take them out!
Posted in 2004-present | Family Helpers | body | primer and paint | link to this page | | Comments (0)
June 08, 2014
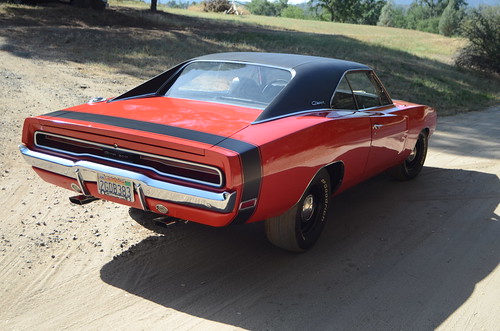
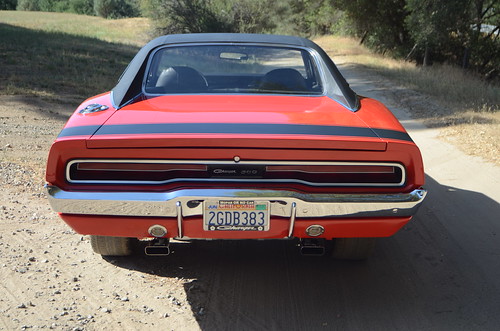
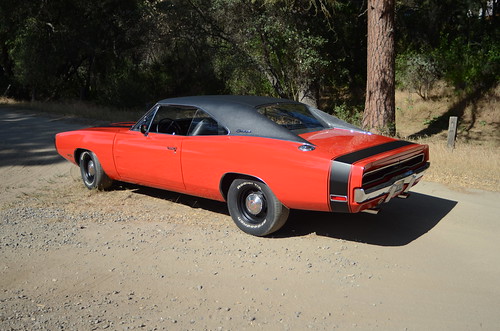
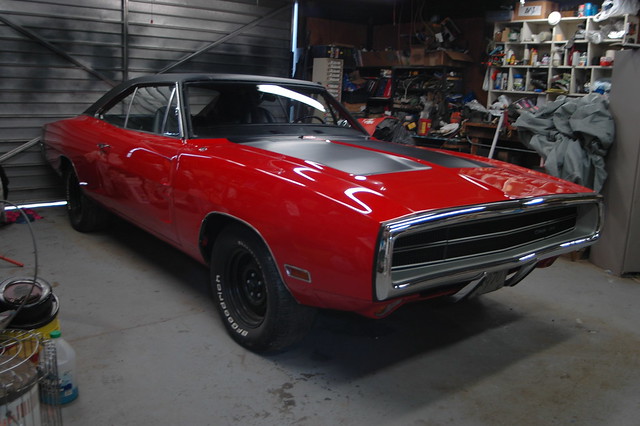
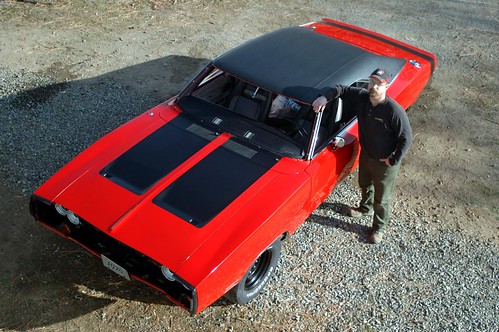
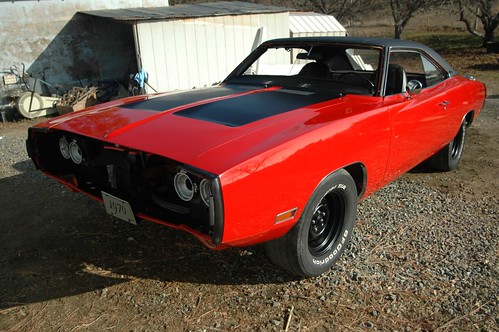
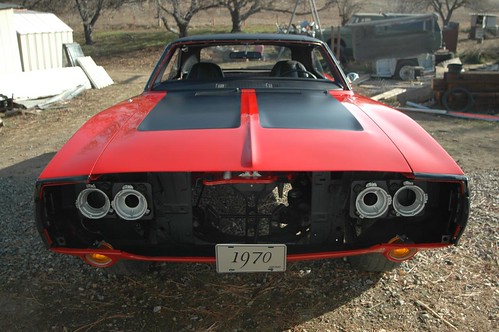
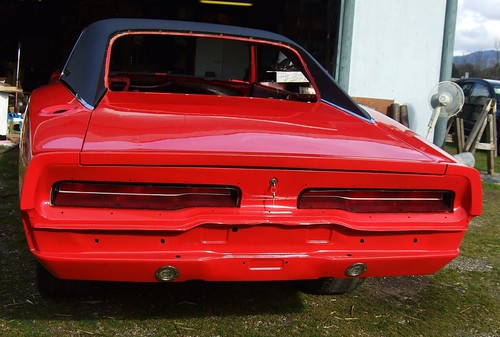
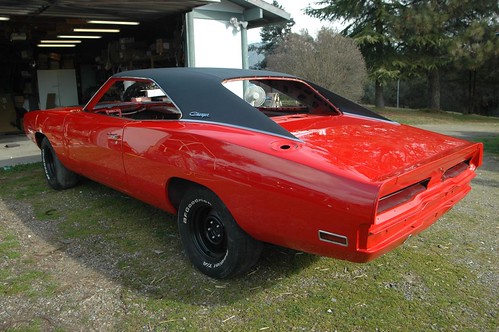
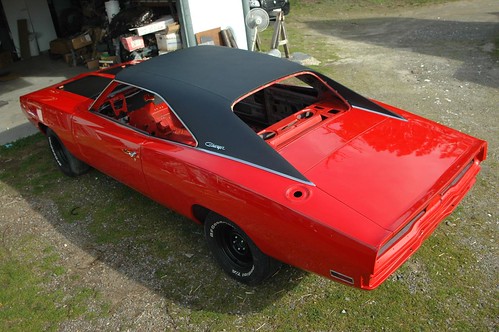
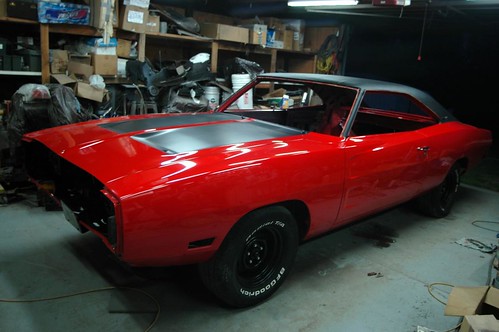
DRIVING my Charger out into the sun!
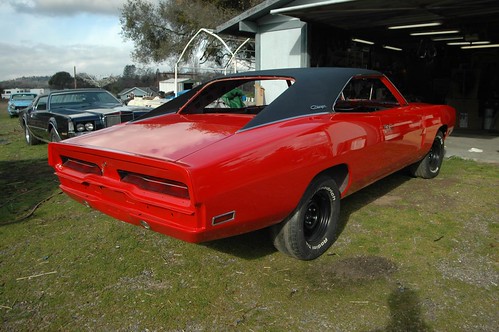
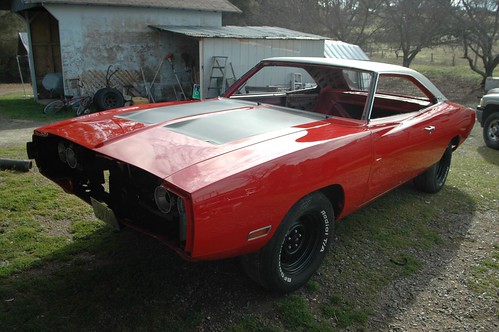
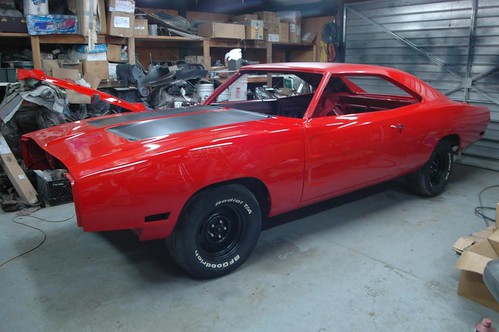
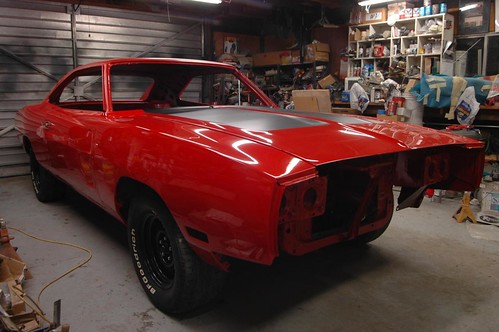
For the first time in more than 10 years I drove my Charger today. It still needs shocks, tires, insurance etc so I did not go far, but far enough to get my Charger out into the sun for a round of nice pictures. Thanks to my wife for taking the video and photos, and my son for spotting for me.
Into the sunshine!
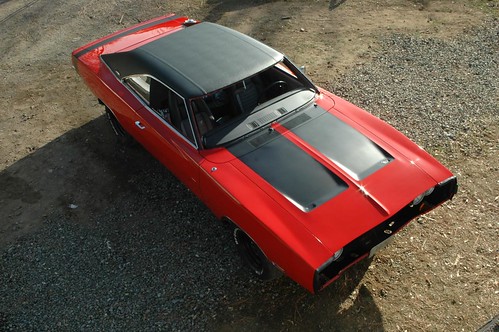
Down the driveway
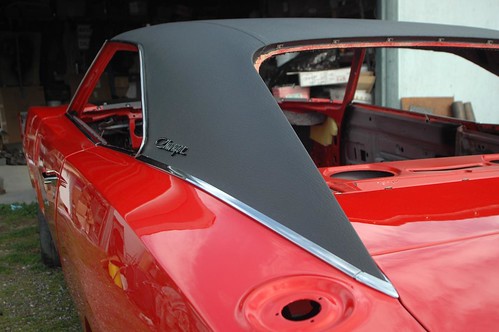
If you like, join me on a quick walk around my Charger.
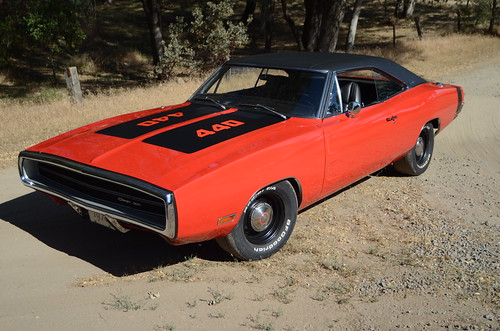
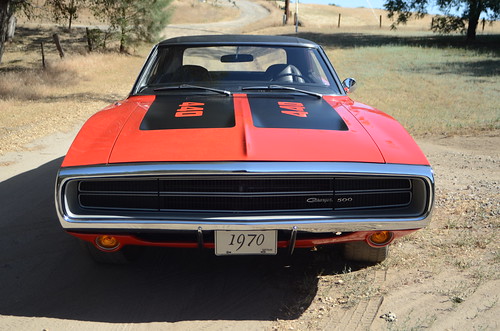
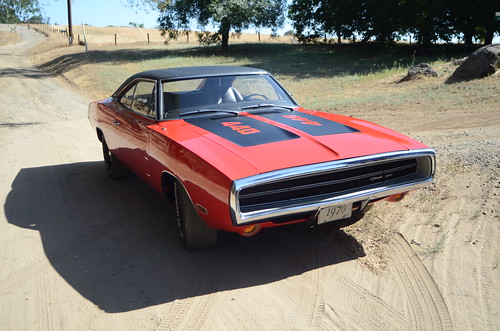
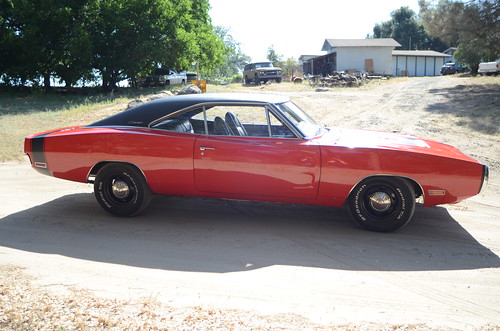
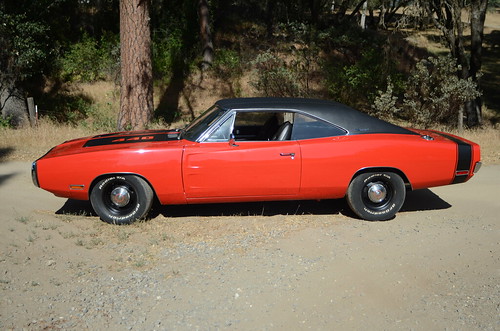
The to-do list is getting shorter and shorter, and my Charger is getting closer to being ready to take to it's first car show, probably in October.
Posted in 2004-present | Family Helpers | RESTORATION | Reassembly | body | engine | glass | suspension, brakes, tires, and wheels | link to this page | | Comments (0)
July 28, 2013
Father's Day present and parts gathering
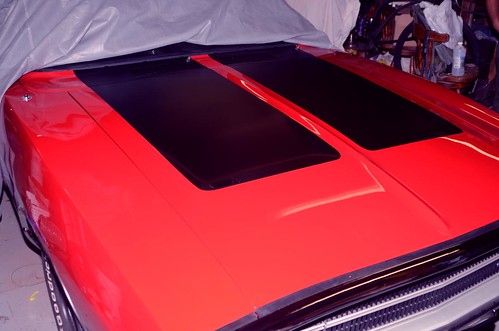
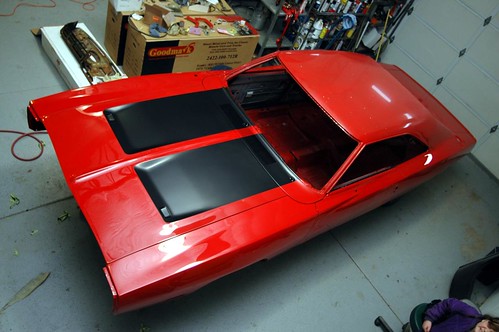
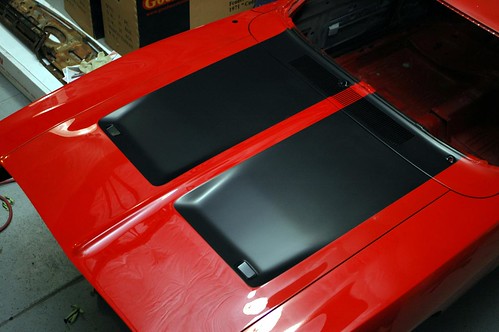
This year for Father's day my family bought me a set of tomato red 440 call outs for the hood of my Charger from Performance Car Graphics- thank you guys!
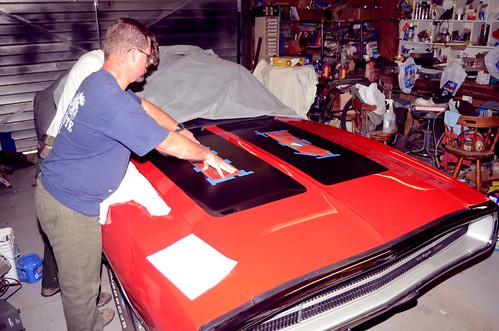
Finally had some time, and my son and I went out to put them on. It actually went really well, we spent a few moments cleaning the hood, and measuring everything. Sometimes you see these numbers (or the HEMI letters) put off to the side of the hood more. The correct placement is centered. The fine folks at Performance Car Graphics included a print of the factory guide for placement. It seems obscure at first, but after carefully studying it, we were confident about the placement of my numbers.
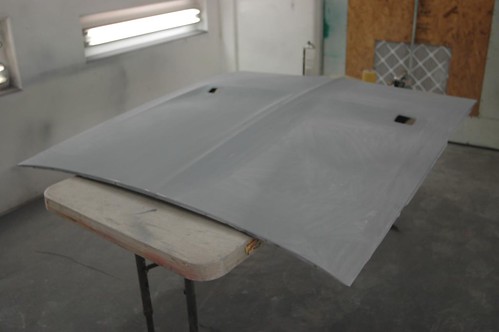
Here was the hood just prior to installation
Here are my son and I completing the layout process, which again was easy once we knew where they were supposed to go.

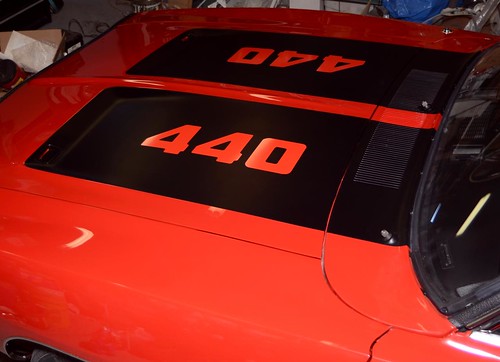
And here is the final product. It took less than an hour start to finish. It was fun, easy, and I think it looks great!

Also, I finally have all the pieces to rebuild my 727 transmission, the torque converter has been ordered from Performance Torque Converters (PTC) It is their copy of the HD 11' street Hemi converter with a stall of about 2,800 - 3,000 RPM., My 800 CFM Edelbrock Thunder AVS carburator should be headed this way tomorrow, I have the sending units for the engine, and a line on a set of original HP exhaust manifolds from Mopar Ed A few other odds and ends are trickling in, so fairly soon, the engine and transmission should be sitting in the car! Stay tuned...
Posted in 2004-present | Family Helpers | Reassembly | body | engine | link to this page | | Comments (0)
December 14, 2012
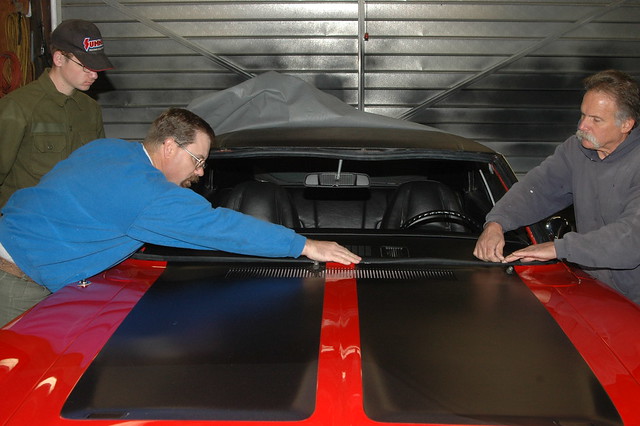
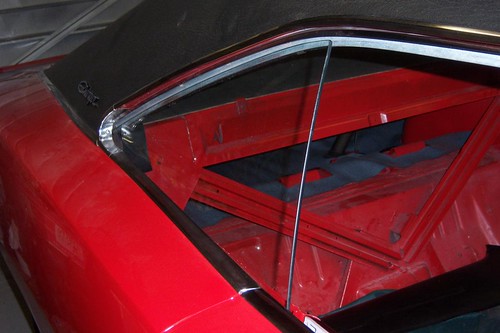
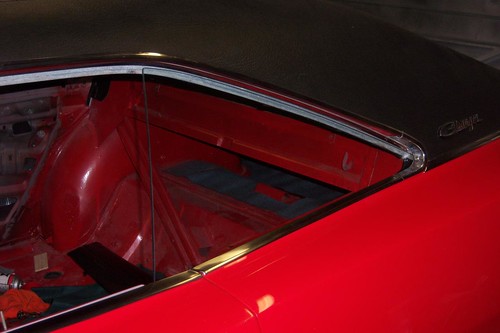
The last glass - Windshield installation
Well, once my electrical systems check was completed successfully I started planning to get my windshield installed.
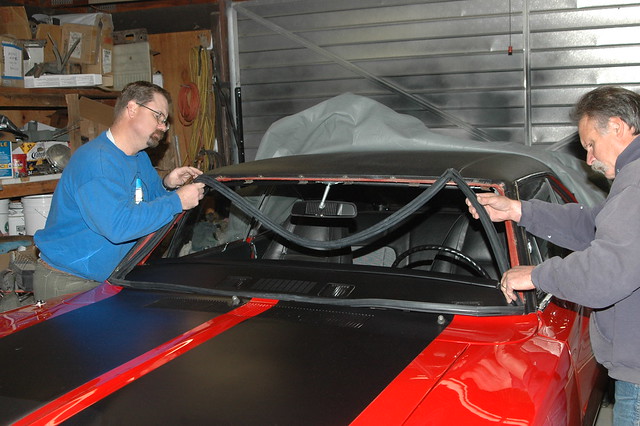
I arranged to once again have a local businessman, George Sgambellone, owner and operator of Mariposa Auto Trim, about installing my windshield (he came to my house and installed my vinyl top and let me help and learn). He was willing to come to my house and put the windshield in, showing me step-by-step how he was doing everything. The job went very smoothly, took an hour, maybe less, and once again, his rates were EXTREMELY reasonable. I have again decided to place an image of his business card here at the end of this post in case any people in my area need this sort of work done. I highly recommend George.
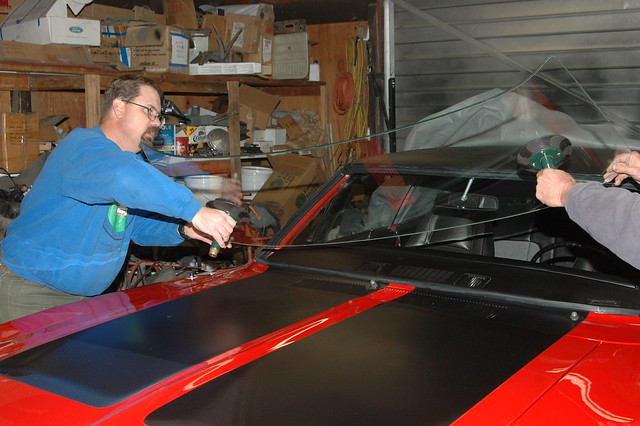
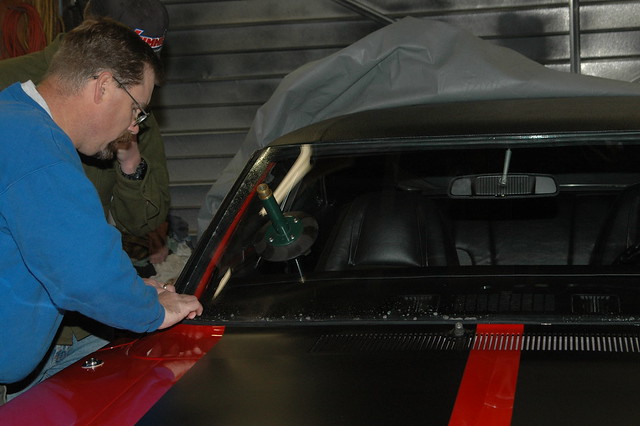
Here are a progression of pictures from the windshield installation. The first image shows George and myself working together putting the gasket in , then the progress forward.
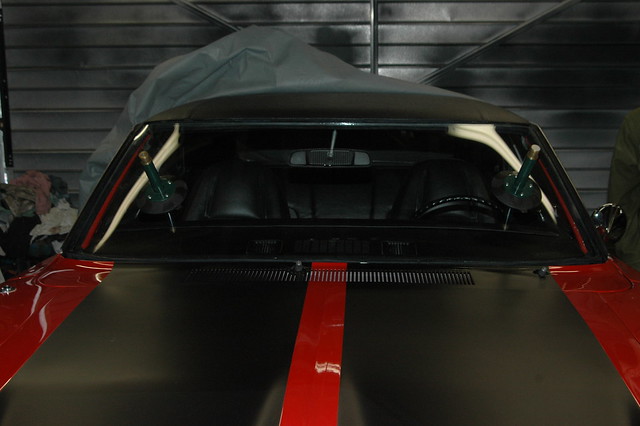
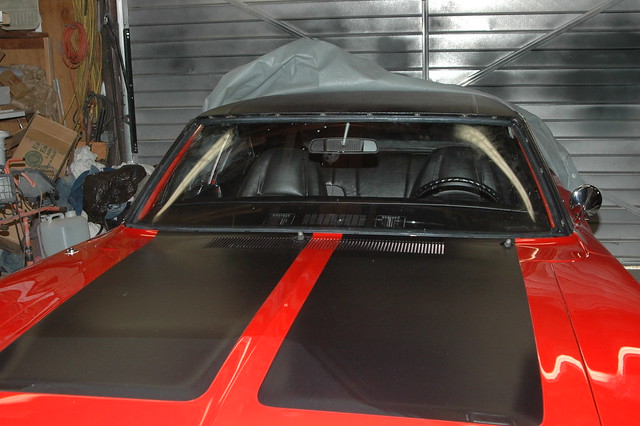
Yay! The glass is complete -The car wlll be much easier to keep clean inside now!
I have begun the process of cleaning and straightening the stainless steel windshield moldings and hope to finish polishing them and get them installed over the next week.
Here is a well deserved plug for George and Mariposa Auto Trim

Posted in 2004-present | Family Helpers | RESTORATION | Reassembly | body | glass | trim | link to this page | | Comments (0)
October 30, 2012
Electrical test video
Well, while I wait for the engine to progress further, I have been playing with my wiring harness. After having to fix one wire I had reversed (which caused the passenger front marker lights not to work), everything seems to be going according to plan.
My son and I made a short (2 1/2 minute) video of my Charger's "First light" it was a happy moment!
Here's the link.
70 Charger Electrical system first test
I was using my battery charger to provide the power, but it did the job.
Pardon the mess in the garage. I've had precious little time to work on my Charger, and even less to clean up.
Enjoy!
Posted in 2004-present | Family Helpers | Reassembly | body | link to this page | | Comments (0)
October 01, 2012
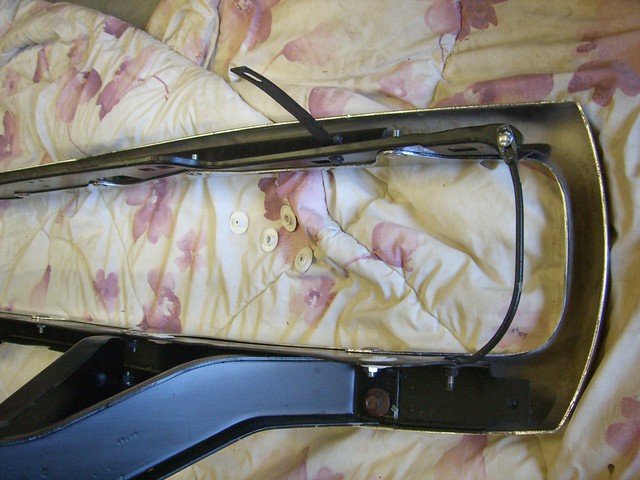
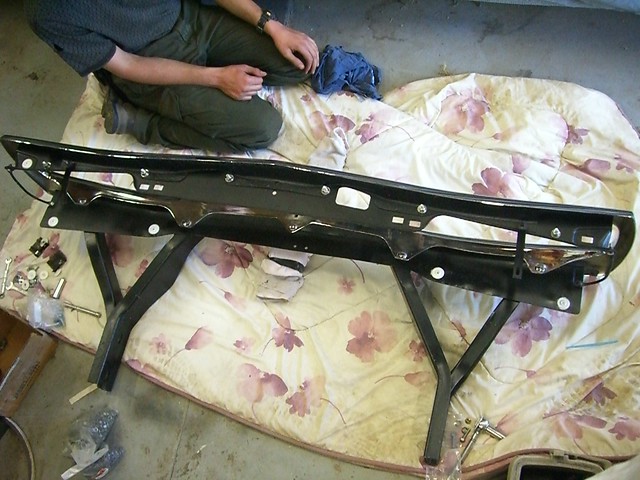
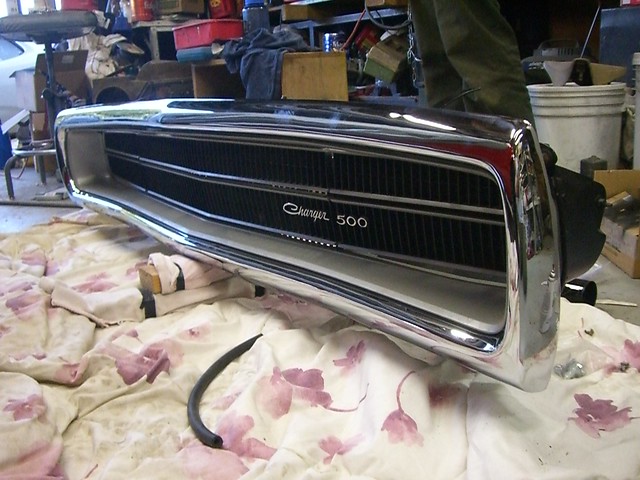
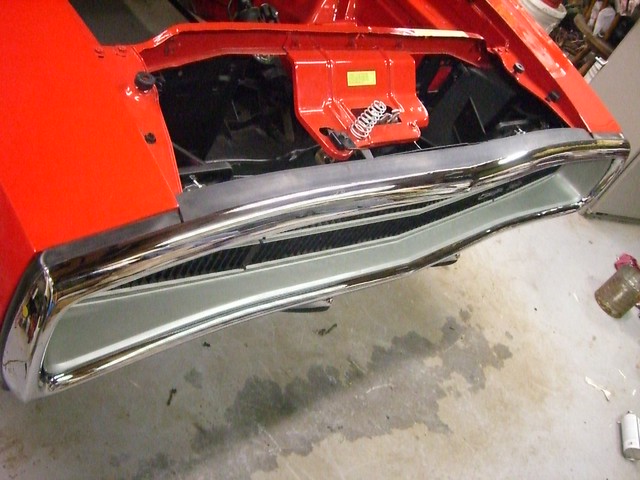
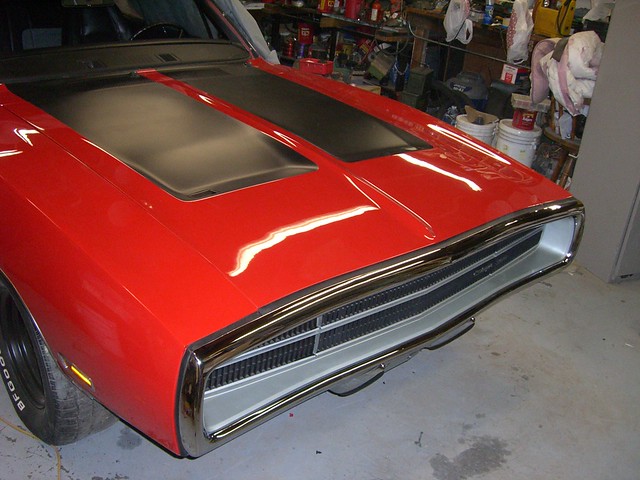
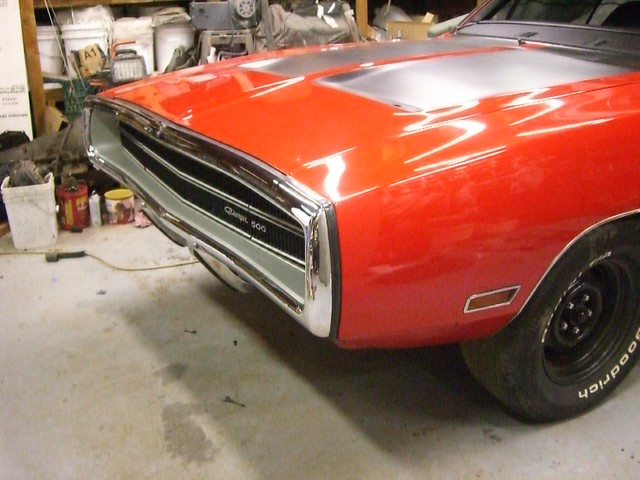
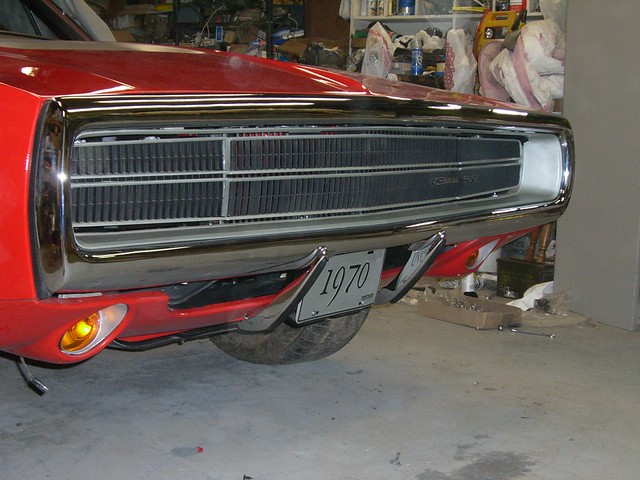
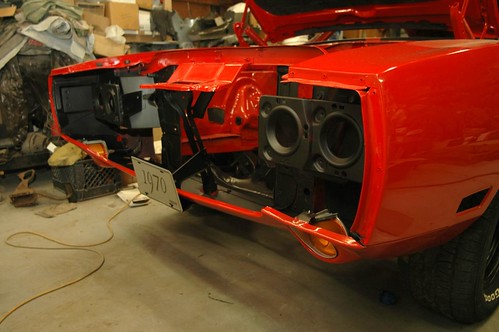
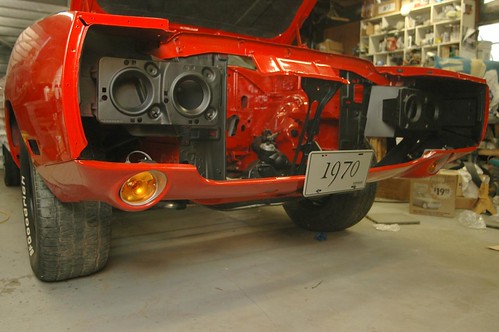
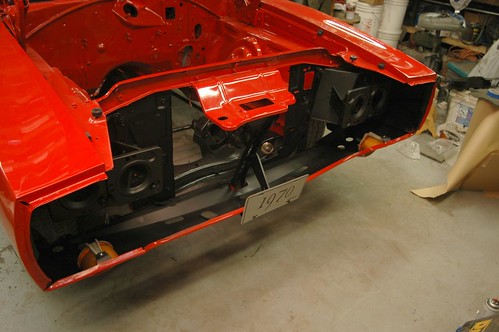
Bumper and Grill where they belong!
At long last, my bumper has returned from the chrome shop, it cost me extra and took 11 months, but I finally got it back, and it does look very good.
Rather than give you carpal tunnel scrolling down through all the pictures, I put together this slide show detailing the assembly and installation sequence.
The grill is a nice original one that I restored some years ago, the bumper and bumpettes are newly re-chromed originals, the rubber strips on the bumperettes are new reproduction ones I bought several years ago.
The images below are generally in order, and clicking on any of them will yield a larger image if you need more detail.


Posted in 2004-present | Family Helpers | Reassembly | body | trim | link to this page | | Comments (0)
September 22, 2012
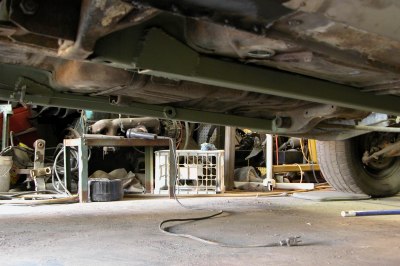
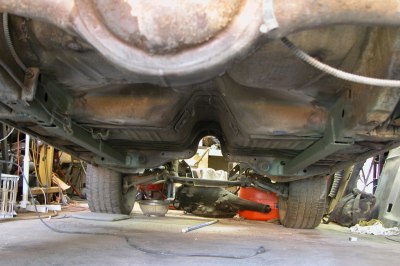
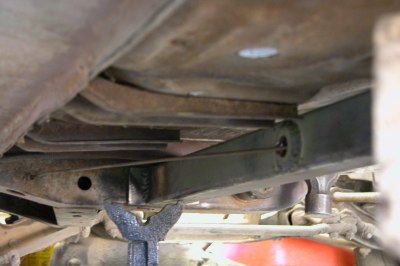
Brake lines, wheel well details
Well, while I am waiting for a few other things to fall into place, I made some time to square away my Charger's brake lines.
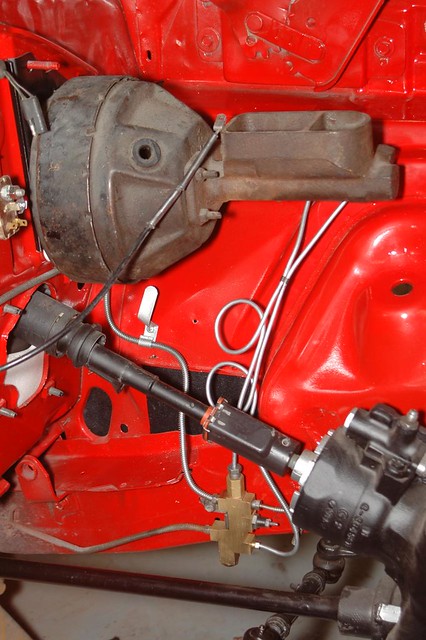
My Charger originally had 10" manual drums on all 4 corners. Even when I was young and fairly reckless, those were barely adequate for safety (especially when you decide to use that 440!)
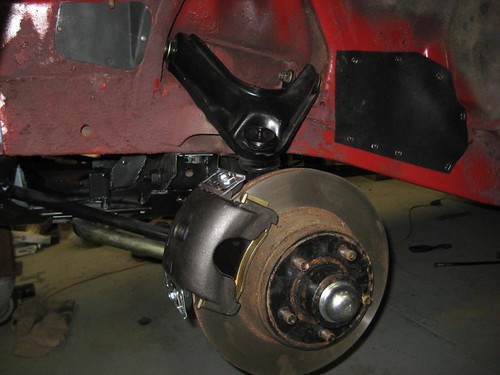
So as detailed some time ago in this blog, I upgraded the brakes to the large 12" rotor set up using the large Chrylser Cordoba rotors, and the required longer caliper mounting brackets. These parts are mounted to a pair of '73-'76 A-Body spindles.
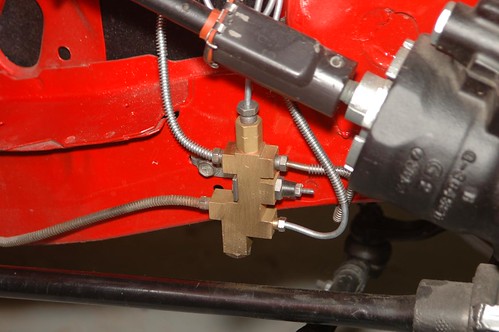
As most folks know, converting to disc brakes, and doing right requires more than simply bolting on discs. I located the correct proportioning valve for a disc brake equipped '70 Charger, which thankfully was the same as the early '70's disc brake equipped Dodge Darts. In addition the master cylinder adn booster are different for disc brake cars. Since mine was a manual brake car before I needed to install the correct re-enforcement plate and brake linkage pieces inside too.
The using new bulk steel seamless brake line, and the proper double flaring tools, I created my new brake lines following the original contours as closely as possible.I even transferred the factory spiral armor to the new lines. I used new fittings where ever the old ones were chewed up. Then put it all together.
In order to help me know where to put the lines going to the master cylinder I temporarily mounted an un-restored but correct master cylinder and booster set-up I got from a '69 Charger with disc brakes years ago.
Here are some pictures of the project.
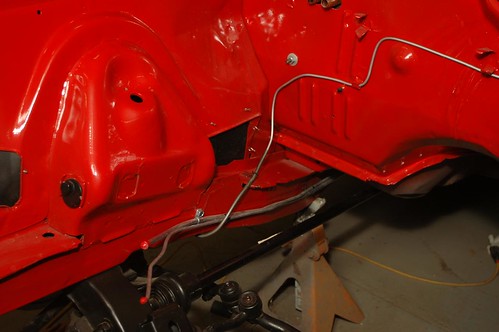
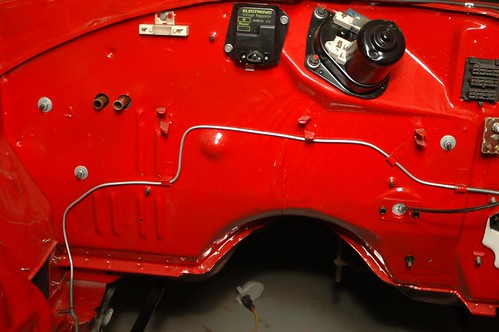
One thing I did while I was working on this area of the car is replaced the weatherstripping inside the front and rear wheel well ares, added some under body coating to the wheel wells.
Also after doing a lot of reading I discovered that the spindles were reverse-able left and right. Even though the 73-76 Dart I took the spindles from had the calipers on the front, there were some advantages to swapping the spindles and mounting the calipers on the rear. The main reason I chose to do this was that the rubber hoses I had bought fit better with the calipers on the rear, other things I read suggested that the extra clearance between the caliper and the sway bar and strut bars was a good thing.
So in these pictures everything is in its new position.
Driver's side
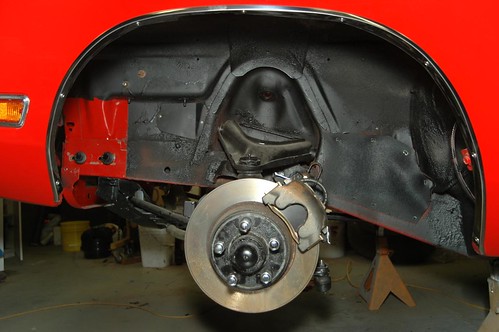
Passenger side...

Stay tuned, I have information that my front bumper may be returned to me soon, and my engine parts are at the machine shop being perfected, so check back soon for more!
Posted in 2004-present | Reassembly | body | suspension, brakes, tires, and wheels | link to this page | | Comments (0)
August 02, 2012
Interior progress (finally!)
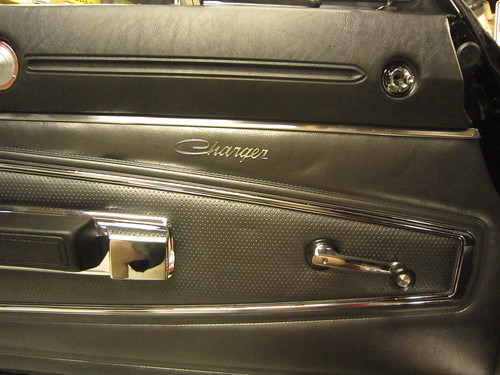
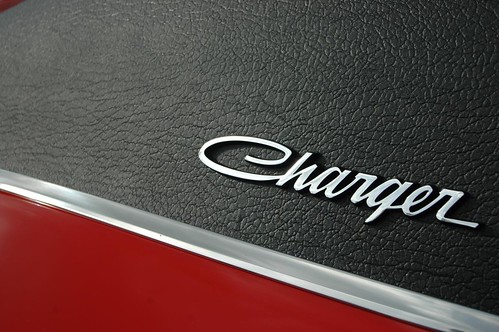
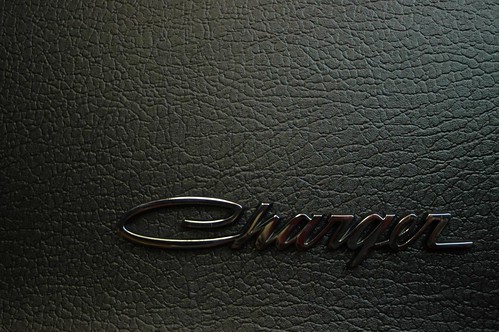
Well, I finally have some progress to report. Now that I have found a satisfactory solution to my door panel Charger script dilemma,( I found a guy who makes self adhesive Charger scripts in custom sizes on Ebay) At long last I could install the front door panels, trim, and hardware.
My son and I did both doors in an evening.
This was our starting point...
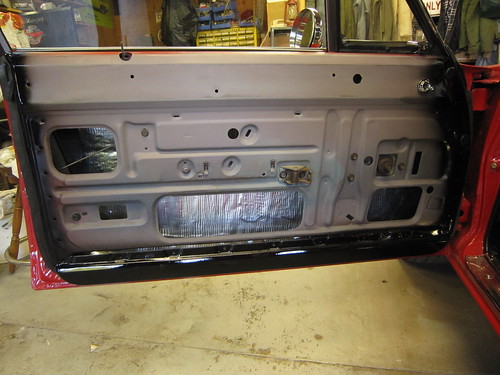
Then we sealed the door off factory style with barrier plastic held in place by a thin string of butyl tape I had left over after doing the rear window installation.
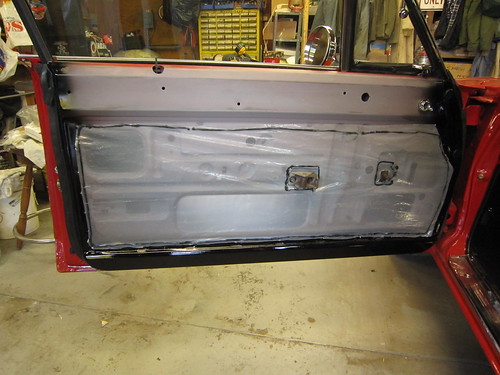
The the door panel trim, new Legendary Interiors door panels, arm rest bases, arm rests, inside door handles, and window cranks were installed. (everything but the trim itself was new).
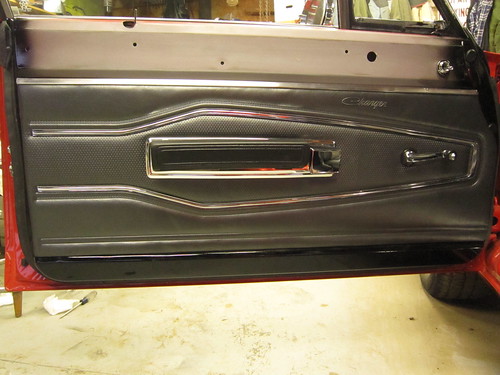
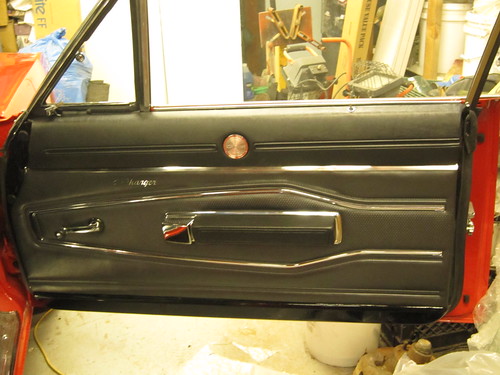
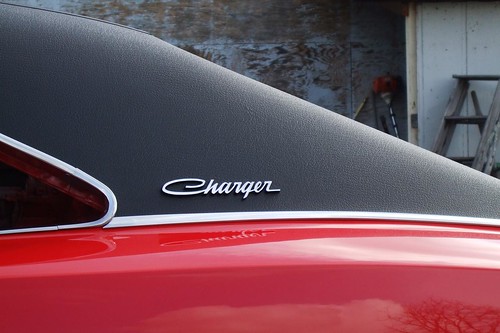
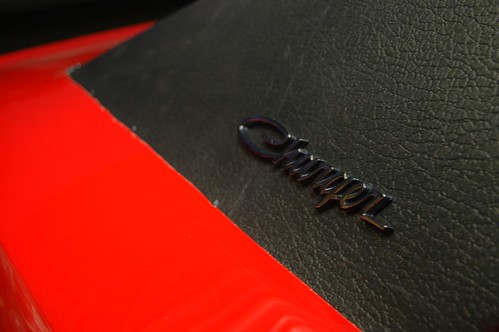
Here is the completed door, the upper door pads are exceptionally nice used ones I bought last year. I treated them to a couple coats of correct Charcoal interior paint from Herb's Parts.
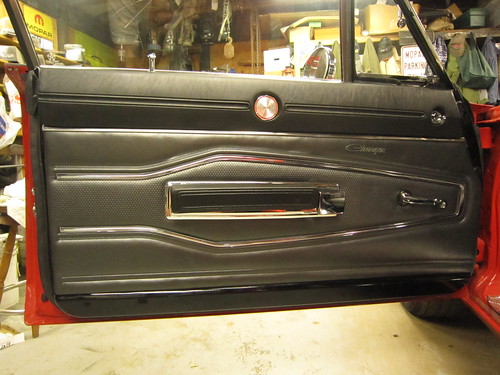
Here is a close-up of the rather nice Charger Script I had made to the same size as the hard to find original pieces.
Both sides are looking sharp as a tack now.
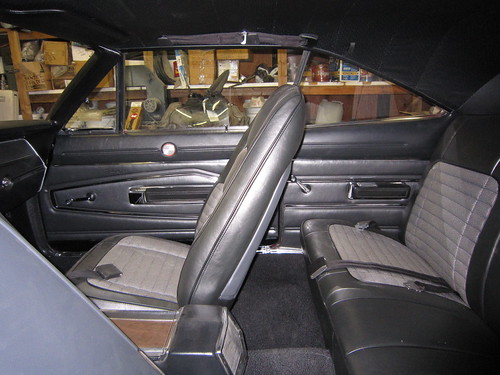
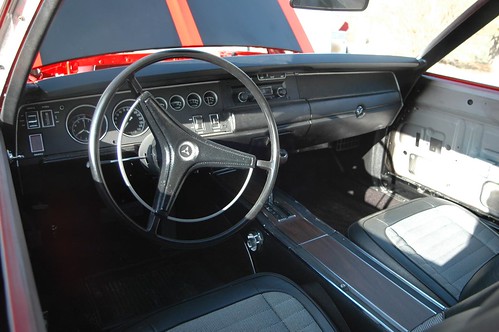
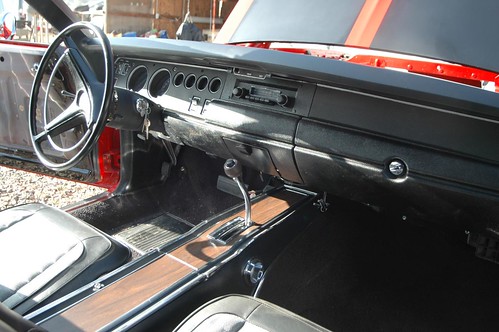
Here is a view of the completed interior,
Posted in 2004-present | RESTORATION | Reassembly | body | interior | trim | link to this page | | Comments (0)
July 04, 2012
Meeting a Mentor
While on a family vacation up north this year, I was able to tie-in with some really neat folks. One of them I had wanted to meet for a number of years. My body-work instructor guru, and pal Howard Holland of Howard's Backyard Auto Body. His DVD's are really great at helping a person go from pretty near zero to actually doing a good job, in a fun and informative way.
My family and I really enjoyed getting to meet Howard, and take a tour of his shop, his home and band room. Howard is even nicer in person.
We had a lot of fun, thanks Howard!
Posted in 2004-present | Family Helpers | body | primer and paint | sanding | link to this page | | Comments (0)
February 03, 2012
It's all in the details
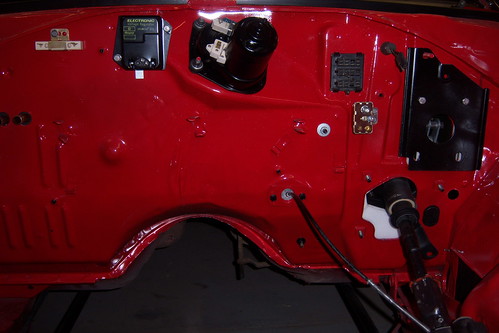
Well, while I am waiting for my glass to arrive (should be not more than a couple of weeks now), I have been keeping busy assembling a collection of fairly "correct" appointments for my Charger's firewall. I got a great deal on a Mopar reproduction voltage regulator, I reconditioned an original type ballast resistor I had, I did the same with the starter solenoid, and restored my windshield washer nozzles and hoses (installed after this picture was taken) I located original type bolts for each and put them on for this picture.
Nothing too exciting, but still, some progress.
Posted in 2004-present | Reassembly | body | wiring | link to this page | | Comments (2)
December 28, 2011
Christmas goodies
OK, well I have not made much progress on my Charger lately, been busy saving every penny for my set of all new glass which I plan to buy in February. But for Christmas, I got an assortment of Charger care & beautification items I had requested from my wife and kids.
I got a waxing kit with Meguiar's Ultimate Liquid Wax, an applicator and buffing cloth, a "California Car Duster", and an assortment of car washing, and detailing supplies.
So, today since it was nice outside, we pushed my Charger outside and started in. It had gotten fairly dusty since I have never washed it since it was painted about a year ago. It is covered, and indoors, but everything here outside is dirt, or gravel, so over time dust creeps on to everything.
First thing we did, was very carefully give my Charger a proper bath, I dried it off with a large micro-fiber towel I got with my goodies. Then my son and I applied the "Ultimate Wax", and then buffed it off by hand with the Meguiar's micro-fiber buffing cloth from the kit.
It really came out nice. The pictures below are quite good, and taken by my wife, but even she says they really aren't as stunning as the car is in person. As always, you can click on each image to see it larger.
It was a lot of fun bring the shine out, and knowing the finish is now protected somewhat, is nice too.
It has been a very merry Christmas for my Charger indeed. (and me!)


Oh, and since all my buddies, and everyone in my family keep asking me about the engine, I dropped in an engine today too. And YES, It's a HEMI!
I need to finalize the engine mounts, but check it out!
Well, on second thought, I guess I'll have to keep the "Holy Hemi" on our Christmas tree, and wait to overhaul my 440.
Posted in 2004-present | RESTORATION | body | engine | interior | primer and paint | link to this page | | Comments (0)
December 03, 2011
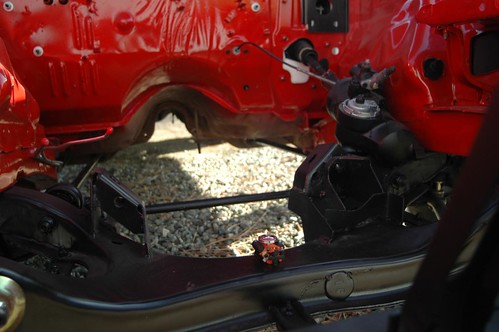
Fuel tank and lines are in!
Today, my son and I also put in the new Fuel tank, a new 3/8" sending unit (with 1/4" vapor return fitting) we will mate this to the new reproduction steel fuel lines and clips he and I installed earlier this week. (again new 3/8 feed with a 1/4 return)
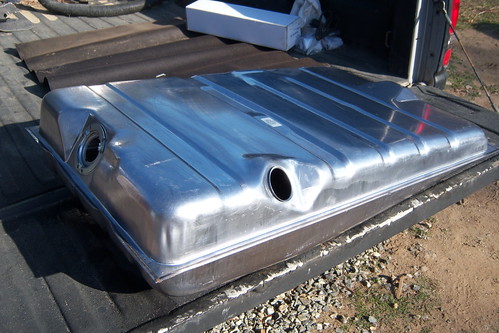
Here's the tank with pads, sending unit, and new fuel fill seal installed.
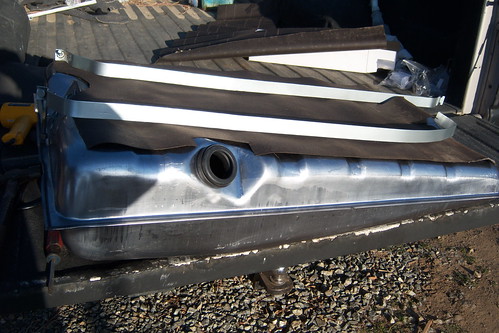
And here it is all tightened down in its permanent home!

More to come.
Posted in 2004-present | RESTORATION | Reassembly | body | engine | link to this page | | Comments (0)
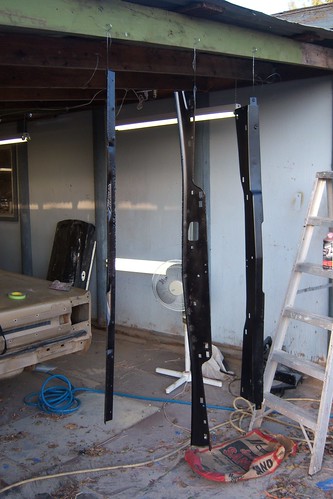
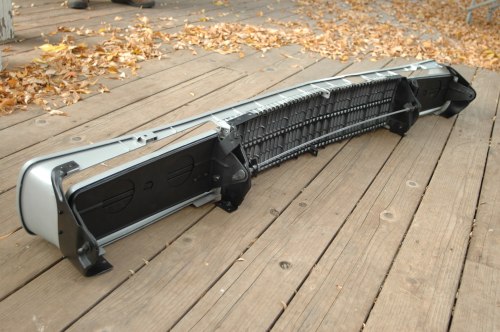
Front Bumper Parts ready
Well, I had a chance to get a few things done today.
Finished sand blasting the metal parts that surround the grille, then got them primed, and painted. Now when I get time, I can reassemble the grill, bumper etc, and install them!
Here they are after being primed, and painted...
Looking forward to finishing the front!
Posted in 2004-present | RESTORATION | Reassembly | body | rust & rust repair | sandblasting | trim | link to this page | | Comments (0)
November 08, 2011
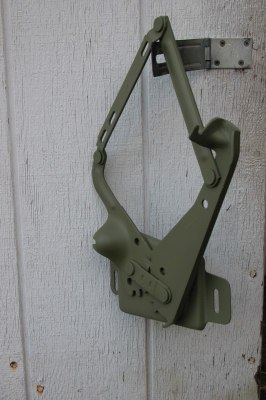
Headlight door motor ready
Now that I am getting closer to installing my grille, I blasted, restored, and rebuilt my headlight door motor. The gear, and internal plastic parts are all new from The Headlight Motor Man (Great stuff by the way). I appears to work very well!
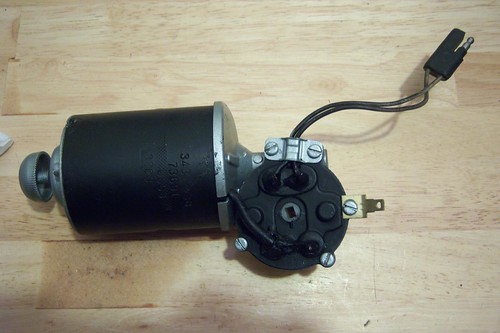
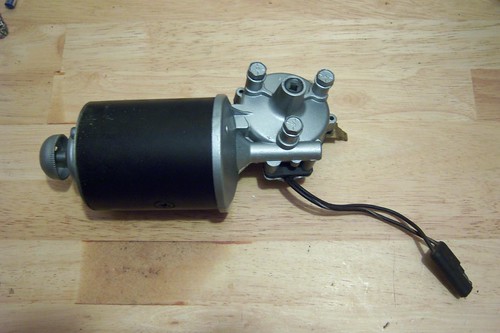
Hopefully soon I'll have my refurbished motor back in its natural environment!
Posted in 2004-present | Reassembly | body | trim | wiring | link to this page | | Comments (1)
November 02, 2011
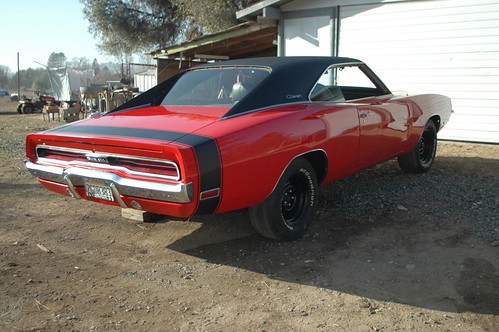
Re-Chromed Rear bumper - On!
Well, my son and I have found time to install the new wheel lip mouldings, and to re-assemble and install the re-chromed rear bumper.
I blasted the bumper brackets and hardware, shot them with self-etching primer, painted all satin black and put it together with new bumper bolts, and my brand new but several years old," Mopar or No Car" Charger script license plate frame I bought from Mopar Collector's Guide.
Here's a preview; my wife took a picture for me this afternoon while I was at work...

Stick around, more on the way!
Posted in 2004-present | RESTORATION | Reassembly | body | sandblasting | trim | link to this page | | Comments (0)
October 28, 2011
Some progress
OK, things have been pretty quiet on my restoration for over a month, maybe closer to two. However, as my overtime pay has arrived and has now been put to work for me parts are starting to roll in.
Some folks have been asking, so I thought I's share the current status.
I will have pictures soon, especially when things start to go together, but, here is a list of what I have been able to acquire for my Charger...
Re-Chromed front bumper - got it!
Re-Chromed front bumperettes - got them!.
Re-Chromed rear bumper - got it!
Re-chromed rear bumperettes - got them!
Re-chromed vent window frames and smaller vent window parts (latches etc) - got them!
New bumper bolt kit - got it!
New shifter knob - got it!
New Wheel lip mouldings - got them!
New fuel tank - got it!
New 3/8 fuel line - got it!
New 1/4 fuel return line - got it!
New sending unit - got it!
New fuel line clip kit - got it!
Can't wait to get everything put on. That means I get to finish putting in the side glass, them complete the interior, I get to install bumpers and that means un-boxing my grille! I am getting excited!
Pictures coming "soon" (probably a bit at a time over the next 60 days or so) Please stay tuned!
Posted in 2004-present | Reassembly | body | glass | interior | trim | link to this page | | Comments (0)
July 23, 2011
Dash and trim progress
Finally had a moment to upload some photos of some recent progress.
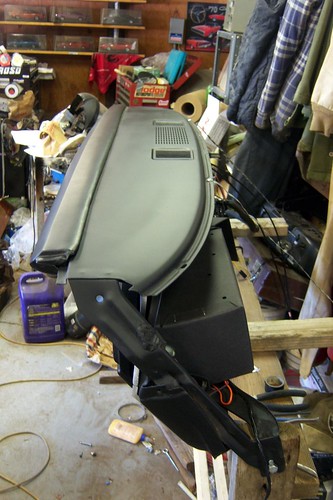
First, my son and I have been working in our "extra" time to finish the dash assembly, here are some pictures.
First, dash overall. new PG Classics dash pad, new PG Classics radio bezel purchased from Mopar Ed, gauges and heater controls restored with Performance Car Graphics kit, everything else was restored and hand painted by me.
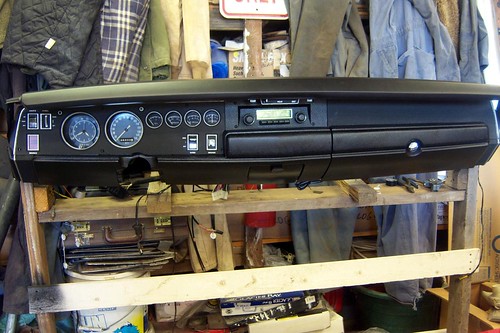
A close-up of the instrument panel area
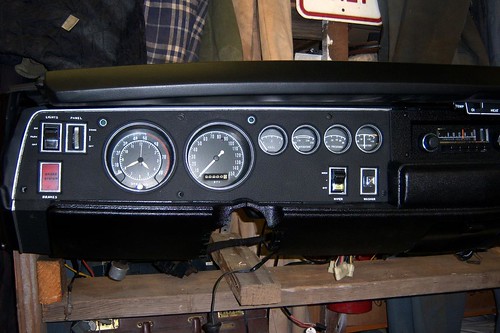
Side view
Next, emboldened by Murray's success on his tail light panel, I tried to restore my own. I started over three times before I ended up with the look I was after. Found the "chrome" paint I liked best, painted the black first, then masked off all but the shiny strip with super detail 3m 1/2" wide precision tape.
The 500 emblem I restored, the Charger emblem is new from AMD via Mopar Ed.
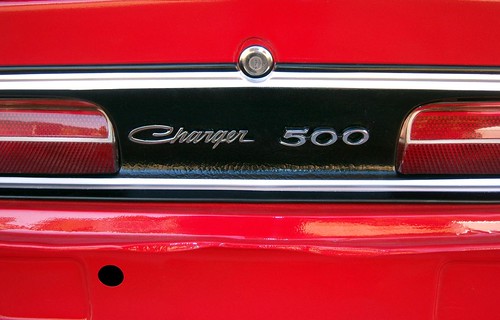
Here are some over all pics for effect.
More to come. Stay tuned
Posted in 2004-present | RESTORATION | Reassembly | body | interior | trim | link to this page | | Comments (1)
June 11, 2011
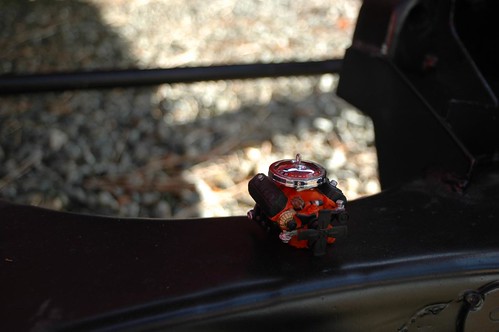
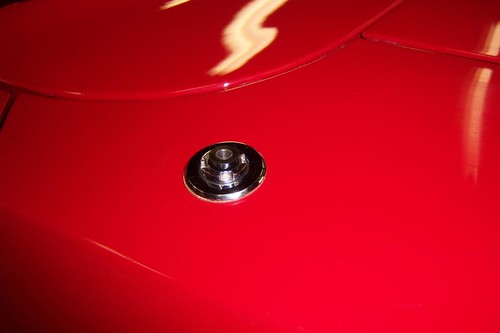
Fuel cap Father's Day!
A lot of things have been coming together for my Charger lately.In addition to the smoking deal on an NOS antenna base mentioned in the previous post, my order from Mopar Ed came in this week, which consisted of my new PG Classics dash pad, radio bezel, and a pair of nicer quarter windows, a set of '70 AM radio knobs.
Today while we were down in Mopar Ed's office picking up my parts, my wife and kids announced that Ed had a Father's Day surprise for me, and that she and my kids had all chipped in to buy it for me. Then Ed handed me a box containing this (which I promptly installed when I got home)
All I can do is thank Jesus for such a wonderful week, and a wonderful family!
Now I have all the needed pieces, and as soon as I get time, I can complete the assembly of my dash and get it in.
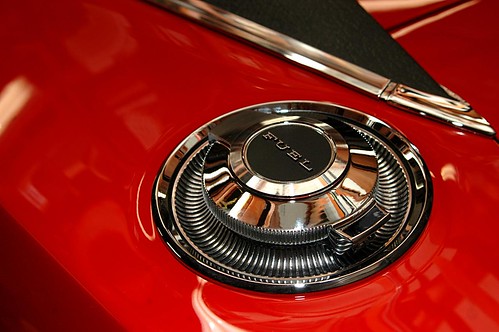
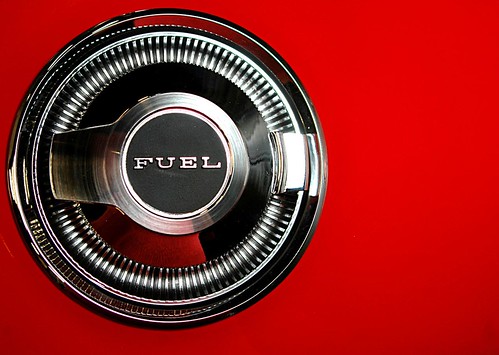
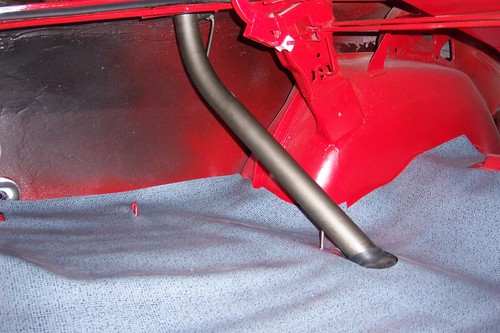
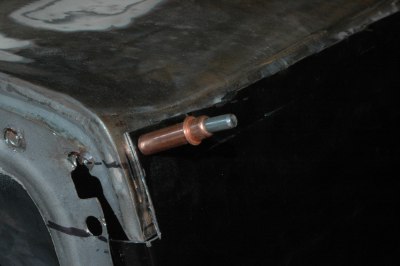
The beautiful fuel cap assembly pictured above attaches through the quarter panel and associated gaskets into the fuel filler tube, so it was necessary to refurbish the filler tube and install the trunk gasket for it at the same time as I installed the fuel cap.
Posted in 2004-present | RESTORATION | Reassembly | body | trim | link to this page | | Comments (0)
June 10, 2011
Filling in holes
Recently my family and I attended the Fremont Mopar Alley Mopar Rally car show, and I met a really nice guy and his wife who own a beautiful '69 Charger. While talking with them, I found out that they had some leftovers from restoring their car. One of those items was a NOS antenna base, nut, and bezel. He made me an extremely good deal, so I purchased it. My son, my nephew and I installed it in the car and routed the antenna coax. It looks really good, just like it's supposed to, and gives a finished look to the fender.
My friend and regular parts supplier, Mopar Ed, gave me an excellent deal on a pair of used quarter windows that were in considerably better shape than my originals. My son and I had previously installed all the hardware, so it was a simple matter for my nephew Jordan and I to install and adjust the windows themselves. It sure is fun, seeing some of the big holes start to be filled on my Charger.
Posted in 2004-present | RESTORATION | Reassembly | body | glass | wiring | link to this page | | Comments (0)
June 03, 2011
A long-awaited day
A bit more progress to report. A long awaited day.
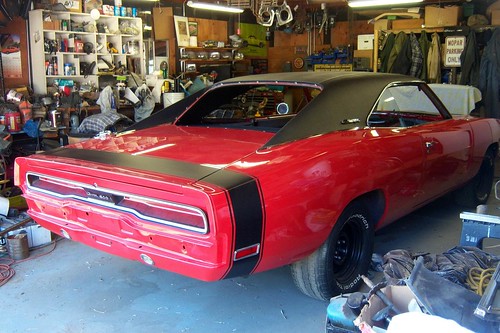
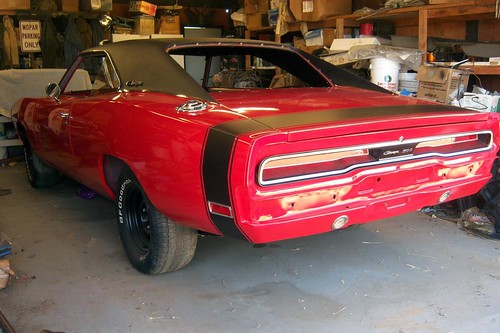
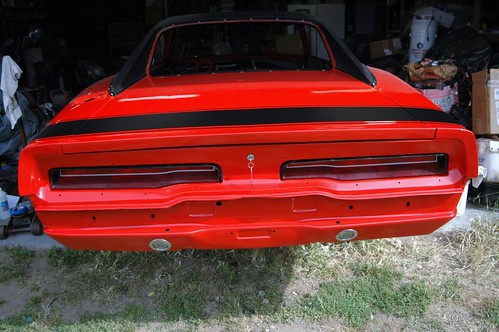
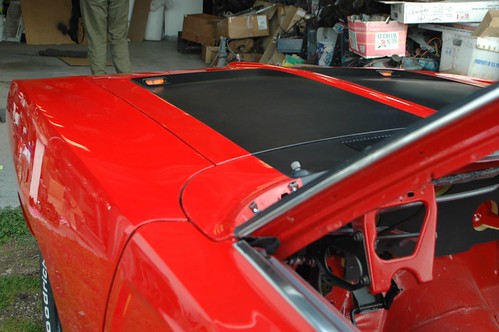
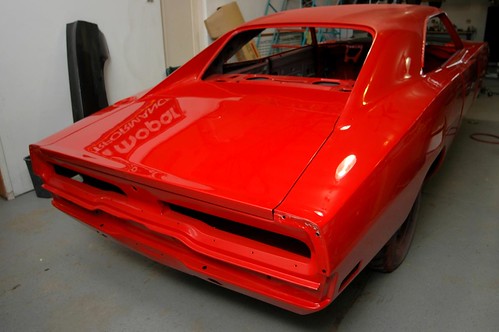
My son and I installed the new matte black tail-stripe from Performance Car Graphics.
Weather was iffy, so we just pulled it out enough to photograph the stripe work.
Tail stripe, passenger side:
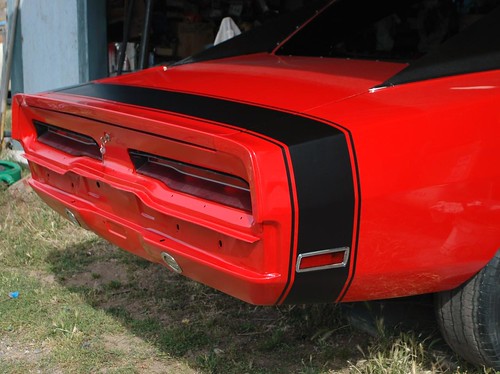
Deck lid with tail stripe:
Tail stripe, driver's side close-up
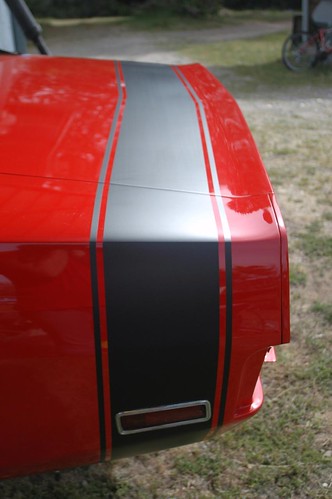
Tail stripe, driver's side looking backward

I had to re-order a driver's side section, when I put it on at first I messed up badly. The other two pieces went on fine (tried different method) PCG will sell individual parts. So when it arrived, we put it on slowly and gradually, and it went fine. Looks even better in person, if I do say so myself.
Tolley
Posted in 2004-present | RESTORATION | Reassembly | body | primer and paint | trim | link to this page | | Comments (0)
May 15, 2011
Decals
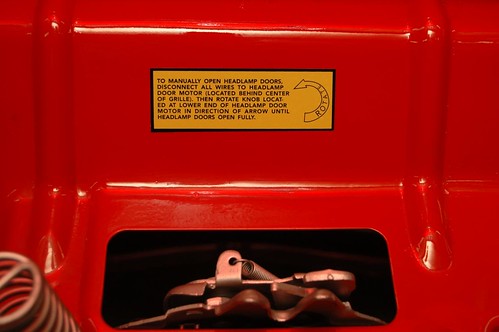
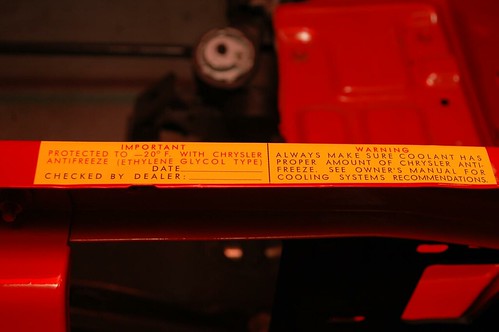
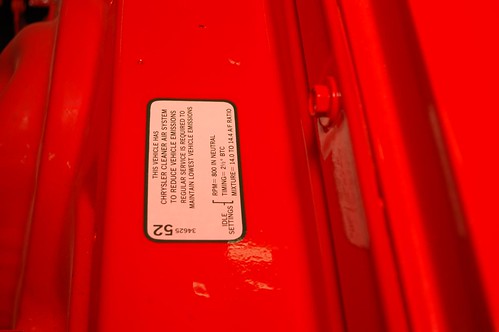
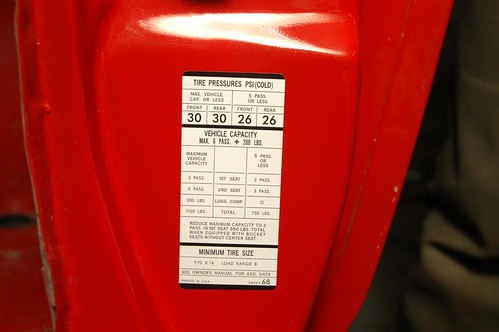
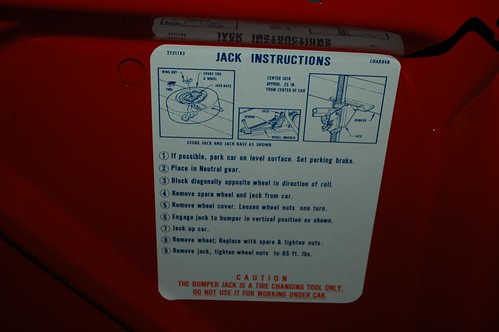
One of the steps I have been very excited to be able to perform was purchasing and installing the various authentic reproduction decals that go around the car. I purchased most of the decals from Performance Car Graphics, and I have to say the quality and service were outstanding. I ordered my reproduction VIN decal from ECS Automotive Concepts , and my dealings with them could not have been better. They were fantastic and fast. I also purchased from Performance Car Graphics a matte black tail stripe and air cleaner decal, which have not yet been installed.
Headlight door motor decal
Antifreeze decal
Emissions decal
Tire inflation decal
VIN decal

Jack instructions
Posted in 2004-present | RESTORATION | Reassembly | body | trim | link to this page | | Comments (0)
April 15, 2011
Some progress to report
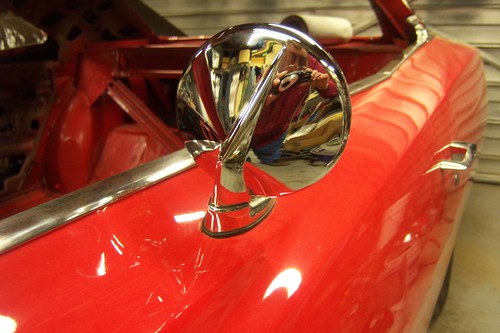
I have not had a lot of time to work on my Charger lately. I've been working on a lot of other things instead. But I have had a few moments now and then to get a few fun things done on the Charger. I installed my new reproduction fender-to-bumper seals; I installed a new PG Classics driver's side remote mirror (which seems very nice); and I blasted and detailed my wiper motor and voltage regulator bracket and got them painted and installed.
Fender gasket, driver's side:
Fender gasket, passenger side:
Mirror:
Firewall with details:
Posted in 2004-present | RESTORATION | Reassembly | body | link to this page | | Comments (0)
February 21, 2011
Trim and detail work
Work has been continuing full-speed on my Charger. The sorts of detail work that make up the phase I'm in right now require a large number of hours for a relatively small difference on the car, but I realize that attention to these details will add up to a terrific final product. The most time-consuming part of the project in this phase was straightening, sanding, and polishing the stainless steel trim that surrounds the border of the vinyl top. The materials I had read online gave tips for smoothing out dents, then sanding the pieces with progressively finer grits of sandpaper, and then buffing the pieces, all prior to installation. I am still learning, but so far I am happy with the results.
I have also been polishing the plastic lenses and have been able to now install a number of them. The firewall is also coming together nicely, with the brake pedal assembly and wiper pivots rebuilt and detailed. Next should be the heater box.
This morning my wife asked me to push the car outside the garage so that she could take a fresh round of pictures. Here are some shots that show what I've been doing lately on the Charger.

Posted in 2004-present | RESTORATION | Reassembly | body | interior | primer and paint | trim | link to this page | | Comments (2)
February 06, 2011
Vinyl Top
One of the things I have really been looking forward to is getting my new Legendary black vinyl top installed on the Charger. I contacted a local businessman, George Sgambellone, owner and operator of Mariposa Auto Trim, about installing my top. He was willing to come to my house and put the top on, showing me step-by-step how he was doing everything. The top looks outstanding, took only a few hours, and his rates were EXTREMELY reasonable. I have decided to place an image of his business card here in this post in case any people in my area need this sort of work done. I highly recommend George.
Here are a progression of pictures from the vinyl top installation. The first image shows George and myself working together. The next set are of the top after it was installed and the car was still outside. Then a couple detail shots after the car was safely back in the garage. I was very happy to finally be able to install the new Charger logos that my wife and kids got me for Christmas, and the new check moldings. As soon as I have the rest of the stainless trim polished, I will install that, hopefully over the next few weeks.
I did also install all of the windshield molding clips for the windshield and rear window.


Posted in 2004-present | RESTORATION | Reassembly | body | trim | link to this page | | Comments (0)
January 23, 2011
Front valance and blackening
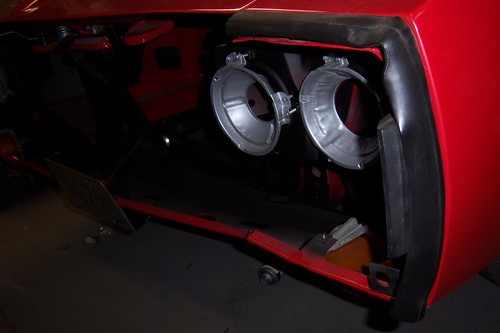
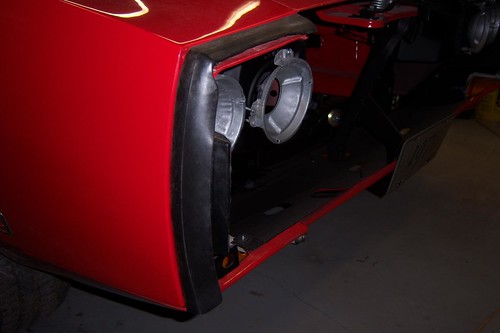
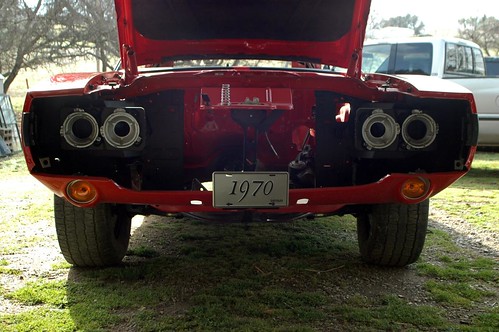
Didn't have much time this week to work on the car until today, but my son and I did reinstall the front valance and mask everything off, carefully, to black out the area behind the grill and bumper. Also, I wanted to see what my new parking light lenses would look like installed, so we put those together and installed them with new hardware in the valance. I think it all came out well and looks really cool.
Posted in 2004-present | RESTORATION | Reassembly | body | primer and paint | link to this page | | Comments (0)
January 17, 2011
Reassembly begins
It is wonderful to finally be at the reassembly stage. Boxes, envelopes, containers of new and restored parts, will now be freed from their captivity to adorn my Charger.
The very first part I installed on my newly repainted Charger was the passenger side fender emblem, the symbol of Mopar, the pentastar.

Next I installed my new reproduction outside door handles, to encourage people to not put their hands all over the paint when they want to open the door and look inside. They sure look nice to me.
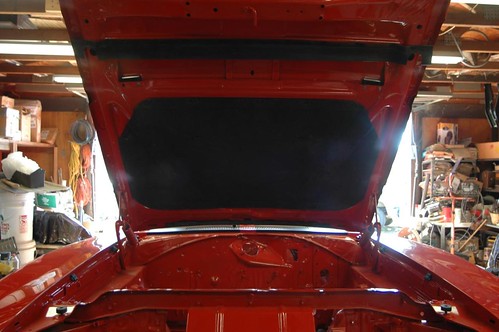
Here's a shot under the hood, with new weatherstripping, bumpers, and hood insulation, with new clips.
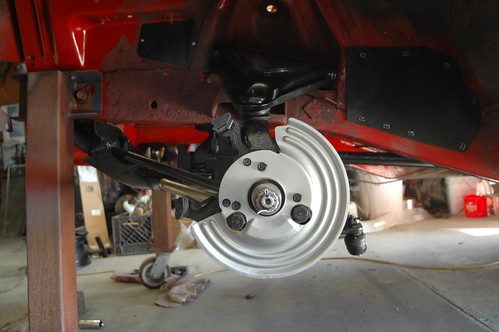
With help from my brother-in-law, son, and nephew, we jacked up the assembled K-member and bolted the front suspension in. I installed the .96-inch torsion bars with new seals and clips, and began to assemble the brakes. These are 11.75-inch Cordoba brakes, and will do the job very nicely, I'm sure. The rotors are used, but have been turned. All other parts, including bearings, seals, calipers, and hardware are all new.
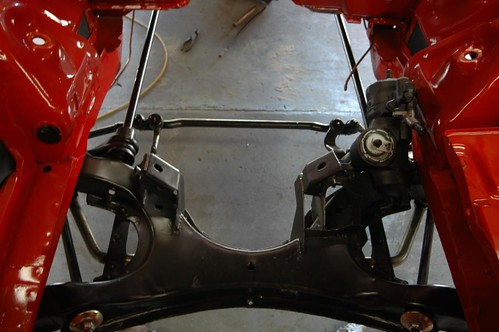
After installing the front suspension, my son and nephew were itching to put something else on the car, so I let them install the new body plugs.
I really appreciated the use of Mopar Ed's dollies for the front end of my car, and wanted to free them up to return to him as soon as possible. The most fun way to do that was to get the car sitting on its tires again. I remounted my old BFGs on the newly painted rims, and installed them with new chrome lug nuts. At some future time, I will install the stainless steel red-line dog-dish hubcaps, to see if I like that look as much as I think I will. I really like the look of the car sitting on its tires. To me it looks more like a car than a "project" this way. I think this combination looks really sharp, and is the look I have been hoping to achieve.
Posted in 2004-present | RESTORATION | Reassembly | Reassembly | body | primer and paint | link to this page | | Comments (1)
January 15, 2011
Happiness in the garage!
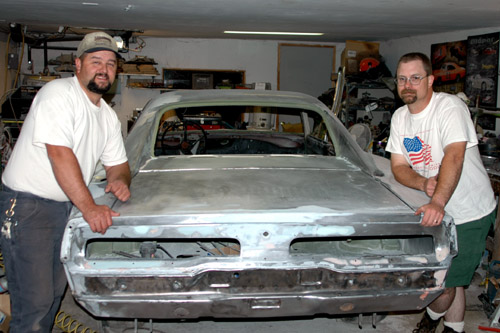
Today was to be the day! Mopar Ed said if we could give him a little while to finish buffing and detailing a few areas, we could bring the Charger home today. Here are some views from inside his shop. My family and I were stunned with how beautiful the car was, how great a job Ed and his team did, and how totally cool the colors looked together in real life, after imagining them or seeing examples on paper for all these years.
Here is my buddy, the famous Mopar Ed, doing some last-minute dusting prior to taking some pictures for his records and his Facebook page. I cannot recommend Ed's work highly enough. I encourage all my Mopar buddies to give Ed a holler for your Mopar parts or painting needs. His shop pretty much does it all.

Here are a few more pictures of the car outside at Ed's and on the trailer preparing to come home:

AT LONG LAST, with the help of some wonderful friends and family, here is my Charger, beautifully painted and safely unloaded in my own garage. The boxes you see in the background of one of these photos are full of parts, new and/or restored, waiting their turns to complete my Charger's restoration, inside and out.
We've been home for about three hours as of this writing, and I've already run outside six or eight times just to look and let it sink in.
Posted in 2004-present | RESTORATION | body | primer and paint | link to this page | | Comments (1)
January 08, 2011
RED update
We took our first road trip down to see the car. Mopar Ed and his team continue to work on my Charger, as time allows, and things are really starting to look sharp. They are in the process of "cutting and buffing" the paint. The paint has a luster in person that is hard to capture in these photos; however, the shiny paint catches reflections in a frustrating way. (This last is according to my wife, the photographer.)
Perhaps in a week, the car may be reassembled and ready to come home. We will update this page as soon as we have new information.


(This is me, laying hands on the red paint for the first time. Hard to tell, but I am definitely smiling. This is a happy moment.)
Posted in 2004-present | RESTORATION | body | primer and paint | link to this page | | Comments (0)
December 27, 2010
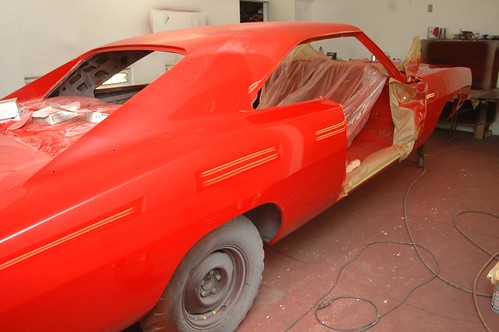
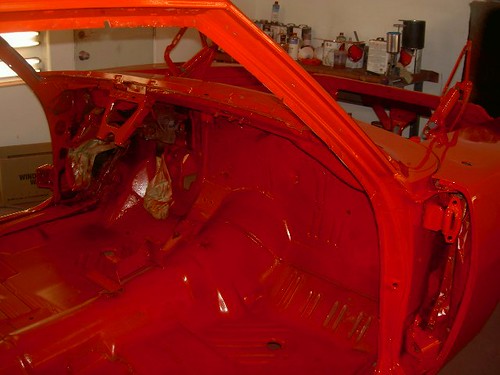
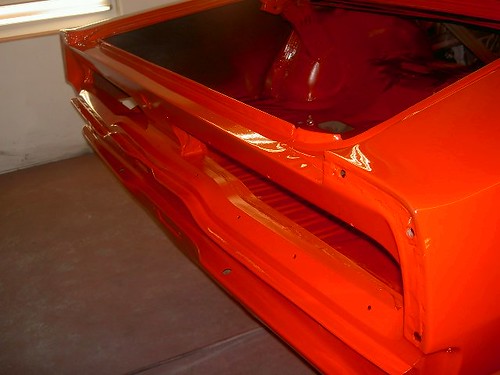
RED!
I knew that Mopar Ed was getting very close to painting my car, but today I got an email from him with the following pictures. Needless to say, I am very, very happy.
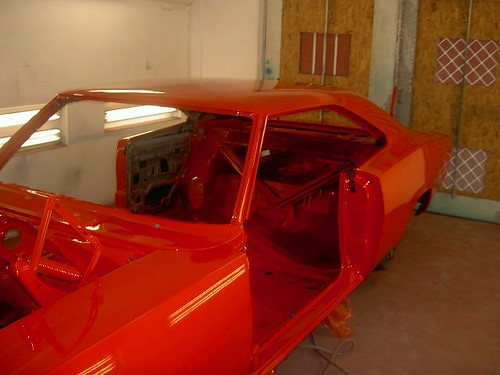
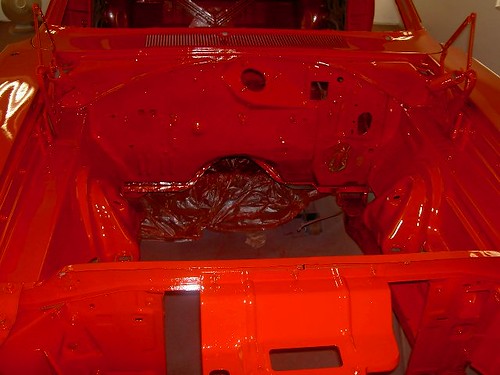
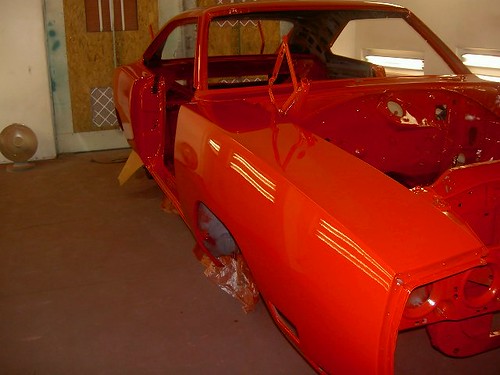
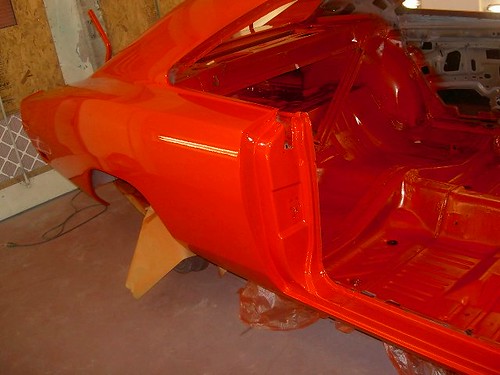
Posted in 2004-present | RESTORATION | body | primer and paint | link to this page | | Comments (1)
December 22, 2010
Visit to Mopar Ed
Mopar Ed had contacted me and said that he was just about done on the remaining body work on my Charger. He wanted some input from me about a couple of things, so we made the short trip down to his shop, and I was very pleased with the work that he and his team had done on the Charger. Once they finish up this current round, the car will move to paint.
Despite my best efforts, there was still a little bodywork for them to do on the rear quarters and hood, but they sure look great now.
Posted in 2004-present | RESTORATION | body | primer and paint | sanding | link to this page | | Comments (0)
November 12, 2010
Special Thanks to Howard!
I am LONG overdue in giving proper thanks to a mentor, teacher, guide and friend who I have seen countless times, spoken to on the phone, spent hours and hours listening to, but never actually met.
When my good friend the "metal wizard" Frank moved away I was just beginning some very serious work on my Charger. I was feeling lost, and unsure how I would be able to proceed. I went online in search of some more books, or preferably some videos to help me along as I continued to learn body work.
Well, praise the Lord that I found Howard Holland's "Backyard Autobody" instructional DVD's. Right away in a very personable, and down to earth way, Howard's teaching reenforced what my friend Frank had been showing me, and being able to go over and over the DVD's helped immensely. Getting one of Howard's DVD's (there are currently three volumes) is more than just buying some good practical instruction, Howard himself is available via telephone or email to help you through any questions you may have. The only warning I have to offer though is, when you start talking to Howard on the phone, sit down and get comfortable because your not talking to some generic "tech help line" you are about to make a friend with someone who is as interested in your success as you are!
Howard teaches more than "just" hammer and dolly work, but goes into panel replacement, patch fabrication, filler uses (pro's and con's), priming and painting too! In fact it was my having watched Howard talking about, and demonstrating the use and benefits of single stage Urethane paints that allowed me to so easily accept Mopar Ed's suggestion that we go that route on my Charger's upcoming paint job.
I simply can't recommend highly enough that anyone wanting to learn the ropes in the auto-body universe consider giving Howard's videos a try. You may be amazed by what you can learn to do yourself.... and don't be surprised if the phone rings and it is Howard asking you how your project is going!
I get nothing from Howard for recommending him; he does not even know I am posting this, but I do so in hopes that some of you might get your projects a little further down the road (or back on the road!) through the unique kind of help he has to offer.If you want to you can click on his logo below to go to his website.

Posted in 2004-present | RESTORATION | body | primer and paint | rust & rust repair | sanding | link to this page | | Comments (0)
November 11, 2010
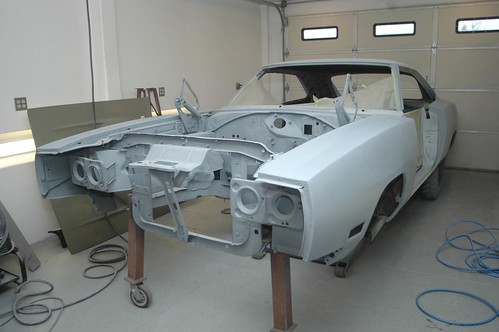
Seeing RED... very soon!
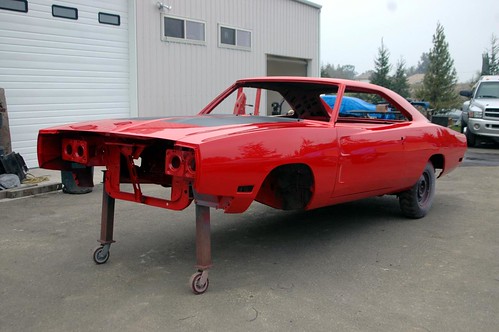
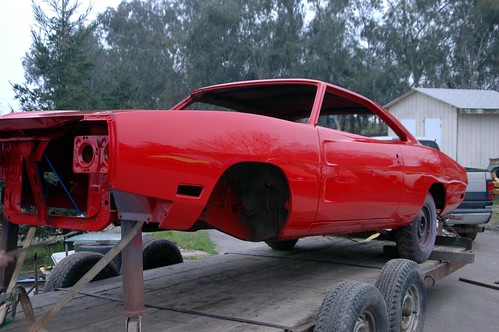
Well today was a really monumental day in the "life" of my Charger, and in my life too. A couple weeks ago on Halloween day, I had Ed, the owner and operator of E-Body Parts and Restoration come to my house and look my Charger over. He agreed to come and inspect my body work to ascertain if I was ready to hand it over to him for painting. He rubbed the car over quite a while, pointed out a few things I'd overlooked, and told me "Very good work, especially if this is your first time, that's really great. If you fix those things, I'll have space in my shop to get your car in in Mid November" This was a pleasant surprise, I had not expected him to have time so soon. Well, needless to say I worked every available moment to get the things done that he had noticed. Well today being Veterans Day, I was off work, so I drove down to his shop (a bit over one hour away) and picked up a pair of casters that bolted to my frame at the front bumper mounts so that my car could roll. Then loaded it up for a trip to FE5 heaven.
Here is the car loaded and ready to go in front of my garage.
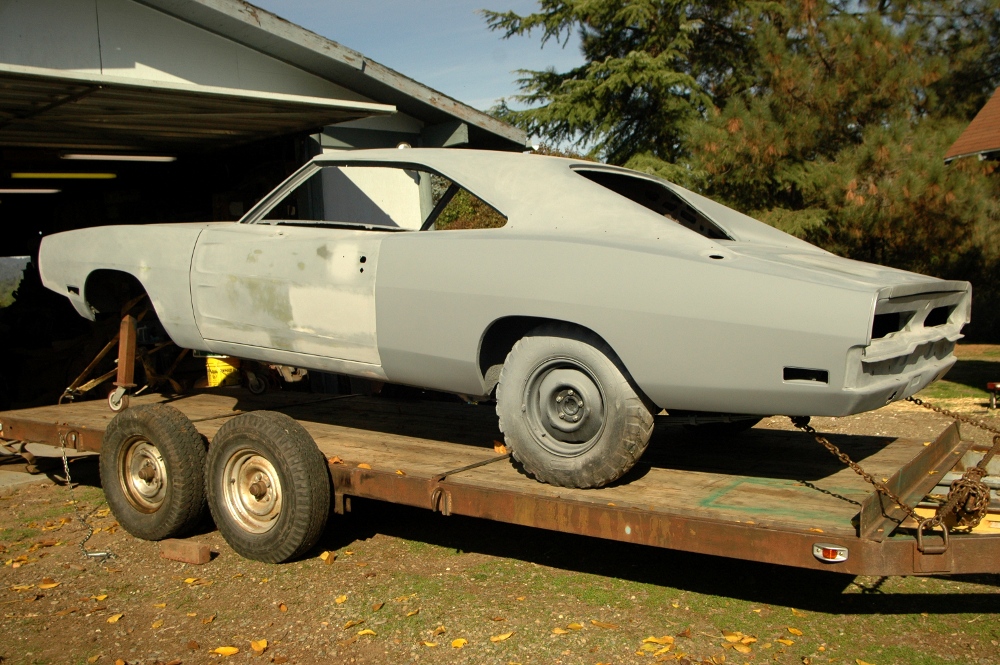
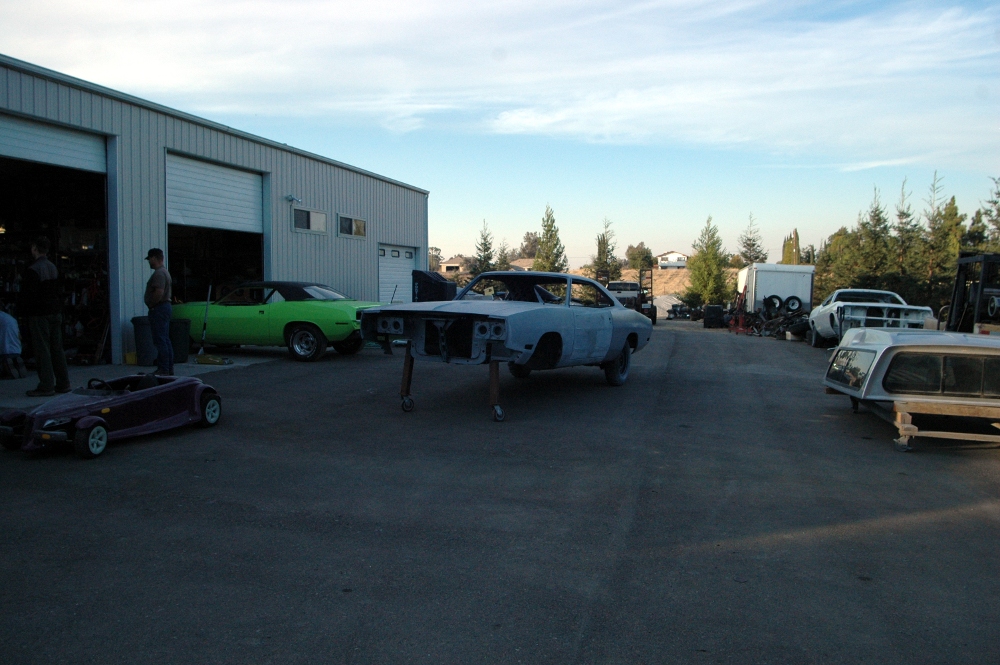
Here we are after having unloaded the car at Ed's shop,
Here is the car snug in the paint booth!
Ed and his staff will shoot the car one more time in primer, block the body out, fix any minor things I still missed, then he will disassemble the car, paint everything then put it all back together. He promised he'd try to take pictures, but added that my wife and I are welcome to stop by and check things out anytime.
His shop is really amazing! He must have had more than a dozen awesome Mopars inside, with dozens more outside. I will update my Charger web page and this thread as things progress rapidly from here.
Posted in 2004-present | RESTORATION | body | primer and paint | link to this page | | Comments (0)
August 15, 2010
NOPE!
The previous time I updated my page last fall, I had hoped that I was done priming and was on my last go-around with block sanding. I wasn't there yet! Really things are going quite well, but the doors (especially the passenger side door) still had some issues to resolve. When using my longest Dura-Block (about 24") I found some unhappiness that had somehow escaped detection in my previous attempts. After many nights of re-working the doors, I am now confident that things can resume.
I have reprimed the reworked areas, and am eager to begin blocking them again. You really can't tell much difference from the pictures, so I'm not posting new ones yet. I do have some good news to report however, I have spoken to a guy I trust who owns a Mopar restoration shop nearby (about 45 minutes away) and he is willing (and more than able) to paint my Charger when I'm done sanding!
One of the reasons for the lack of progress lately has been how busy we've been as a family. Since spring we've been helping an elderly lady by cleaning up her property. Her late husband (who died about 20 years ago) was a mechanic, collector, and accumulator of lots and lots of stuff. Well she figured it was time to sell the place, so my family and I volunteered to help out. It was fun, and rewarding, but most of all, a lot of work! We sorted and hauled a bit over 90,000 lbs of scrap metal off her place to a scrap yard about 1 hour from there (each way). We hauled off several tons of trash (not included in the 90,000lb figure), over 125 tires (also not included in the 90,000lb figure), lots of cars, appliances, and assorted scrap metal. I did get a '67 Plymouth Belvedere which sadly had been mostly crushed but still had a few salvageable parts for my son's '67 Satellite, a '74 Dart Sport, and a '63 Dodge Dart GT both in decent shape. Some of these funds have given a boost to my "Charger paint job fund" and I hope and pray that before the close of 2010 my car will be very very RED! Please stay tuned.
Posted in 2004-present | RESTORATION | body | primer and paint | sanding | link to this page | | Comments (0)
November 22, 2009
Third time's the charm...?
When you mention bodywork, especially block sanding, to most people, they imagine and/or describe something that goes on and on and on, seemingly with no end in sight. While I am still enjoying seeing my Charger get better and better with each stage of progress, I am looking forward to that final block-sanding in the sky when I can sand the entire car and see nothing but primer. Then I should know I'm done. Will I get that this time? I hope to know the answer to that in the next six weeks or so. This next round of blocking will be done with 600-grit paper, and things keep looking better and better. Stay tuned.
Posted in 2004-present | RESTORATION | body | primer and paint | sanding | link to this page | | Comments (1)
November 17, 2009
Second block sanding all done
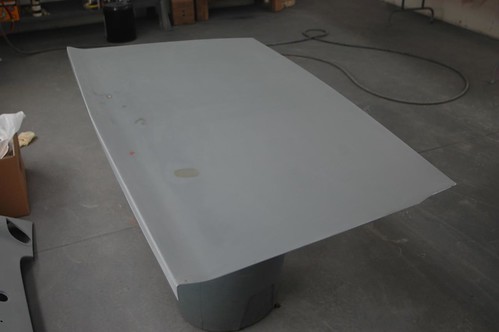
The second block sanding was done with 320-grit paper on Durablock sanding blocks in varying sizes and shapes. It is gratifying that there were fewer things that needed attention than the last time, and some areas, like the hood, are "there".
Posted in 2004-present | RESTORATION | body | primer and paint | sanding | link to this page | | Comments (0)
August 17, 2009
Second round of 2K primer
The work continues. The application of the primer went well. I didn't repeat some of the mistakes I made last time, though I did make a couple of new mistakes. The good thing about the primer is that you end up sanding off your mistakes. It is very gratifying to see the panels coming out straighter and straighter. The next round of block sanding will begin shortly. While it was 150 grit last time, this time we'll be using 320 grit and we will be avoiding cutting down to bare metal. I'm not anticipating a problem with any severe high spots, but time and work will tell if I'm right.
Here's a slide show of a walkaround of the car with the second round of primer on it.
Posted in 2004-present | RESTORATION | body | primer and paint | sanding | link to this page | | Comments (1)
Just before the second round of 2K primer
Well, my son and I finally finished the first round of block sanding on my Charger. After blowing the car off really well with compressed air and using a tack cloth on the body, I covered bare metal areas with self-etching primer. Then, after letting it dry for a day or two, I blew the car off with air again, washed it down with wax and grease remover, and tacked it off again one final time, in preparation for the second application of 2K primer.
Here's a slideshow of a walkaround of the car just before I started spraying. The various highs and lows exposed during block sanding are now much more level than before and are about to be covered up again.
Posted in 2004-present | RESTORATION | body | primer and paint | sanding | sheet-metal replacement | link to this page | | Comments (0)
July 29, 2009
Dividing the work, multiplying the fun
We recently had the treat of having my niece and nephew over at our house for a couple of days. While they were here, my son and I took my nephew out to the garage and showed him how much fun it is to sand on my Charger. The boys both did a really good job, and it was fun to teach them some of the things I've learned the hard way - not to mention it was really great for me to see that side of the car being sanded much more rapidly than when I'm working alone. Thank you, kids!
Posted in 2004-present | Family Helpers | RESTORATION | body | primer and paint | sanding | link to this page | | Comments (0)
June 03, 2009
Block Sanding 101
This summer, with our Bible study on vacation until fall, I find myself with some extra time on some evenings. My son and I have embarked on a project to get the block sanding moving at a quicker pace: I am teaching him what I have learned, and he is being a HUGE help. We are having a lot of fun together. We're making rapid progress on completing our first go-round of the car, and I anticipate during August putting on the next layers of 2K primer, and blocking the car out again, but then with 320-grit paper (we are using 150-grit on our first pass).
Not only is it wonderful to spend time with my son and get things done, but an added bonus is seeing his growing enthusiasm for about the upcoming restoration of his 1967 Satellite. (You can see a picture of his car here.) Working on my Charger together is excellent training for him, because when we're done with my car, his is next and he will be doing much of the work on that project.
Posted in 2004-present | Family Helpers | RESTORATION | body | primer and paint | sanding | link to this page | | Comments (0)
March 01, 2009
Block sanding.
With the car perfectly stable, and all my fears of it falling down gone, I happily got back to work. I am using a series of Dura-Block sanding blocks of various sizes and shapes. The blocking out itself goes fairly quickly. The green tape line that is visible down the car is of course protecting the body line. The tape allows me to sand to but not over the body line I worked so hard to perfect in the body work phase of my Charger's restoration.
From what I have read and what my buddy Howard Holland told me, on the initial block-sanding, I didn't have to worry too much about seeing small patches of metal show, because I'm in the coarse leveling phase. When I'm done with this round of block sanding, and I've dealt with anything that is far too high or low, I will shoot more 2K primer and block it out again with finer paper, and be more concerned about not cutting as deep from that point on.
So far, the blocking out of the Charger has been a lot of fun, and I'm really enjoying seeing the car's body get straighter and smoother with each pass.


Posted in 2004-present | RESTORATION | body | sanding | link to this page | | Comments (0)
December 14, 2008
2K Primer
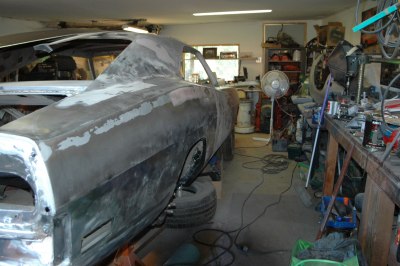
Here I am admiring the beautiful lines of my Dodge Charger. I happen to have been wearing my Charger-logo polo shirt while my wife was taking photos of the 2K primer job on the car, and she asked me to pose. (I am smiling.) All those boxes on the shelves in the background are full of parts to go on/in my Charger once the final paint job is done.
Well, finally I was able to get my 2K primer on my Charger. I am a year and a half or more behind where I thought I would be, but I spent that time learning better ways to straighten and perfect the body of the Charger. I am glad that I waited, as things are looking fairly good now, with three coats of the high-build primer on the car. I have begun the blocking-out process, and so far it is a lot of fun. Once the blocking-out is done, another several coats of primer will go on, and the car will be blocked out again. Hopefully by that point the body will be ready for paint. However, experience has shown me not to get in a rush, and to take time to do it right no matter how long (or how many tries) it takes.
Posted in 2004-present | RESTORATION | body | primer and paint | link to this page | | Comments (0)
October 28, 2008
Removing the suspension
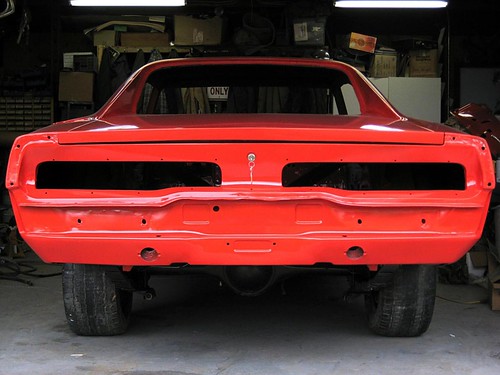
The following series of pictures shows my Charger starting out on jackstands with the tires and wheels removed, displaying, hopefully for the last time, its sad stock ten-inch drum brakes. I wanted to remove as many of these parts as possible prior to priming and painting.
Upgrading the brakes is not the only thing I have in mind for this phase of my project. When this goes back together, I will install Hemi .960 front torsion bars and stock XHD 440/Hemi leaf springs. I have all new polygraphite bushings to install throughout, a firm-feel steering box, 12-inch front rotors from a Chrysler Cordoba riding on disc-brake spindles from a '73 Valiant, and 11" HD drums out back. I will also upgrade to a 1 1/8" diameter front sway bar.
My son, just completing the removal of the steering column.
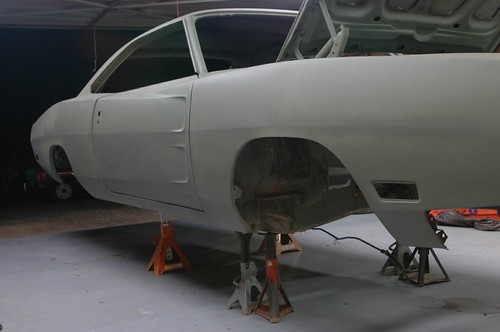
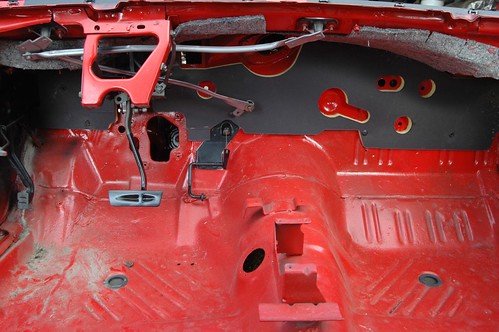
This picture, in addition to showing the absence of the suspension, shows fairly well what I have been doing these last months on my car. I have been working very hard to get my body lines straight and appropriately crisp. I think they show fairly well in this photo.
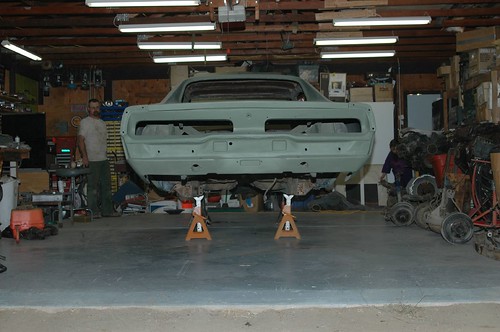
Rear view of the car; rear-end, springs and shackles all had to go as well.
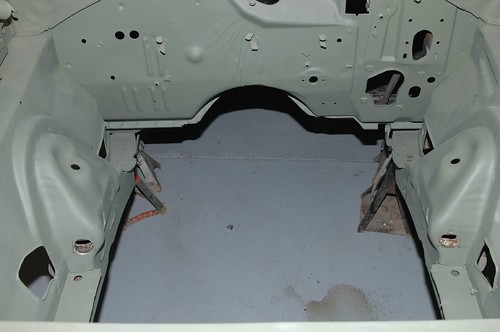
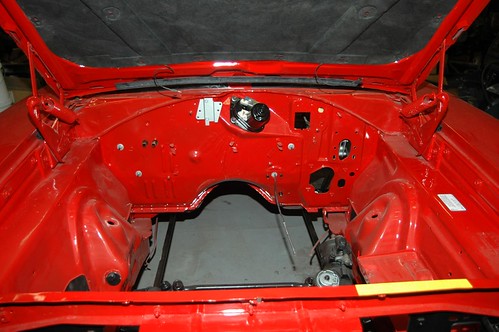
Having the engine bay this clear should make it extremely easy to get the primer and paint everywhere I need them to be, prior to reinstalling the restored and upgraded front suspension and K-member.
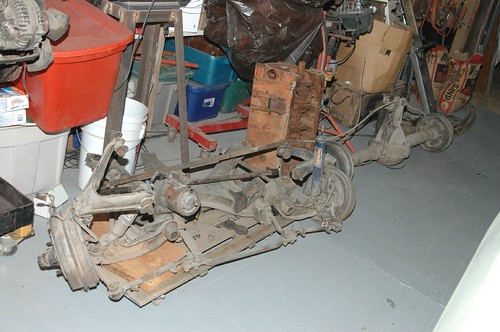

It is really something I thought I would never see, looking at this pile of parts in the side of my garage. It will be a lot of fun this winter to disassemble, clean, restore, and upgrade all of these assemblies prior to installation, after the paint goes on.
Posted in 2004-present | RESTORATION | body | disassembly | suspension, brakes, tires, and wheels | link to this page | | Comments (1)
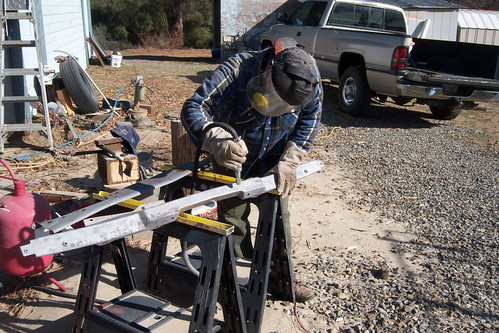
One last sandblasting chore
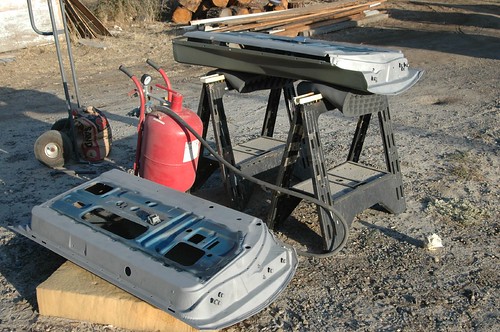
As the day to put primer on my Charger draws near, I realized I had neglected to strip the old paint and minor surface rust, etc., off the inner part of my doors. I had used a wire wheel on my grinder to remove all the paint from the door jamb area of the car body itself, but wanted a good fresh start on the doors. My son and I removed the doors, gutted the latches and window regulators etc., and set them outside for sandblasting. The red tank-looking object between the doors in the first photo is my inexpensive but very serviceable sandblaster.
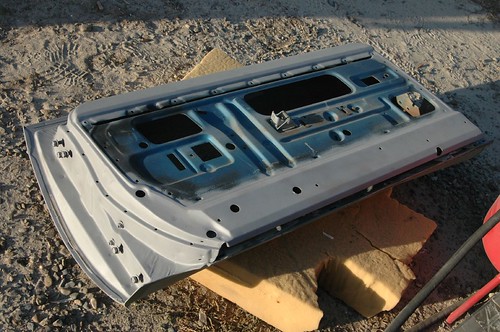
This is a closeup of the areas I sandblasted. I protected the outside edge of the door, which already has primer on it, with a heavy layer of masking tape prior to sandblasting. I was very pleased with the results. All the rust, all the paint, all the years of glue, etc., are gone. After this, the doors were taken inside the garage and etching primer was applied to all the bare metal.
Posted in 2004-present | RESTORATION | body | disassembly | sandblasting | sanding | link to this page | | Comments (0)
October 26, 2007
Fall Colors
With the coming of fall, many people look forward to the changing colors of the leaves. I have been looking forward to seeing my Charger change colors for what seems like a very long time. With all of the coarse bodywork done, it was finally time to put a base coat of etching primer on my rolling shell. Very soon, I hope to be adding two or three coats of black 2K primer, and to begin the blocking-out process. That should keep me busy for a very long time. Please enjoy the slideshow "walkaround" of my Charger in its new green glory. Hopefully soon we will be posting pictures of a newly-blackened Charger. Stay tuned.
Posted in 2004-present | RESTORATION | body | sheet-metal replacement | link to this page | | Comments (1)
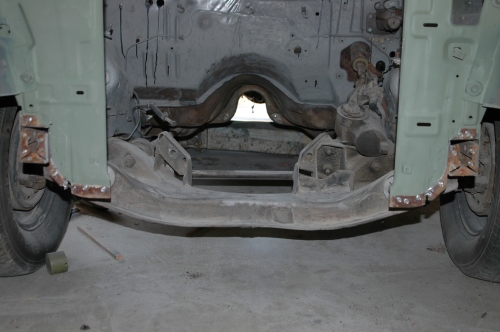
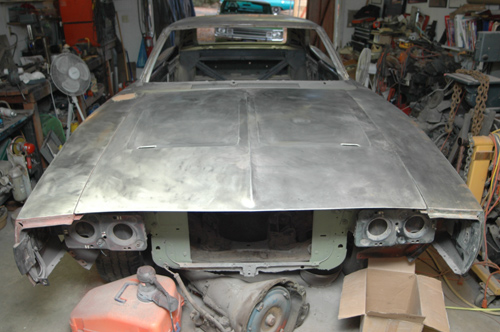
Beware teens with torches
For many years, I have lamented the fact that back in 1987, some ignorant teenager took a torch to my lower radiator support, supposedly to make room for a larger radiator. That ignorant teenager was me. When I was seventeen, I thought it would be a great idea to put this big monster radiator I found in my Charger -- not that the one I had ever overheated, but it was bigger, so it would have to be better, right? Well, after making clearance for the taller radiator, I realized for some other reasons that escape me now that it wouldn't work, so I reinstalled the old radiator, and comforted myself with the notion that nobody would ever really see that jagged edge way down there.
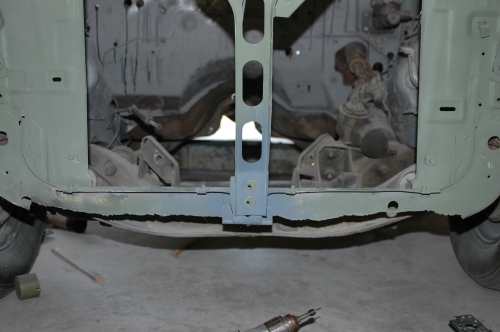
Recently, my son and I were scavenging some parts from a wrecking yard for his 1967 Plymouth Satellite. I had recently been perusing the sheet-metal parts catalogs and discovered that '67 to '70 B-bodies all used the same lower radiator support. As it turned out, the donor car had a good one, and we were able to get it very inexpensively.
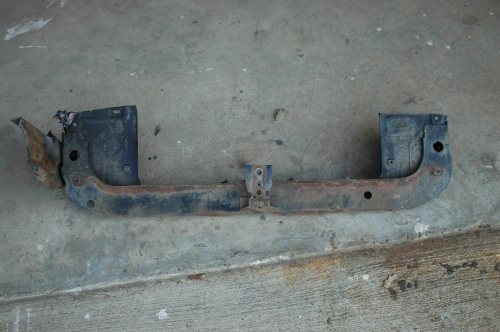
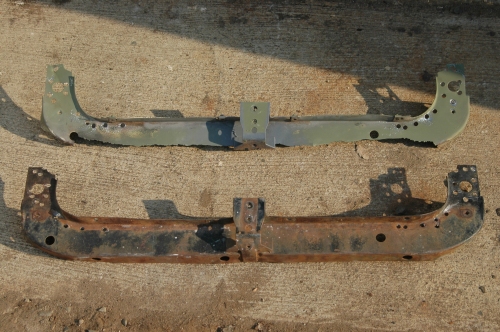
Now the replacement I had long thought would never happen was literally a few spot welds away from reality. The next couple of pictures show the front end of my Charger, with the old defiled part removed, and it sitting next to the cleaned and straightened replacement.
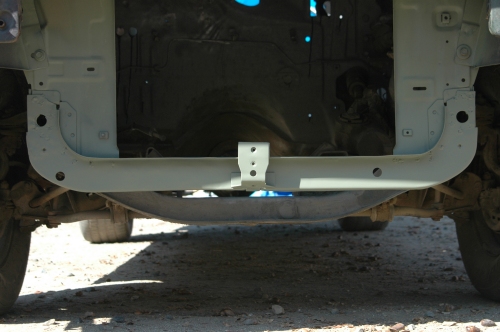
And here's the "new" support, installed, primed, and ready for paint.
Posted in 2004-present | RESTORATION | body | sheet-metal replacement | link to this page | | Comments (0)
July 01, 2007
The Return of the Wizard
My great friend, brother in Christ, and "metal mentor", Frank, returned for a visit from his new home in Montana. In the several hours we spent visiting, he took a walk around my Charger and showed me where I've been making the rookie error of oversanding my filler, causing unevenness where the filler and the bare metal come together. With a pen marking the highs and lows, he indicated the areas that still needed work (there were lots). However, he did find one area that was done correctly, by chance, and had a nice indistinct feathered edge. Now that he's shown me what it all ought to look like, things have been progressing rapidly, and I think in the right direction.
I realized all over again how much I leaned on Frank when he was here, and it was great to see him. With his nudge in the right direction, there's a good chance my car might even be primered and/or painted before he sees it in person again.
Posted in 2004-present | RESTORATION | body | sheet-metal replacement | link to this page | | Comments (1)
November 11, 2006
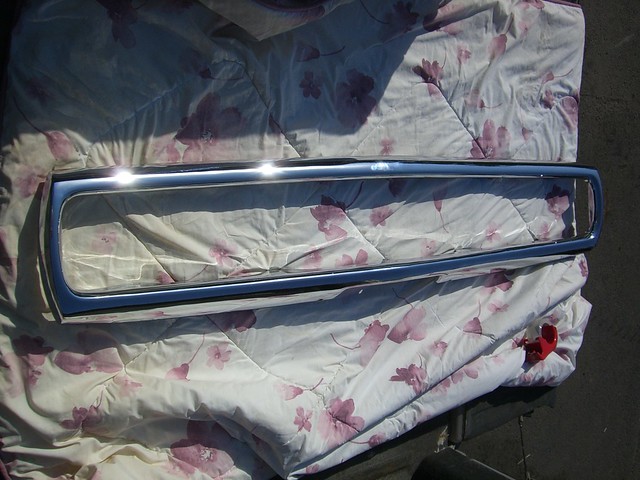
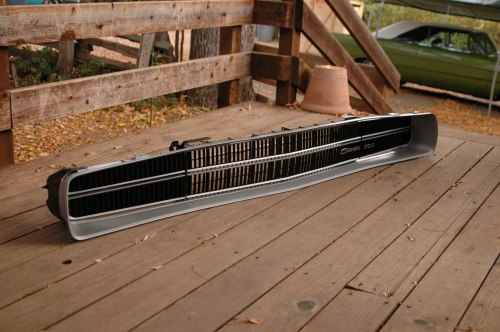
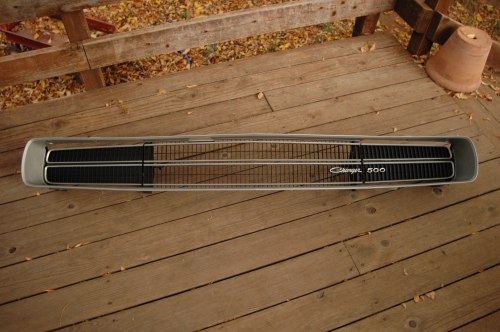
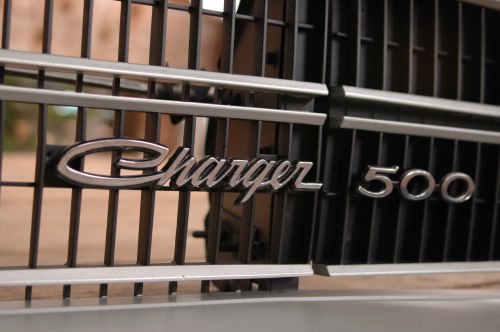
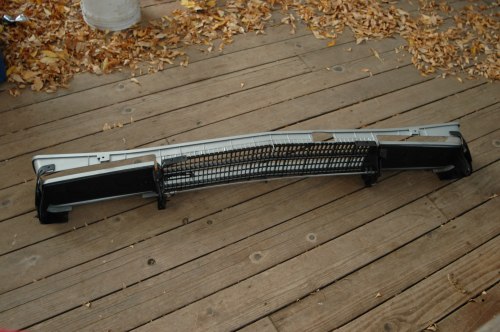
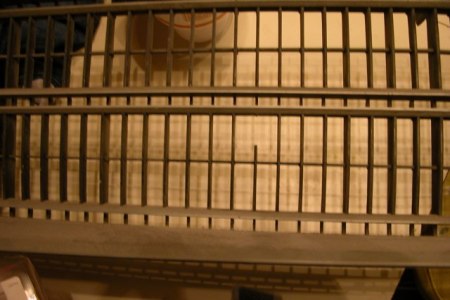
Grille restored!
One of the things that can set off a '70 Charger no matter how beautifully painted the body is, how shiny the bumpers are, or how clean the interior is, is the grille. If the grille looks tired and old, cracked, deteriorated, I think it affects the way the entire car is perceived. I have spent a great deal of time repairing, cleaning, masking, and painting my grille, the headlight doors, and the Charger 500 emblems. I am very happy with the end result I achieved. As good as these pictures are, I don't think they do the grille justice. The paints I purchased from Totally Auto were excellent. I had my doubts as my first coat of silver was going on; it sort of looked blotchy. But as it dried and multiple coats were applied, it really did take on a nice even smooth finish everywhere I used it. Besides having the grille very clean, spending hours masking with high-quality masking tape seemed to be the key to getting a good final product. The grille will soon be packaged safely and stored in the attic until needed during reassembly, but first I want to show it off to some of my local Mopar buddies.

Posted in 2004-present | RESTORATION | body | trim | link to this page | | Comments (3)
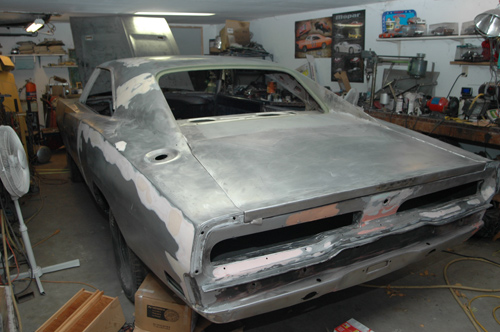
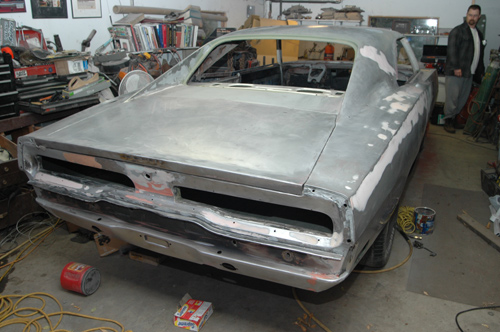
Body pieces back in place
Here are a few updated snapshots of the body of the Charger coming back together a little bit more. The hood is now back on the car and on its hinges. A lot of attention has been paid to keeping all my gaps between the fender/cowl/doors etc even. It sure looks better than it did when it was last together. In these pictures, the trunk lid is not actually attached to its hinges; it's just sitting on some foam shims temporarily. My focus continues to be on smoothing out the body work as best I can, moving toward the eventual priming day, when I can then begin to really perfect the final finish of the car before painting.
Posted in 2004-present | RESTORATION | body | sheet-metal replacement | link to this page | | Comments (0)
October 20, 2006
Sub-frame connectors
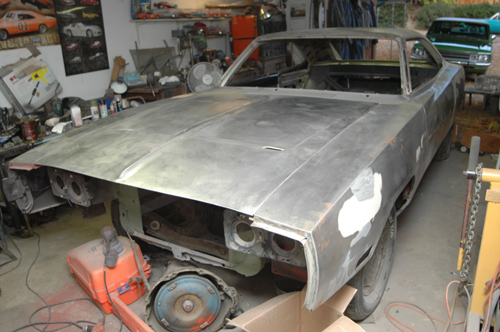
One of the things it seems virtually all Mopar people agree with is that there are many huge benefits to stiffening up our old Mopar muscle cars. One of the best ways to do this has proven to be attaching what are called sub-frame connectors, which tie in the front and rear frames of the car. This relieves stress from the sheet metal during hard launches and extreme handling situations. There are numerous brands of these available, ready-made to go into a wide assortment of cars. However, I found a number of people who had fabricated their own quite successfully. I decided to take that approach and save some money. The material I used was 2x2 square tubing with a 1/8"-thick wall. The plates that attach to the forward frame were 1/4" thick 2"x4 1/2". The gussets for the rear were 1/16" mild steel.
The first thing I did was weld the 4 1/2"-wide pads onto the front edge of each tube. The front subframe was cleaned with a wire wheel prior to welding, and the whole piece was fitted approximately in place in order to mark the angle at which the rear would have to be cut to meet the rear subframe.
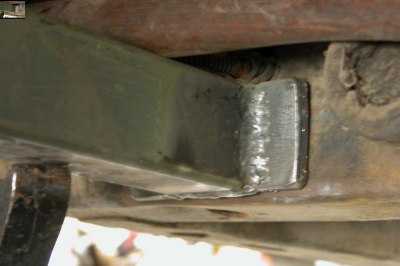
I cut the rear of the tubes so that the bottom of the frame would be flush with the tube. This resulted in the tube being brought up exactly to the bottom of the rear floorpan. I did not want to cut into the floorpan, as I have seen some do on A- and E-body cars. This junction was completely welded off on both sides prior to being plated.
This is the finished view of the rear, with the plates welded over the top of the joint of frame and subframe connector, which was also welded. Each side of the subframe connector had one of these plates, and each plate was welded on all four sides.
Here are both bars in place, painted with etching primer, as seen from the passenger side.
Both bars viewed from the rear.
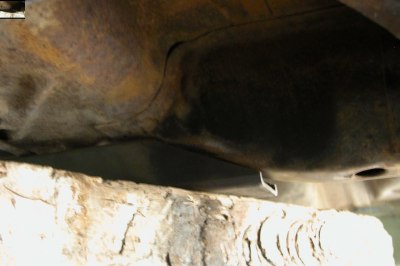
The only thing that prevented this from being a super-easy job was the fact that on the driver's side, the parking brake cable passed directly through the space where the subframe connector needed to be. After marking the location on the tubing where the cable would need to go through, I drilled large 3/4" holes on either side. Realizing that this could possibly weaken the subframe connector on that side, I chose to weld heavy washers on the outside of the hole on each side. I took a drill with a 5/16" bit at the same angle the cable would pass through the tubing and made a smooth, angled channel for the cable. I was very pleased with how well it turned out, and can't wait for the day when I can realize the benefit that these bars will provide.
Posted in 2004-present | RESTORATION | body | suspension, brakes, tires, and wheels | link to this page | | Comments (0)
October 19, 2006
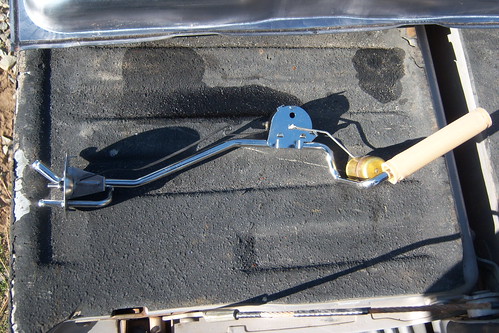
Restoration of hood hinges and springs
Using my 4 1/2" grinder with a cup-style wire wheel, I removed all the original finish from my hood hinge. Since these had functioned fine on the car before it was disassembled, no real refurbishing was needed. However, I wanted them to be ready for new paint, and after they were totally stripped they were given multiple coats of self-etching primer.
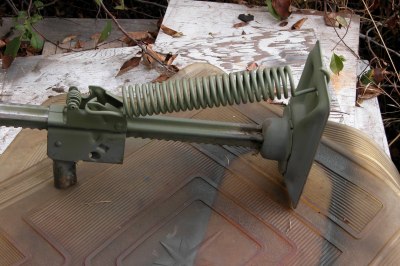
Some people recommend using a coil-spring compressor, reversed, to stretch hood springs for paint removal and repainting. I found that this surplus Mopar bumper jack did a great job and was easier to use.
Posted in 2004-present | RESTORATION | body | link to this page | | Comments (0)
October 15, 2006
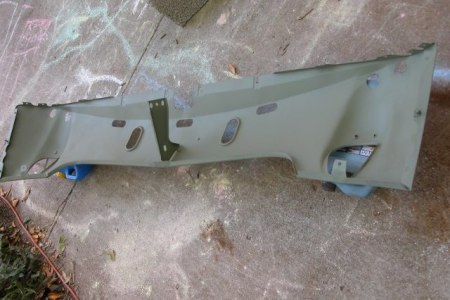
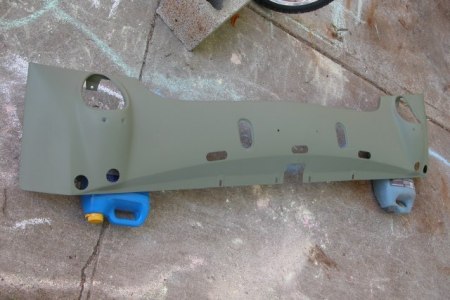
Front valance ready to go
One of the many things accomplished by my family members for me during one of our several "sanding parties" was getting the majority of the original finish sanded off of this front valance. The front valance was in really good shape, and needed very little hammer-and-dolly work after removing the rest of the finish, prior to being primed with self-etching primer. This piece will now be set aside, awaiting further reassembly of the car.
Posted in 2004-present | RESTORATION | body | link to this page | | Comments (0)
October 05, 2006
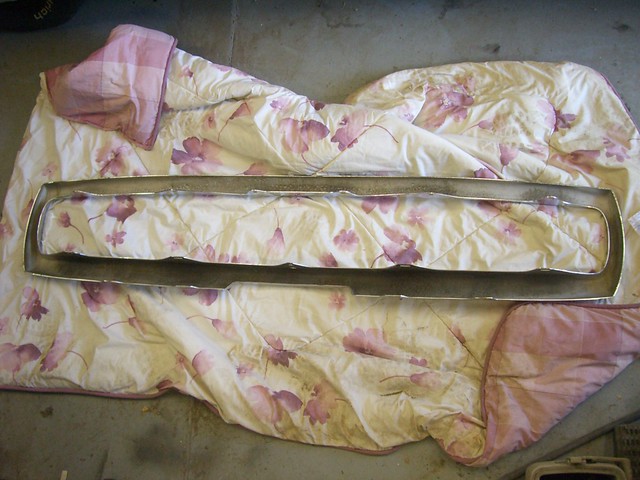
Restoring the grille
I was really happy when I was able to get this grille some time ago, as documented earlier. It was in vastly better condition than my original grille, but it had one flaw: one of the vertical fins was missing a section. I used Plastifix to repair it. The major steps in the process are shown below. Warning to people planning to use this product: It smells really strong, and may have your family really disgruntled if you use it in the dining room. Trust me on this, I know.
This was the trouble spot I was going to try to fix.
After using the soft molding block provided to make a mold off of a neighboring good fin, I clothespinned the mold into position and filled the mold with the liquid plastic repair material. This took six or so hours before it was really hard enough to take the mold off.
After trimming, sanding, and filing the new plastic to meet the shape and contour of the other fins, a quick shot of flat black was applied just to test how well my new piece would blend in. Visitors to whom I have shown my grille in person cannot find the repaired fin until I show them which one it is, and even I have a bit of trouble finding it sometimes.
The next step for my grille (or is it grill?) will be to take it outside, clean it, buff it up with a Scotch-Brite pad, and repaint it using correct paints I purchased from Totally Auto. Stay tuned for completed grille pictures soon.
Posted in 2004-present | RESTORATION | body | trim | link to this page | | Comments (0)
July 15, 2006
July 2006: Sheet metal replacement continues
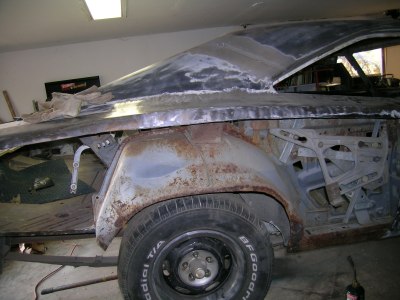
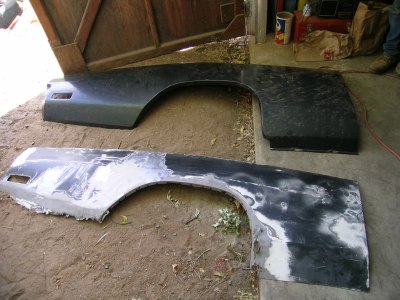
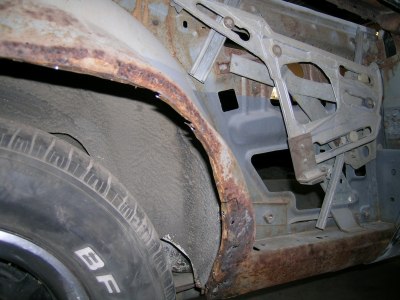
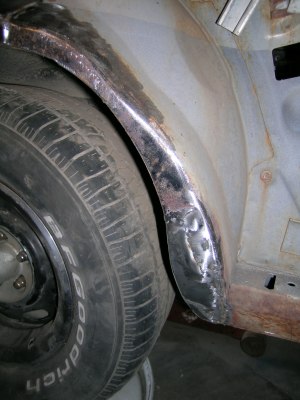
The driver's side fender I acquired for my car was in excellent condition as it had no collision damage in its life. However, the car had sat since the 1980's and the lower portion of the fender behind the brace was thoroughly rusted out. Using a patch panel I purchased from Auto Body Specialties, I have repaired the fender by welding in new metal after completely cutting out the rusty metal. The welds were sealed with waterproof metal body filler, and then a skim coat of filler and glazing putty were applied to get the contour just right. I have coated the back of the fender with Eastwood's rust encapsulator, and hope to soon be re-mounting it on the car, following the same exacting alignment procedures I followed previously on the passenger side.
--------
Posted in 2004-present | RESTORATION | body | sheet-metal replacement | link to this page | | Comments (0)
June 30, 2006
June 2006: Body coming back together
After cutting out everything that was bad, replacing it with metal that was new, and doing rust-prevention treatment on parts, it is tremendously exciting and rewarding to begin reassembling the car. I am especially excited to see the body lines crisp and beautifully aligned, better than they ever have been in the 20+ years I've owned this car.
The welded seam on the newly replaced quarter panel needed to be sealed inside and out with waterproof metal body filler (I learned about how important this was from an outstanding set of how-to DVDs I purchased when my metal wizard friend moved away. I highly recommend the Howard's Backyard Auto Body series for anyone who plans to do any body work, any paint prep, any priming or painting, and isn't sure exactly how to proceed). With a heavy layer of metal filler on the inside, and a solid-but-thin layer on the outside, the quarter panel only required minor traditional filler to smooth out imperfections along the seam. It now feels and looks very good. I can't wait until the day comes to start laying some primer on this thing.
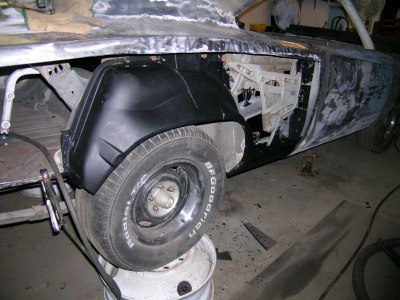
Before installing the passenger fender, I primed all bare metal beneath it with etching primer. The backside of the fender itself was treated with a good coat of Eastwood's rust encapsulator, the same as I used on the floors in the earlier sections. After adjusting all the adjustable portions of the fender-mounting arrangement, the body lines are crisp, the door gap is even, and now only some minor sanding on the fender will be required prior to priming. Eventually, the entire underside of the fender/wheel-well area will be underbody coated, once I know for sure that I'm not taking the fender back off for any reason.
This is the driver's rear quarter opening, all trimmed and prepped for installation of the new quarter, which has also been trimmed to fit the opening. Starting with a technique a friend shared with me of laying the new metal over the old metal and cutting them both at the same time, I improvised (and I think improved) the process by using my Sawzall to make most of the cut, using the cutting wheel on the grinder only to get the sawblades a place to start. This went much smoother, was easier for me to control, and was vastly less expensive than using six or eight cutting wheels as we did on the other side.
On the driver's side, the welding process was the same as for the passenger side -- slowly tacking the gap between the car and its new piece, keeping heat to a minimum. Pictured here are the special clamps I purchased from Eastwood's, which I mentioned in the write-up on the passenger side but did not have a picture of. These little gems really work, and keep the panels aligned while maintaining a small gap for good Mig penetration.
--------
Posted in 2004-present | RESTORATION | body | sheet-metal replacement | link to this page | | Comments (0)
March 11, 2006
Spring 2006: Seeing Results
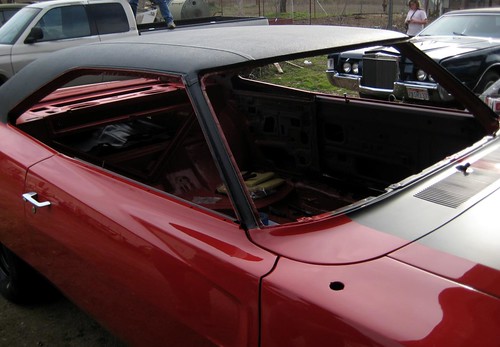
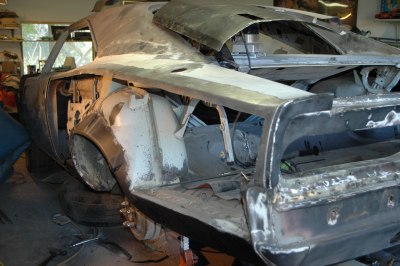
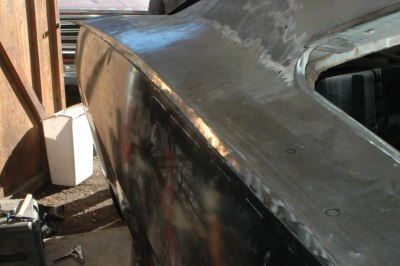
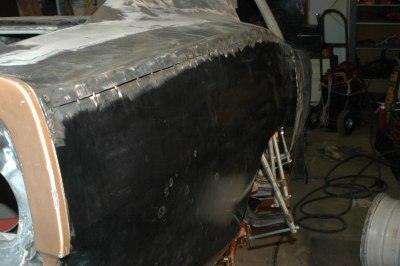
The driver's side sail panel area was one of the first areas on the car that I realized had extensive rust. Now all the metal in that area is brand new and is awaiting only some very fine filler work to smooth over where the welds have been ground down smoothly. The welding process was done slowly to minimize warping, and a bit tedious, but the results should be well worth it.
The passenger side had significant rust, though not as serious as the driver's side. However, it too now gleams with new shiny metal. The rear-window opening has been rebuilt and will do a much better job sealing out the rain than it used to.
The tack-welding process is nearly complete! Hopefully my metal wizard buddy will be able to help me do the final smoothing on this quarter panel, as we have recently learned that due to a new job he'll be moving away. BUMMER! (for more reasons than that).
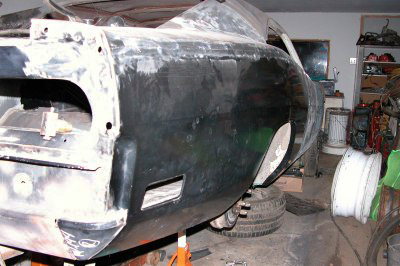
There was quite a bit of hand-forming that had to be done in the area of the recess for the bumper. This was handled extremely well by my very helpful metal wizard. Using the quarter panel extension piece as a guide, he obtained the correct alignment, and as this picture shows, the welding over most of the panel is finished, awaiting only final smoothing. I am very happy to have this worst part of my car become one of the nicest.

With my metal work coach leaving, I am moving aggressively to attack the driver's side quarter next. This picture is the quarter before I started drilling spot welds and separating the panels, which I now have completed. When my buddy shows me where to cut, I'll have another picture, with another gaping hole in the side of my car. Stay tuned.
--------
Posted in 2004-present | RESTORATION | body | rust & rust repair | sanding | sheet-metal replacement | link to this page | | Comments (0)
January 10, 2006
Rear quarter panel installation
It was finally time to cover up the gaping hole in the side of my car. While paying very close attention to the alignment of the main body lines, and also focusing on the wheel opening and bottom flanged edge alignment, we carefully figured out how much of the reproduction quarter panel would have to be cut off and discarded. A friend of mine, James, who has worked in the automotive restoration field for a number of years, gave us a suggestion which saved us a lot of grief. We were puzzling over how to get the new piece and the opening it would fill trimmed as precisely as they would need to be. His suggestion was to overlap the pieces by as much as possible, and then using a 4" grinder with the thinnest available cut-off wheel, cut both the new panel and the car at the same time. To maintain our alignment, we used a number of cleco temporary clamping devices, which I purchased from Eastwood's.
For those who are wondering, this is a Cleco, purchased in a kit with special pliers to install and remove them, these are a reusable temporary clamping device. First you drill a small hole through both items to be held. Then squeeze the Cleco with the pliers, slide it into the hole, and release. When you're ready to remove it, simply grab it with the special pliers, squeeze, and slide it out of the hole. If you're going to be doing a lot of metal replacement and welding or fabrication work, a set of these is really handy. I bought these at Eastwood's, although I understand they are available elsewhere.
Using Eastwood's intergrip panel clamps, the new panel was held in place for tacking, which we did very carefully, putting a tack only every twelve inches or so initially, in order to avoid overheating the material. Once the edges were well-tacked after several passes, we glued all the lower flanged edges with panel-bonding adhesive, also purchased from Eastwood's. The rear quarter was now in its final resting position. The body lines lined up very nicely, and it would just be up to me to patiently continue the tack-welding and smoothing process until we had a seamless welded bond.
EDIT, OCTOBER 2010
While trimming the wheel lips to the proper dimensions (the after-market quarter panels had an excessively wide wheel lip), I discovered that the panel bonding adhesive, for whatever reason, had not bonded the quarter panel to the wheel house in many places. I removed the panel bonding adhesive, which wasn't that difficult, and drilled holes, then spot-welded the two pieces together just like we did on the driver's side from the beginning. Not sure what the failure was, but I'm glad to have discovered it before getting everything painted.
Posted in 2004-present | RESTORATION | body | rust & rust repair | sheet-metal replacement | link to this page | | Comments (0)
October 01, 2005
October 2005: sheet-metal work resumes
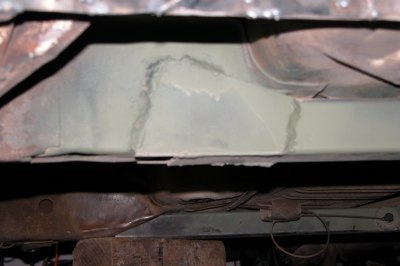
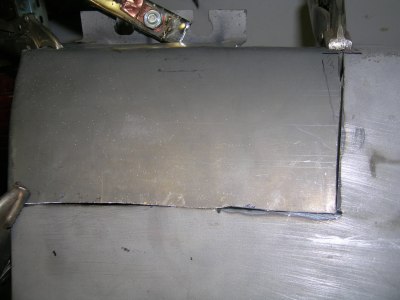
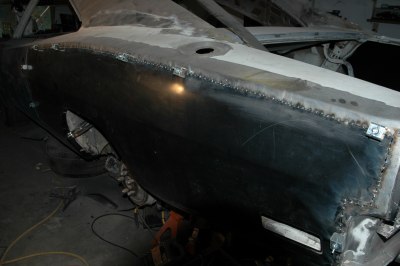
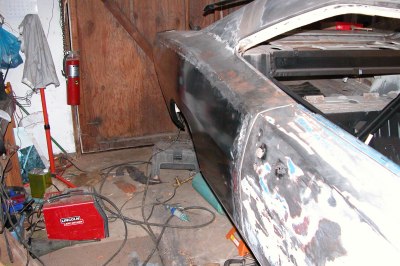
With all the metal prep work done, and the new piece formed and fitted, it was finally time to weld in the piece that would complete the rear-window opening and cover the expanse between the window and the trunk. To get this right, we temporarily reinstalled the deck lid, in order to match the slight crown the original piece had. Carefully tacked in place so as to avoid warping, the piece looked great when it was finally pinned down.
Even though I've been looking forward to this moment for years, I had to swallow hard, grit my teeth, and just go with it when my buddy put his cutoff wheel into the quarter panel. The passenger side had more extensive rust and much more previous body damage (hidden by up to half an inch of filler), so it was decided that full replacement was best.
Out with the old, in with the new, so they say. Here's the veteran quarter panel lying next to its replacement.
One more reason we totally removed the passenger-side quarter panel was to get at the inner fender rust on the forward edge of this piece. Only total replacement of all defective material will be good enough to achieve the results we are hoping for.
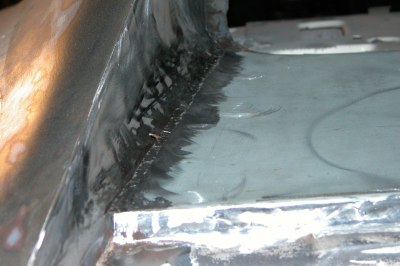
My buddy, the metal wizard, never ceases to amaze me. This was a case in point. He used some of the complex compound curvature left over from the sail panel repair pieces to fabricate an identical steel replacement section for the rusted area in the previous picture. Once welded in and ground off smooth, it was truly amazing how well he had matched the original shape.
To help prevent any future problems, the inner fender, inner rocker panel, and several other areas which are impossible to access under ordinary circumstances, were given a generous coating of the same rust encapsulator used on the floor.
--------
Posted in 2004-present | RESTORATION | body | rust & rust repair | sheet-metal replacement | link to this page | | Comments (0)
March 10, 2005
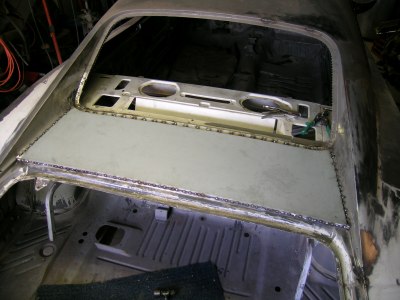
Sail panels
The next time my friend and I work on the Charger, we will start out by replacing the flat panel that lives between the sail panels. Test fitting the Charger Specialties piece indicates that once our surface preparation is complete, it should be a perfect fit. I highly recommend this company if you happen to need the sheet metal pieces they offer.
--------
Posted in RESTORATION | body | rust & rust repair | sheet-metal replacement | link to this page | | Comments (0)
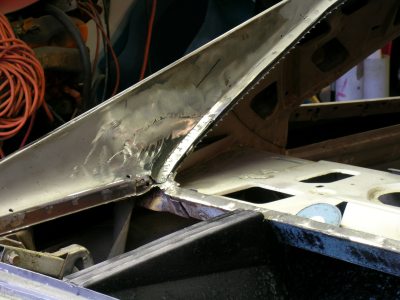
Passenger-side sail panel, repaired
The passenger side has much less rust and only a tiny 3" x 1.5" piece of the repair section was needed. The welding, grinding, and sanding went so well on this side that absolutely no filler will be needed at all.
--------
Posted in 2004-present | RESTORATION | body | rust & rust repair | sheet-metal replacement | link to this page | | Comments (1)
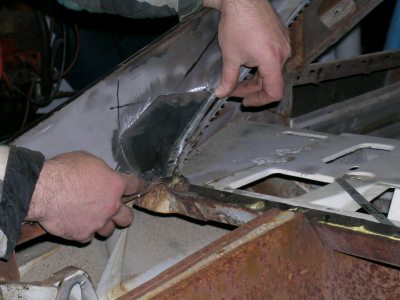
Sail-panel and window tray repair: complete
The final product: welded, ground, and high-speed sanded, looks stunning. Little or no filler will be required on the weld seam area. You will never know how great a job my friend did once this is covered up with a vinyl top again, so I'm glad I have pictures.
--------
Posted in 2004-present | RESTORATION | body | rust & rust repair | sheet-metal replacement | link to this page | | Comments (0)
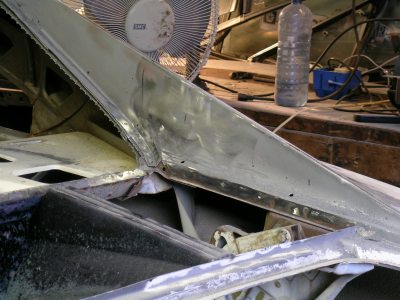
Sail panel repair: ready to weld
After the rusted material was removed, only a relatively small section of each of the repair panels I'd purchased from Charger Specialties was needed. The fit and form of the pieces was quite good, and required no exceptional massaging for a nice fit. Here, the trimmed and fitted repair piece is shown in place, ready for welding.
--------
Posted in 2004-present | RESTORATION | body | rust & rust repair | sheet-metal replacement | link to this page | | Comments (0)
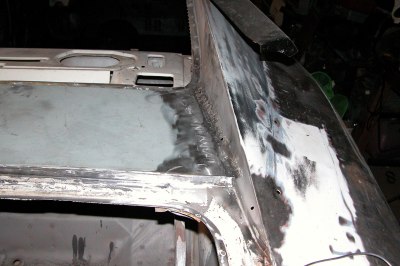
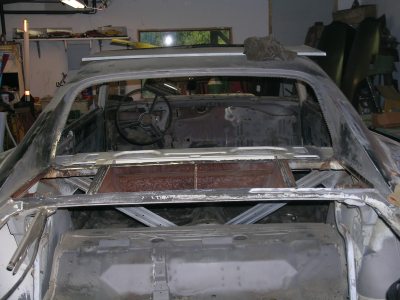
Sail-panel and window tray repair
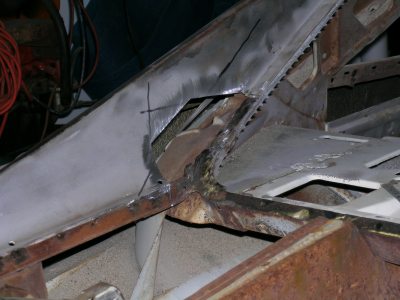
(just as a reminder, a few entries before this one in the 'sheet-metal replacement' category, you'll find a shot of the rust in this area as we initially uncovered it.)
At long last, the exciting day arrived and my metal-wizard friend brought all his welding and fabricating equipment over to my garage. First step was to remove the large flat panel covering the area between the rear window and the trunk lid. Next the rusted-out areas of the sail panels had to be removed. The driver's side was much worse than the passenger side, so we started there.
--------
Posted in 2004-present | RESTORATION | body | rust & rust repair | sheet-metal replacement | link to this page | | Comments (0)
Refurbished center console
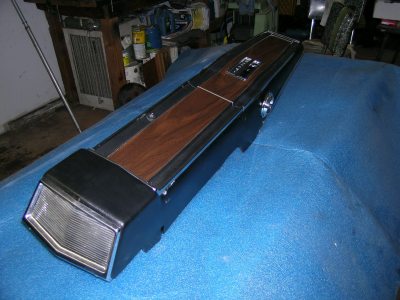
At long last, I had the materials and time to refurbish my center console. I repaired the broken parts of the plastic housing, using epoxy underneath where it doesn't show. The end product of that endeavor is nearly perfect. I refinished the console in black to match the new interior that will be installed one day.
--------
Posted in 2004-present | RESTORATION | body | interior | link to this page | | Comments (0)
Prior to removal of
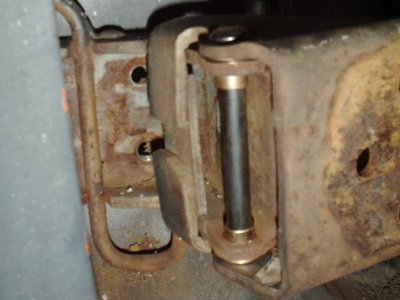
Prior to removal of the original quarter panels, it was deemed necessary that the doors be properly aligned. This required the rebuilding of the hinges. The upper door hinges seem to come from the factory with replaceable bronze bushings, so rebuilding them is easy. The lower hinges did not originally have bronze bushings; this allowed the steel of the hinge and the pin to wear against each other, causing an unacceptable amount of slop. By disassembling the hinge and making some changes, I was able to install bronze bushings in the factory hinge, restoring a nice, tight, smooth fit.
--------
Posted in 2004-present | RESTORATION | body | link to this page | | Comments (0)
New fenders
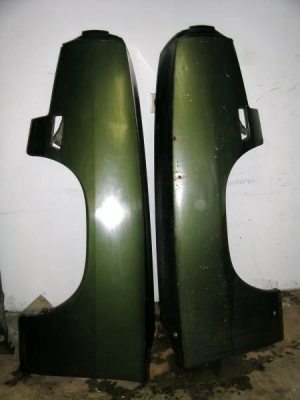
I was very happy to recently come by a pair of fenders for my Charger. I especially needed the driver's side fender, but both are better than my originals. These came off of a car that reportedly had been sitting since the early 80's. This means they have relatively little damage.
--------
Posted in 2004-present | RESTORATION | body | link to this page | | Comments (0)
September 10, 2004
Rear valance quarters
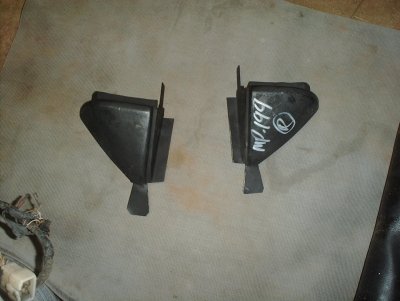
Finishing off my current inventory of rust repair parts is this pair of rear valance corners. The passenger side rear valance corner is badly rusted, and once fitted, these will nicely tie in the new quarter panels with the rear valance, which had been replaced previously.
--------
Posted in 2004-present | RESTORATION | body | disassembly | rust & rust repair | sheet-metal replacement | link to this page | | Comments (0)
Trunk floor extension
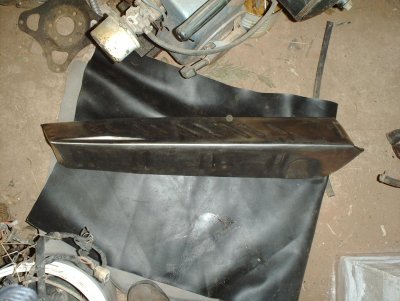
On the passenger side where the rear quarter panel was more severely rusted, the trunk floor extension was rusted out as well, where it met the quarter panel. This piece purchased from Auto Body Specialties will give a solid backing for the new quarter panel on that side.
--------
Posted in 2004-present | RESTORATION | body | disassembly | rust & rust repair | sheet-metal replacement | link to this page | | Comments (0)
Rear window channel replacement piece
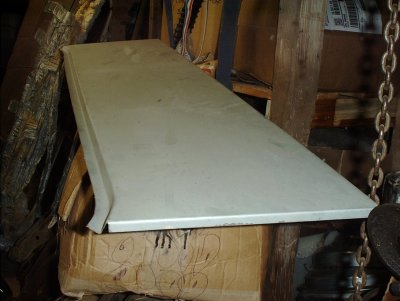
This other piece of metal required to complete the replacement of the rusted portions of the rear window channel was also purchased from Charger Specialties. This too seems to be of excellent workmanship. I will be very happy to have these pieces finally part of my car.
--------
Posted in 2004-present | RESTORATION | body | disassembly | rust & rust repair | sheet-metal replacement | link to this page | | Comments (0)
Window channel replacement pieces
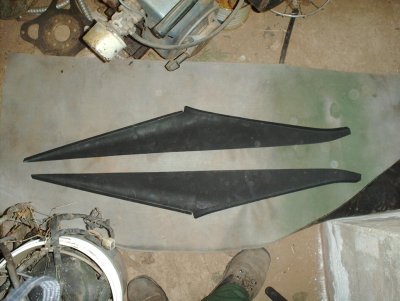
Next I purchased this seemingly very well-made pair of sail panel/rear window channel pieces, made by Charger Specialties in Montana. Not only was I impressed with the parts themselves, but the packing and shipping were very well-thought-out, with my order arriving in a handmade wooden box to keep it safe.
--------
Posted in 2004-present | RESTORATION | body | disassembly | rust & rust repair | sheet-metal replacement | link to this page | | Comments (0)
Replacement quarter panels
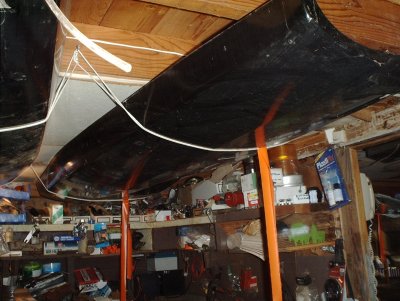
These quarter panels were my first major sheet metal acquisition. They were made by Goodmark Industries. I got a great deal on them on Ebay, which allowed my son and me to have a fun trip together to go get them in the truck. I was impressed with the quality of work on these. The real test will be fitting them to the car later, though. We are considering using an Eastwood Company weldless panel repair process to help make this easier. If anyone reading this has experience with this process, good or bad, I would be interested to hear what you have to say; please feel free to email me about it.
--------
Posted in 2004-present | RESTORATION | body | disassembly | rust & rust repair | sheet-metal replacement | link to this page | | Comments (0)
rust in the window channel
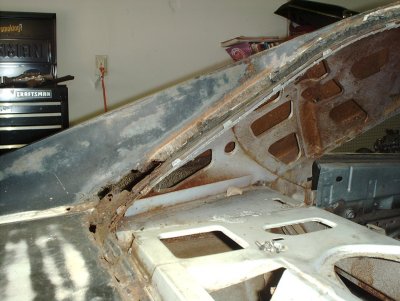
In removing the vinyl top some years ago, I discovered I had a seemingly small patch of rust on the driver's side rear window area. Years later, after removing the rear window and trim, I discovered a fairly large rust hole on the driver's side, with some significant but less extensive rust on the passenger's side corner. The window channel across the bottom was in very poor condition also. I was discouraged upon discovering so much rust on my car, but after looking at various websites and eBay, I have realized that this amount of rust is not only fairly common, but less extensive than a lot of cars that are being restored.
--------
Posted in 2004-present | RESTORATION | body | disassembly | rust & rust repair | link to this page | | Comments (0)
rust in the lower quarter
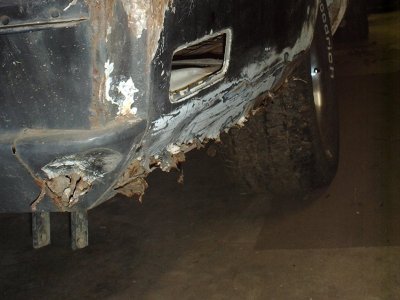
It was astounding to me to discover how much actual decay had taken place in my lower quarter panels. The passenger side was especially bad. I sanded off much of the paint and then used hand tools to pull the metal away to reveal the full extent of the damage. As is visible in this photo, the rear valance corner is rusted through, as is the vertical part of the trunk floor extension behind the lower quarter panel. With the plethora of dents, large and small, this rust helped me to decide that the rear quarters would be replaced rather than reworked.
--------
Posted in 2004-present | RESTORATION | body | disassembly | rust & rust repair | link to this page | | Comments (0)
April 10, 2004
Body disassembly
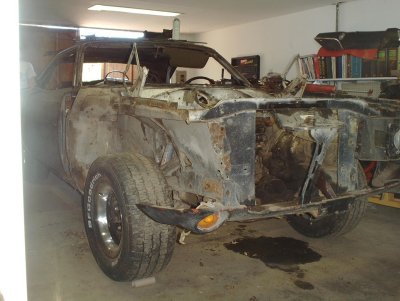
Next, the major body panels were removed, giving me better access to the inner parts of the car, as well as helping me determine what repairs, if any, were needed on the panels themselves.
--------
Posted in 2004-present | RESTORATION | body | disassembly | link to this page | | Comments (0)