


March 26, 2013
A Special Guest!
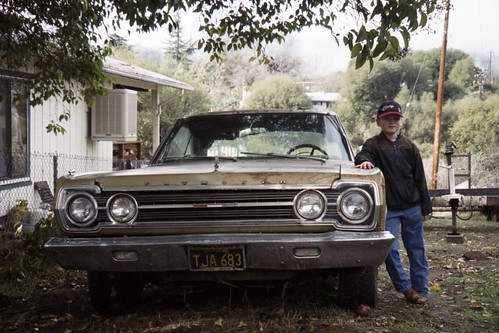
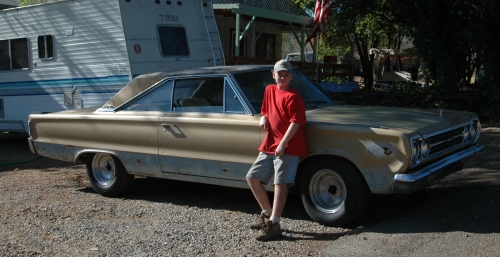
Something I've been encouraging my son to do for a long time is to create a web presence about the ongoing restoration of his 1967 Plymouth Satellite.
Well the last merit badge he needs to finish before he can submit his Eagle Scout package is Communications. One of the ways to meet one of the requirements is to design a web site. The requirements state you do not even have to post it, and it does not have to be more than a few paragraphs of information. However, with a little nudge from his Dad (and Assistant Scoutmaster) he put it on the web.
Here he is at age 7 when I bought him his first Mopar! (he is almost 17 yrs old now and 6'3" tall)
It is basic, and he'll be adding to it as we go, we have many hundreds of photos, but most are references for when we put it back together.
It is a blog, so just like my Charger blog, the newest posts are on top, you scroll down to see older stuff - all the way back to the beginning.
Here is a link to see it... Tolley's Satellite Restoration
Let him know what you think, or if there is anything any of you want to know.
Posted in 2004-present | Family Helpers | RESTORATION | disassembly | glass | interior | primer and paint | rust & rust repair | sandblasting | sanding | sheet-metal replacement | link to this page | | Comments (0)
July 04, 2012
Meeting a Mentor
While on a family vacation up north this year, I was able to tie-in with some really neat folks. One of them I had wanted to meet for a number of years. My body-work instructor guru, and pal Howard Holland of Howard's Backyard Auto Body. His DVD's are really great at helping a person go from pretty near zero to actually doing a good job, in a fun and informative way.
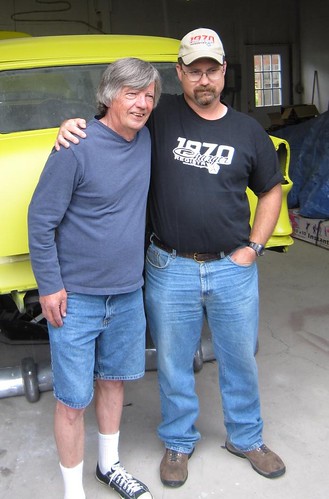
My family and I really enjoyed getting to meet Howard, and take a tour of his shop, his home and band room. Howard is even nicer in person.
We had a lot of fun, thanks Howard!
Posted in 2004-present | Family Helpers | body | primer and paint | sanding | link to this page | | Comments (0)
December 22, 2010
Visit to Mopar Ed
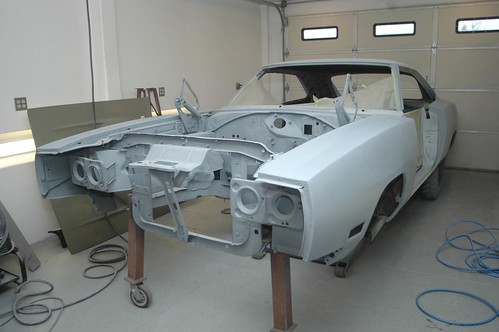
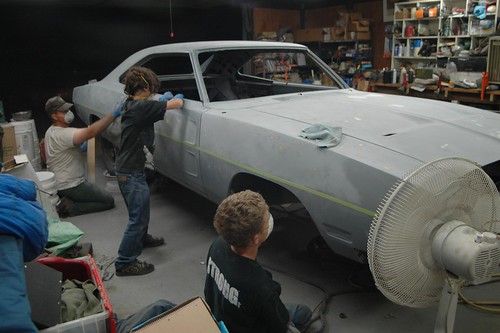
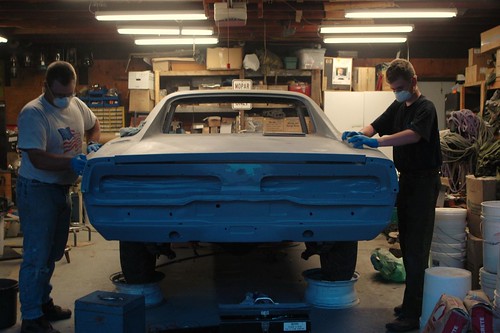
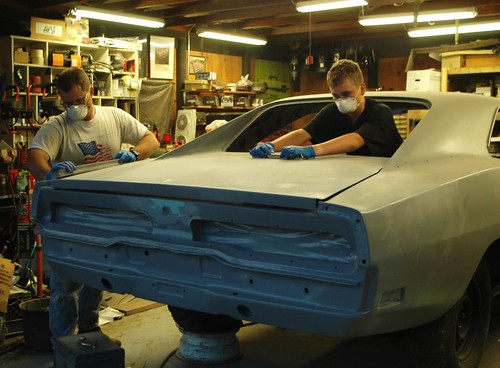
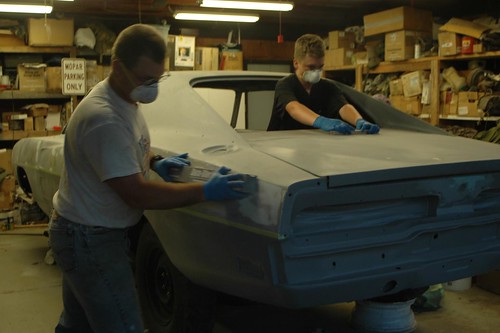
Mopar Ed had contacted me and said that he was just about done on the remaining body work on my Charger. He wanted some input from me about a couple of things, so we made the short trip down to his shop, and I was very pleased with the work that he and his team had done on the Charger. Once they finish up this current round, the car will move to paint.
Despite my best efforts, there was still a little bodywork for them to do on the rear quarters and hood, but they sure look great now.
Posted in 2004-present | RESTORATION | body | primer and paint | sanding | link to this page | | Comments (0)
November 12, 2010
Special Thanks to Howard!
I am LONG overdue in giving proper thanks to a mentor, teacher, guide and friend who I have seen countless times, spoken to on the phone, spent hours and hours listening to, but never actually met.
When my good friend the "metal wizard" Frank moved away I was just beginning some very serious work on my Charger. I was feeling lost, and unsure how I would be able to proceed. I went online in search of some more books, or preferably some videos to help me along as I continued to learn body work.
Well, praise the Lord that I found Howard Holland's "Backyard Autobody" instructional DVD's. Right away in a very personable, and down to earth way, Howard's teaching reenforced what my friend Frank had been showing me, and being able to go over and over the DVD's helped immensely. Getting one of Howard's DVD's (there are currently three volumes) is more than just buying some good practical instruction, Howard himself is available via telephone or email to help you through any questions you may have. The only warning I have to offer though is, when you start talking to Howard on the phone, sit down and get comfortable because your not talking to some generic "tech help line" you are about to make a friend with someone who is as interested in your success as you are!
Howard teaches more than "just" hammer and dolly work, but goes into panel replacement, patch fabrication, filler uses (pro's and con's), priming and painting too! In fact it was my having watched Howard talking about, and demonstrating the use and benefits of single stage Urethane paints that allowed me to so easily accept Mopar Ed's suggestion that we go that route on my Charger's upcoming paint job.
I simply can't recommend highly enough that anyone wanting to learn the ropes in the auto-body universe consider giving Howard's videos a try. You may be amazed by what you can learn to do yourself.... and don't be surprised if the phone rings and it is Howard asking you how your project is going!
I get nothing from Howard for recommending him; he does not even know I am posting this, but I do so in hopes that some of you might get your projects a little further down the road (or back on the road!) through the unique kind of help he has to offer.If you want to you can click on his logo below to go to his website.
Posted in 2004-present | RESTORATION | body | primer and paint | rust & rust repair | sanding | link to this page | | Comments (0)
August 15, 2010
NOPE!
The previous time I updated my page last fall, I had hoped that I was done priming and was on my last go-around with block sanding. I wasn't there yet! Really things are going quite well, but the doors (especially the passenger side door) still had some issues to resolve. When using my longest Dura-Block (about 24") I found some unhappiness that had somehow escaped detection in my previous attempts. After many nights of re-working the doors, I am now confident that things can resume.
I have reprimed the reworked areas, and am eager to begin blocking them again. You really can't tell much difference from the pictures, so I'm not posting new ones yet. I do have some good news to report however, I have spoken to a guy I trust who owns a Mopar restoration shop nearby (about 45 minutes away) and he is willing (and more than able) to paint my Charger when I'm done sanding!
One of the reasons for the lack of progress lately has been how busy we've been as a family. Since spring we've been helping an elderly lady by cleaning up her property. Her late husband (who died about 20 years ago) was a mechanic, collector, and accumulator of lots and lots of stuff. Well she figured it was time to sell the place, so my family and I volunteered to help out. It was fun, and rewarding, but most of all, a lot of work! We sorted and hauled a bit over 90,000 lbs of scrap metal off her place to a scrap yard about 1 hour from there (each way). We hauled off several tons of trash (not included in the 90,000lb figure), over 125 tires (also not included in the 90,000lb figure), lots of cars, appliances, and assorted scrap metal. I did get a '67 Plymouth Belvedere which sadly had been mostly crushed but still had a few salvageable parts for my son's '67 Satellite, a '74 Dart Sport, and a '63 Dodge Dart GT both in decent shape. Some of these funds have given a boost to my "Charger paint job fund" and I hope and pray that before the close of 2010 my car will be very very RED! Please stay tuned.
Posted in 2004-present | RESTORATION | body | primer and paint | sanding | link to this page | | Comments (0)
November 22, 2009
Third time's the charm...?
When you mention bodywork, especially block sanding, to most people, they imagine and/or describe something that goes on and on and on, seemingly with no end in sight. While I am still enjoying seeing my Charger get better and better with each stage of progress, I am looking forward to that final block-sanding in the sky when I can sand the entire car and see nothing but primer. Then I should know I'm done. Will I get that this time? I hope to know the answer to that in the next six weeks or so. This next round of blocking will be done with 600-grit paper, and things keep looking better and better. Stay tuned.
Posted in 2004-present | RESTORATION | body | primer and paint | sanding | link to this page | | Comments (1)
November 17, 2009
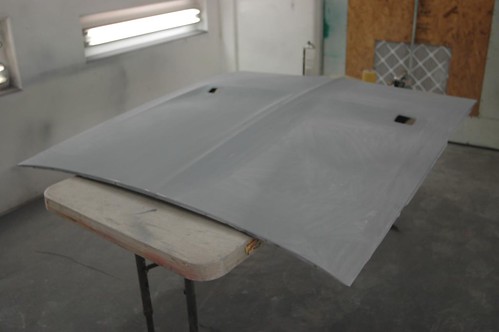
Second block sanding all done
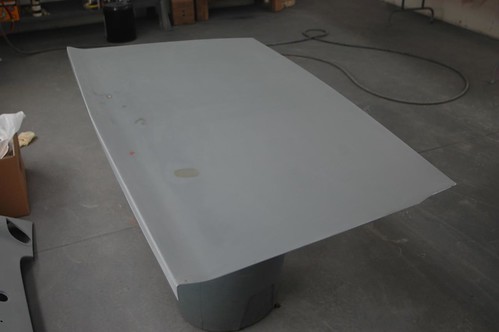
The second block sanding was done with 320-grit paper on Durablock sanding blocks in varying sizes and shapes. It is gratifying that there were fewer things that needed attention than the last time, and some areas, like the hood, are "there".
Posted in 2004-present | RESTORATION | body | primer and paint | sanding | link to this page | | Comments (0)
August 17, 2009
Second round of 2K primer
The work continues. The application of the primer went well. I didn't repeat some of the mistakes I made last time, though I did make a couple of new mistakes. The good thing about the primer is that you end up sanding off your mistakes. It is very gratifying to see the panels coming out straighter and straighter. The next round of block sanding will begin shortly. While it was 150 grit last time, this time we'll be using 320 grit and we will be avoiding cutting down to bare metal. I'm not anticipating a problem with any severe high spots, but time and work will tell if I'm right.
Here's a slide show of a walkaround of the car with the second round of primer on it.
Posted in 2004-present | RESTORATION | body | primer and paint | sanding | link to this page | | Comments (1)
Just before the second round of 2K primer
Well, my son and I finally finished the first round of block sanding on my Charger. After blowing the car off really well with compressed air and using a tack cloth on the body, I covered bare metal areas with self-etching primer. Then, after letting it dry for a day or two, I blew the car off with air again, washed it down with wax and grease remover, and tacked it off again one final time, in preparation for the second application of 2K primer.
Here's a slideshow of a walkaround of the car just before I started spraying. The various highs and lows exposed during block sanding are now much more level than before and are about to be covered up again.
Posted in 2004-present | RESTORATION | body | primer and paint | sanding | sheet-metal replacement | link to this page | | Comments (0)
July 29, 2009
Dividing the work, multiplying the fun
We recently had the treat of having my niece and nephew over at our house for a couple of days. While they were here, my son and I took my nephew out to the garage and showed him how much fun it is to sand on my Charger. The boys both did a really good job, and it was fun to teach them some of the things I've learned the hard way - not to mention it was really great for me to see that side of the car being sanded much more rapidly than when I'm working alone. Thank you, kids!
Posted in 2004-present | Family Helpers | RESTORATION | body | primer and paint | sanding | link to this page | | Comments (0)
June 03, 2009
Block Sanding 101
This summer, with our Bible study on vacation until fall, I find myself with some extra time on some evenings. My son and I have embarked on a project to get the block sanding moving at a quicker pace: I am teaching him what I have learned, and he is being a HUGE help. We are having a lot of fun together. We're making rapid progress on completing our first go-round of the car, and I anticipate during August putting on the next layers of 2K primer, and blocking the car out again, but then with 320-grit paper (we are using 150-grit on our first pass).
Not only is it wonderful to spend time with my son and get things done, but an added bonus is seeing his growing enthusiasm for about the upcoming restoration of his 1967 Satellite. (You can see a picture of his car here.) Working on my Charger together is excellent training for him, because when we're done with my car, his is next and he will be doing much of the work on that project.
Posted in 2004-present | Family Helpers | RESTORATION | body | primer and paint | sanding | link to this page | | Comments (0)
March 01, 2009
Block sanding.
With the car perfectly stable, and all my fears of it falling down gone, I happily got back to work. I am using a series of Dura-Block sanding blocks of various sizes and shapes. The blocking out itself goes fairly quickly. The green tape line that is visible down the car is of course protecting the body line. The tape allows me to sand to but not over the body line I worked so hard to perfect in the body work phase of my Charger's restoration.
From what I have read and what my buddy Howard Holland told me, on the initial block-sanding, I didn't have to worry too much about seeing small patches of metal show, because I'm in the coarse leveling phase. When I'm done with this round of block sanding, and I've dealt with anything that is far too high or low, I will shoot more 2K primer and block it out again with finer paper, and be more concerned about not cutting as deep from that point on.
So far, the blocking out of the Charger has been a lot of fun, and I'm really enjoying seeing the car's body get straighter and smoother with each pass.


Posted in 2004-present | RESTORATION | body | sanding | link to this page | | Comments (0)
October 28, 2008
One last sandblasting chore
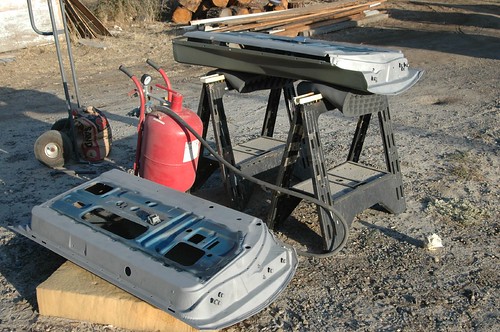
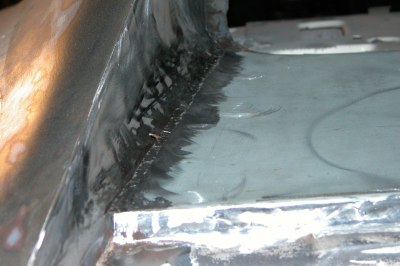
As the day to put primer on my Charger draws near, I realized I had neglected to strip the old paint and minor surface rust, etc., off the inner part of my doors. I had used a wire wheel on my grinder to remove all the paint from the door jamb area of the car body itself, but wanted a good fresh start on the doors. My son and I removed the doors, gutted the latches and window regulators etc., and set them outside for sandblasting. The red tank-looking object between the doors in the first photo is my inexpensive but very serviceable sandblaster.
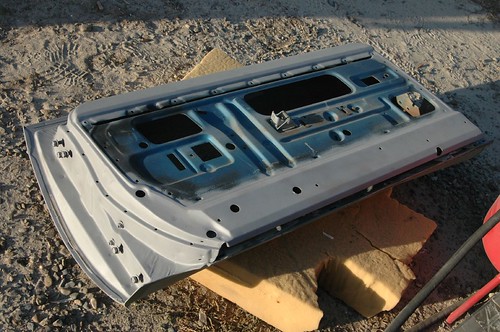
This is a closeup of the areas I sandblasted. I protected the outside edge of the door, which already has primer on it, with a heavy layer of masking tape prior to sandblasting. I was very pleased with the results. All the rust, all the paint, all the years of glue, etc., are gone. After this, the doors were taken inside the garage and etching primer was applied to all the bare metal.
Posted in 2004-present | RESTORATION | body | disassembly | sandblasting | sanding | link to this page | | Comments (0)
June 07, 2006
"Sanding Party"
I have been home from work for almost a month with a couple of herniated disks in my lower back.
My wife, sensing that I was rather frustrated at not making my usual amount of progress preparing my car, did something really nice. She organized my two kids and asked for instructions and safety equipment; then they set to work continuing the sanding work on my car!
My daughter is 6, my son is 10 and he helps me regularly, but twice now in these last two weeks the whole crew cheerfully assembled in the garage for what they call a "sanding Daddy's Charger party".
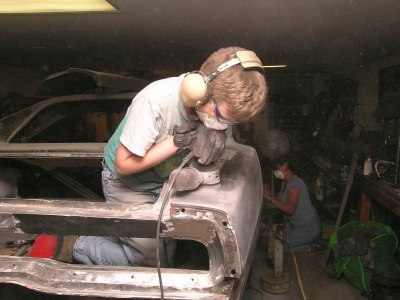
My 10-year-old son taking old paint off of the passenger rear quarter. He generally has a lot of fun helping me, and always learns quite a bit. It is wonderful to be able to share this with him. By the time we go to do his car, he'll be a pro.
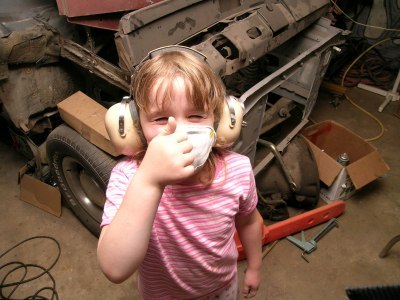
My daughter Claire is always enthusiastic about lending her dad a hand. Her trademark "thumbs-up" gesture says it all.
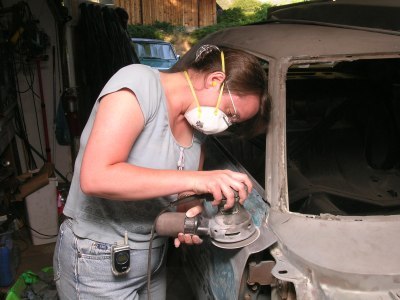
Thanks to my lovely wife Rachel, not only for her hard work on the car and in our home, but for sensing my discouragement at being injured and rallying the troops to keep my restoration moving forward. It has been very fun for both of us to see my wife becoming more and more interested in not only my car's restoration, but in her appreciation of Mopars in general.
--------
Posted in 2004-present | RESTORATION | sanding | link to this page | | Comments (0)
March 11, 2006
Spring 2006: Seeing Results
The driver's side sail panel area was one of the first areas on the car that I realized had extensive rust. Now all the metal in that area is brand new and is awaiting only some very fine filler work to smooth over where the welds have been ground down smoothly. The welding process was done slowly to minimize warping, and a bit tedious, but the results should be well worth it.
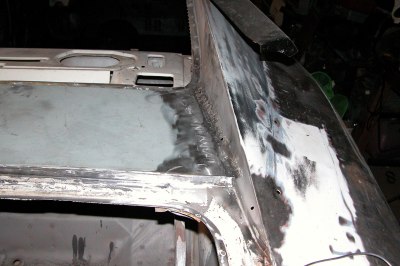
The passenger side had significant rust, though not as serious as the driver's side. However, it too now gleams with new shiny metal. The rear-window opening has been rebuilt and will do a much better job sealing out the rain than it used to.
The tack-welding process is nearly complete! Hopefully my metal wizard buddy will be able to help me do the final smoothing on this quarter panel, as we have recently learned that due to a new job he'll be moving away. BUMMER! (for more reasons than that).
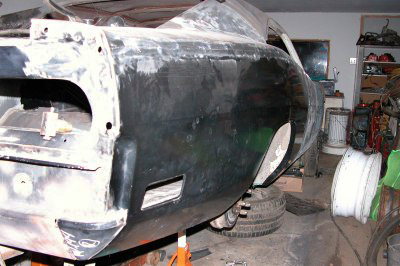
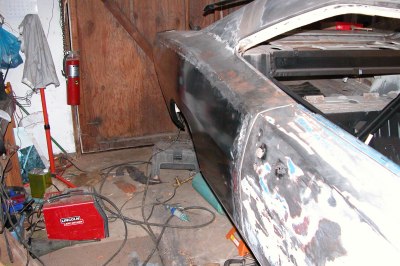
There was quite a bit of hand-forming that had to be done in the area of the recess for the bumper. This was handled extremely well by my very helpful metal wizard. Using the quarter panel extension piece as a guide, he obtained the correct alignment, and as this picture shows, the welding over most of the panel is finished, awaiting only final smoothing. I am very happy to have this worst part of my car become one of the nicest.

With my metal work coach leaving, I am moving aggressively to attack the driver's side quarter next. This picture is the quarter before I started drilling spot welds and separating the panels, which I now have completed. When my buddy shows me where to cut, I'll have another picture, with another gaping hole in the side of my car. Stay tuned.
--------
Posted in 2004-present | RESTORATION | body | rust & rust repair | sanding | sheet-metal replacement | link to this page | | Comments (0)