


September 14, 2014
Final details
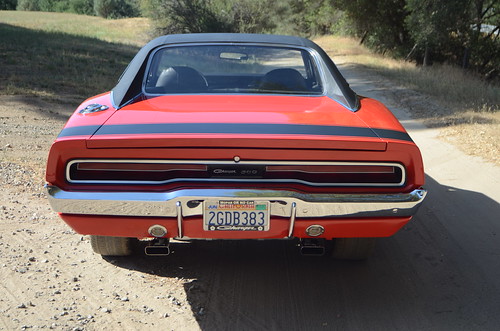
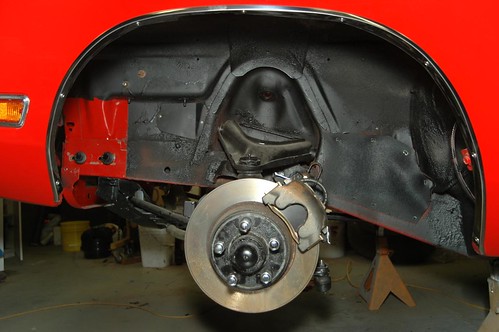
Working through the final details. All four tires are on. Went with Master Craft Avenger G/T's because they were the least expensive tire I could find and they still seem to get great reviews. Bought them from Summit with no shipping, no oversize fees, no tax :) Saved about $300 over going with BFG's (which I hope to do down the road - but I could not swing it right now)
My wheels are Mopar 15 x 7.5" "cop" wheels that came on the Dodge Diplomats and Plymouth Grand Fury law enforcement cars in the 80's. The front tires are size P245/60R15 and the rears are P275/60R15's.
Got my stainless hubcaps polished and detailed with new red "circles" etc.
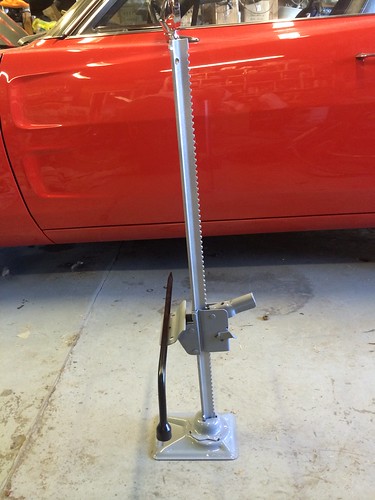
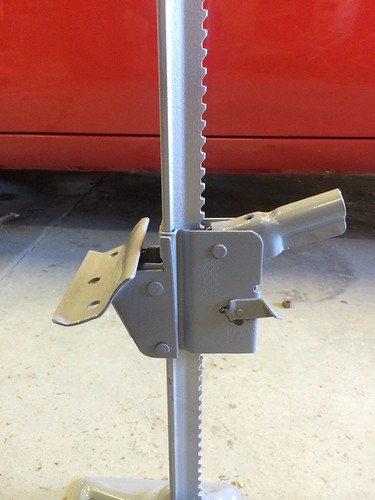
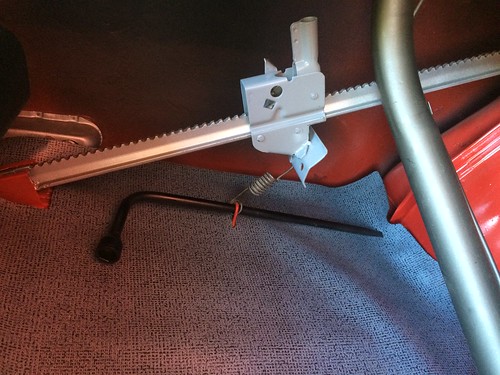
Some time ago I modified a jack to look original so my trunk would look right. Just to be clear, I will never use it, so safety is not a concern. In fact even if it was an actual factory jack, I would be crazy to risk the chrome on the bumpers, and the stability of the car. Those old jacks are pretty scary even when everything is right.
Here is the thread for that over at the '70 Charger Registry forum - Click Here
Well I finally got around to stripping it and painting it, then got it put in today.
A small step, but a fun one :)
A close up
Everything at home looking correct :)
Very soon, I hope to be driving on the roads and attending car shows!
Posted in 2004-present | Reassembly | interior | suspension, brakes, tires, and wheels | link to this page | | Comments (0)
June 08, 2014
DRIVING my Charger out into the sun!
For the first time in more than 10 years I drove my Charger today. It still needs shocks, tires, insurance etc so I did not go far, but far enough to get my Charger out into the sun for a round of nice pictures. Thanks to my wife for taking the video and photos, and my son for spotting for me.
Into the sunshine!
Down the driveway
If you like, join me on a quick walk around my Charger.
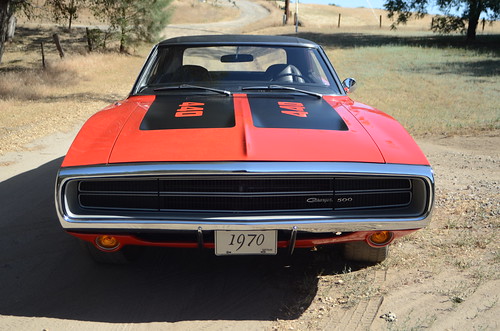
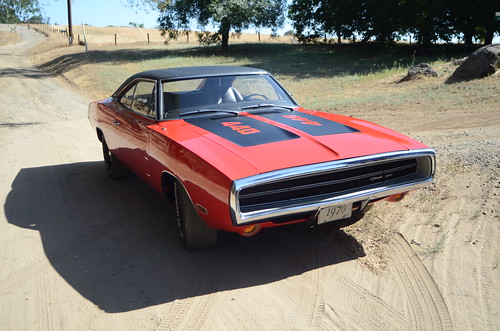
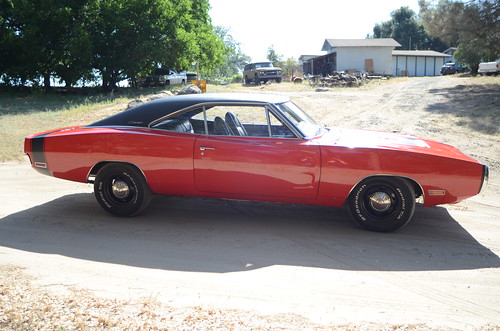
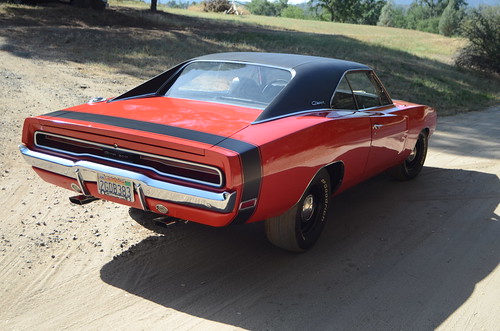
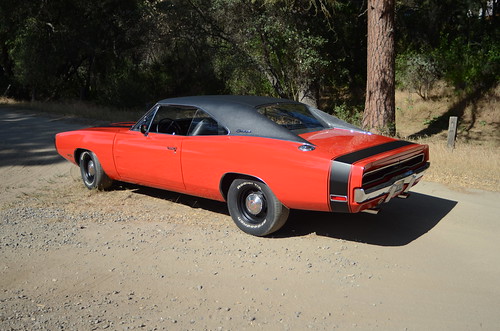
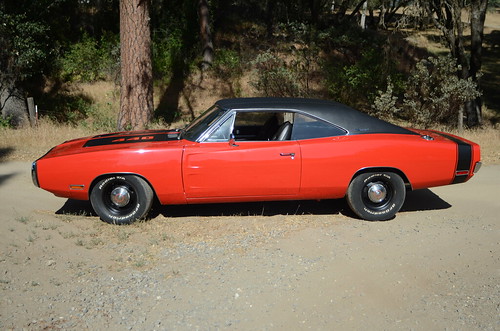
The to-do list is getting shorter and shorter, and my Charger is getting closer to being ready to take to it's first car show, probably in October.
Posted in 2004-present | Family Helpers | RESTORATION | Reassembly | body | engine | glass | suspension, brakes, tires, and wheels | link to this page | | Comments (0)
December 19, 2012
Brake booster and Steering wheel
Some more progress while I wait for the rest of my engine money...
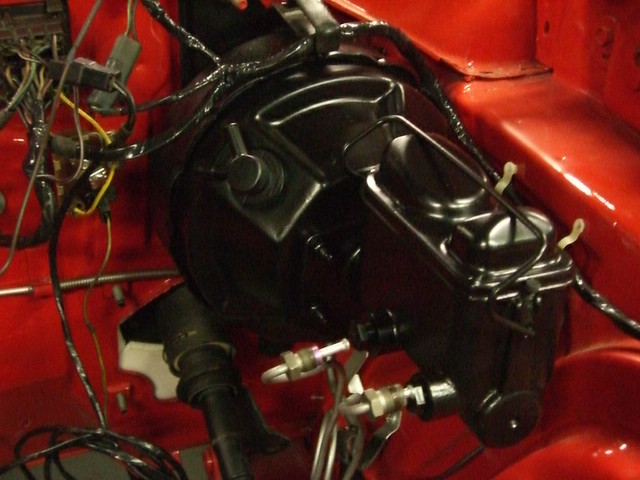
I got one of my Bendix boosters rebuilt by Booster Dewey In Portland Oregon, it arrived in great shape yesterday...
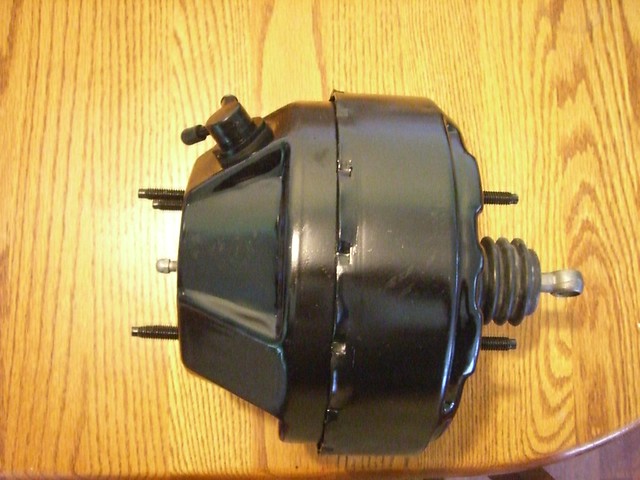
I got it installed today... Should be bleeding it soon, and begin tidying up the engine bay.
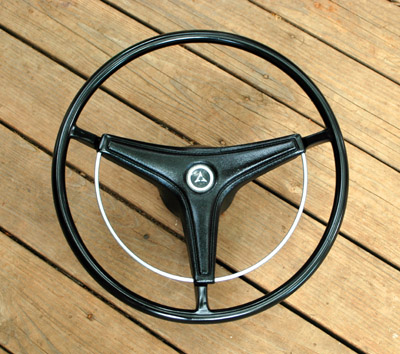
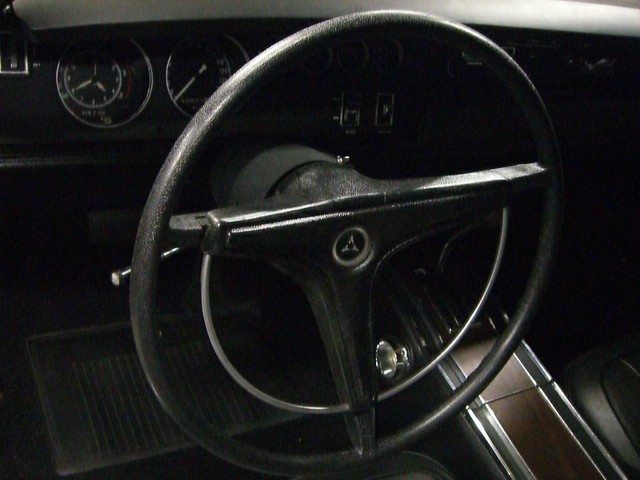
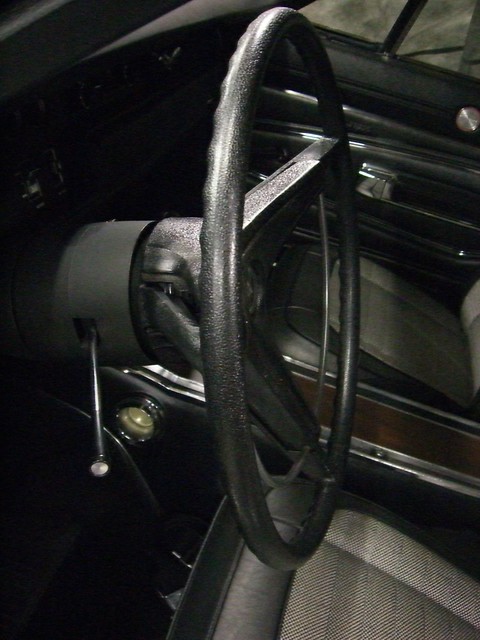
As much as I was stoked to have an original steering wheel that was in such perfect shape for my Charger, it turns out it wasn't for my Charger! (It will however be a beautiful addition to my son's '67 Satellite) So I ordered a new reproduction one from PG Classics, it arrived today and I put it on. Much better, now I have a textured wheel and I can't see my turn signal switch anymore.
This is the wheel I took out today, the wheel is for a '67-'69 with my '70 center put on it.
This is the correct wheel which I installed today also.
I'll keep working on my windshield trim too, it is getting close.
Posted in 2004-present | RESTORATION | Reassembly | interior | suspension, brakes, tires, and wheels | link to this page | | Comments (1)
September 22, 2012
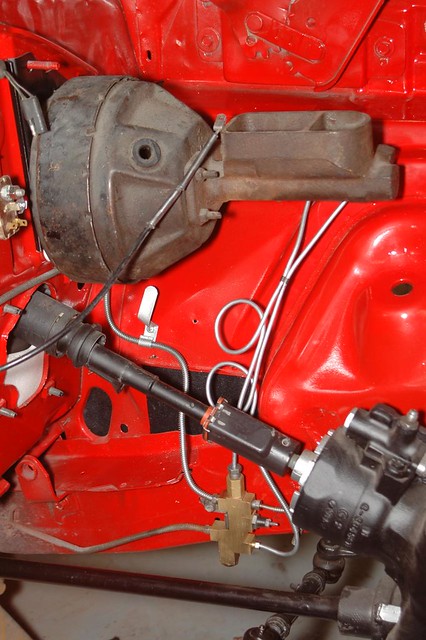
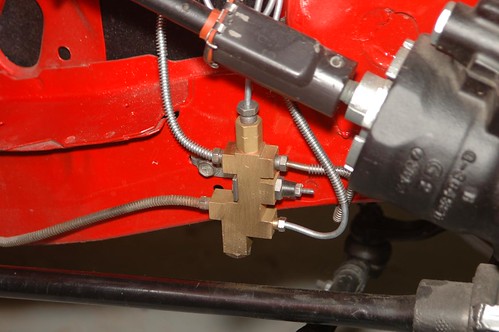
Brake lines, wheel well details
Well, while I am waiting for a few other things to fall into place, I made some time to square away my Charger's brake lines.
My Charger originally had 10" manual drums on all 4 corners. Even when I was young and fairly reckless, those were barely adequate for safety (especially when you decide to use that 440!)
So as detailed some time ago in this blog, I upgraded the brakes to the large 12" rotor set up using the large Chrylser Cordoba rotors, and the required longer caliper mounting brackets. These parts are mounted to a pair of '73-'76 A-Body spindles.
As most folks know, converting to disc brakes, and doing right requires more than simply bolting on discs. I located the correct proportioning valve for a disc brake equipped '70 Charger, which thankfully was the same as the early '70's disc brake equipped Dodge Darts. In addition the master cylinder adn booster are different for disc brake cars. Since mine was a manual brake car before I needed to install the correct re-enforcement plate and brake linkage pieces inside too.
The using new bulk steel seamless brake line, and the proper double flaring tools, I created my new brake lines following the original contours as closely as possible.I even transferred the factory spiral armor to the new lines. I used new fittings where ever the old ones were chewed up. Then put it all together.
In order to help me know where to put the lines going to the master cylinder I temporarily mounted an un-restored but correct master cylinder and booster set-up I got from a '69 Charger with disc brakes years ago.
Here are some pictures of the project.
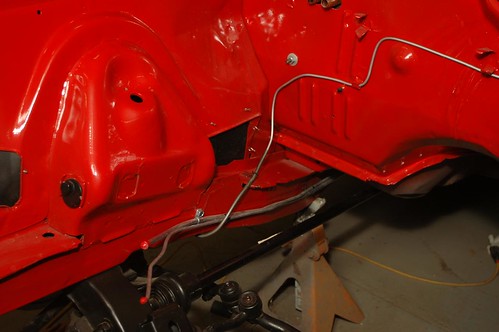
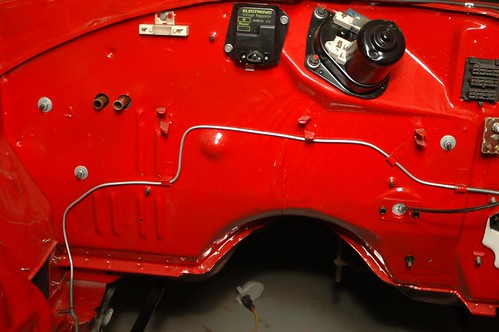
One thing I did while I was working on this area of the car is replaced the weatherstripping inside the front and rear wheel well ares, added some under body coating to the wheel wells.
Also after doing a lot of reading I discovered that the spindles were reverse-able left and right. Even though the 73-76 Dart I took the spindles from had the calipers on the front, there were some advantages to swapping the spindles and mounting the calipers on the rear. The main reason I chose to do this was that the rubber hoses I had bought fit better with the calipers on the rear, other things I read suggested that the extra clearance between the caliper and the sway bar and strut bars was a good thing.
So in these pictures everything is in its new position.
Driver's side
Passenger side...

Stay tuned, I have information that my front bumper may be returned to me soon, and my engine parts are at the machine shop being perfected, so check back soon for more!
Posted in 2004-present | Reassembly | body | suspension, brakes, tires, and wheels | link to this page | | Comments (0)
January 14, 2011
Wheels
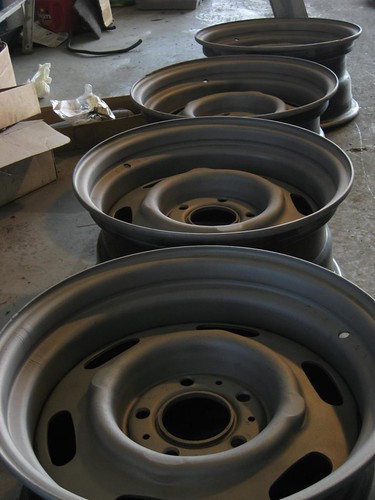
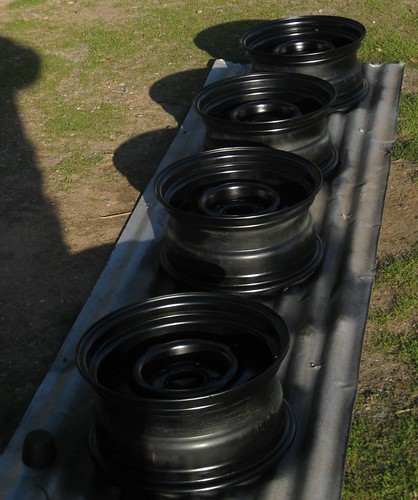
In preparation for the arrival of the Charger, I sandblasted these "cop wheels". They are a Mopar item from the mid-1980s, usually found on Diplomats and Grand Furys. They are nice, stout, ventilated 15x7.5" wheels with great backspacing, making tire selection a breeze. After sandblasting, I coated them with etching primer and then three coats of satin black. These will be set aside until needed.
Posted in 2004-present | RESTORATION | primer and paint | sandblasting | suspension, brakes, tires, and wheels | link to this page | | Comments (0)
January 07, 2011
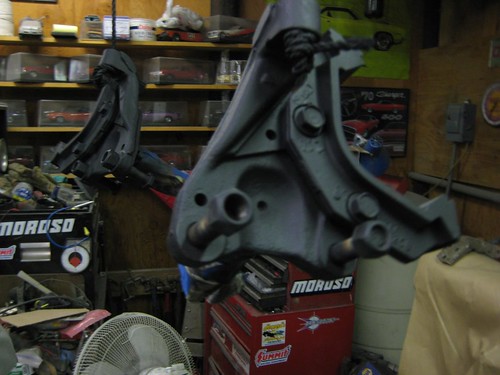
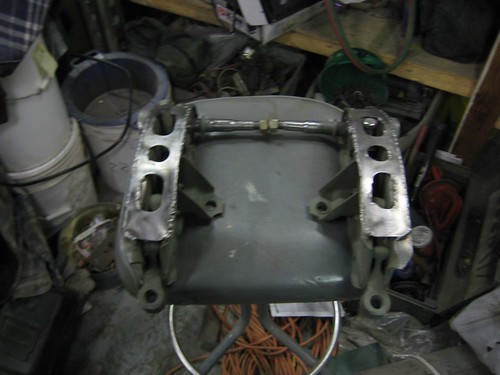
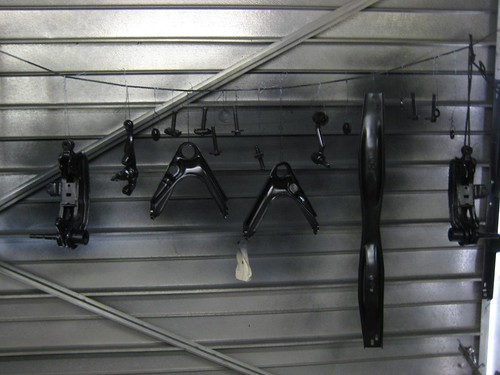
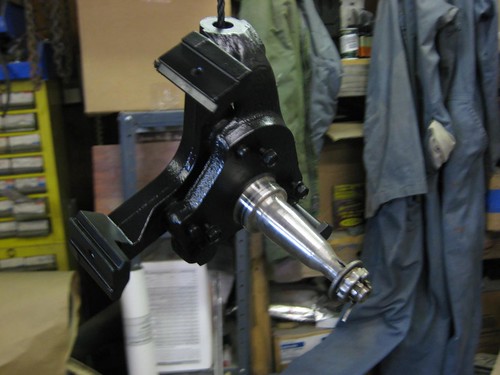
Front suspension coming back together
Now that everything for the front end has been painted with the Eastwood's Extreme Chassis Black, it's finally time to reassemble everything. Here are all the parts laid out, prior to bushing, ball joints, etc being installed.
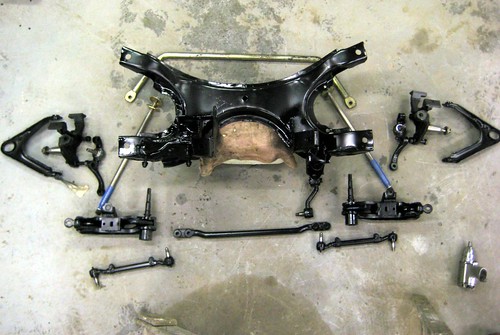
Here is the final product ready for installation when my car comes home from paint.
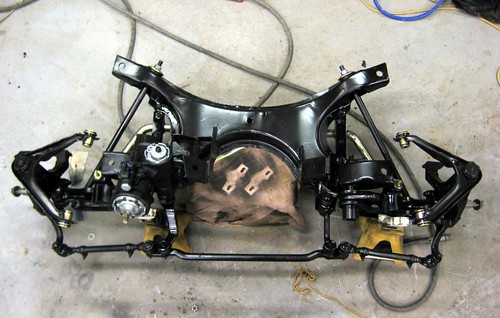
The upper control arm bushings are polyurethane; the lower control arm bushings are stock rubber replacements. I had read too many people having problems with the lower control arm bushings loosening up and/or squeaking with the polyurethane ones. All new ball joints and boots are installed. The tie rod ends and sleeves are stock for C-bodies, which are much beefier than the stock B-body units that my Charger came with. The original strut rods were bent, I realized after I took them out, so these are new steel heavy-duty units from PST with polyurethane bushings. The steering box is a police-car steering box from a Dodge Diplomat police car. Once the K-member and torsion bars are reinstalled, upper control arms bolted in, I will install the dust shields and rotors with new bearings and seals, allowing me to put the front wheels back on, at long last.
Posted in 2004-present | RESTORATION | suspension, brakes, tires, and wheels | link to this page | | Comments (0)
December 10, 2010
Refinishing suspension
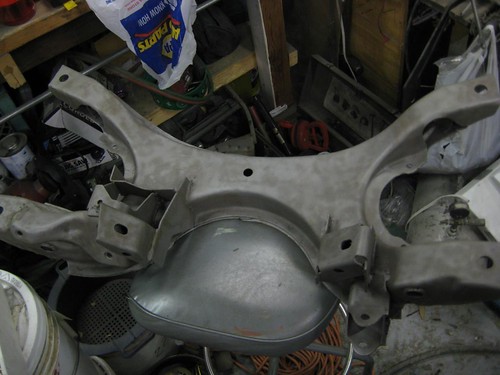
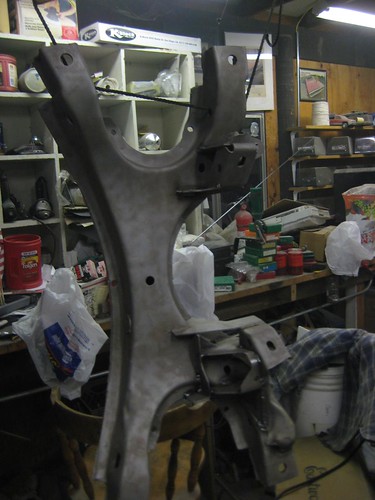
While my Charger is away at the paint shop, in addition to spending some excellent time getting some work done on my son's '67 Plymouth Satellite, I took this time to sandblast, prime, and paint the front-end suspension parts that I will use when my Charger goes back together. Also, while I was at it, I did the same procedure to the bumper brackets and a few other metal parts of the car that usually aren't seen. After sandblasting, all the parts were primed with self-etching primer, then primed again with conventional 2K primer because I learned that you aren't supposed to apply Eastwood's Extreme Chassis Black over self-etching primer. I am not sure why, but I'll take their word for it.
I did take the time to carefully inspect and reinforce some of the components. On the K-member I added new welds and improved some existing welds, and boxed in the steering box mount to eliminate flex that is common in that area. I also installed a set of reinforcement plates on the lower control arms that i ordered from Mancini Racing. Everything I read said that if you're going to increase the size of the front sway bar, which I am, you really need to box in the lower control arms.

Posted in 2004-present | RESTORATION | primer and paint | sandblasting | suspension, brakes, tires, and wheels | link to this page | | Comments (0)
February 17, 2009
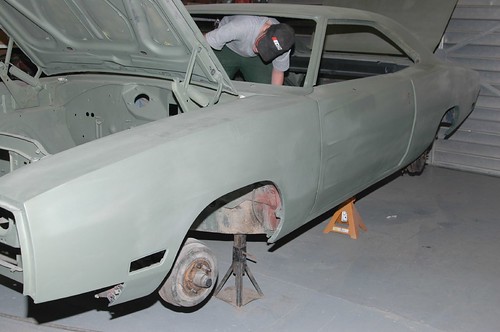
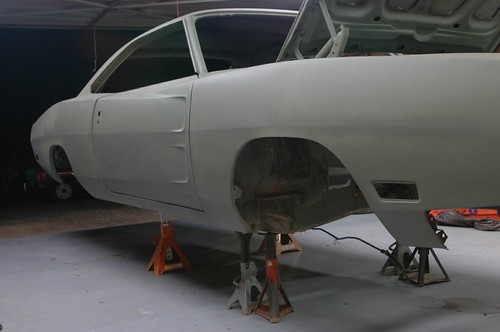
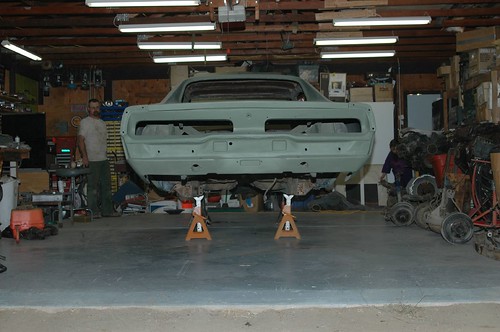
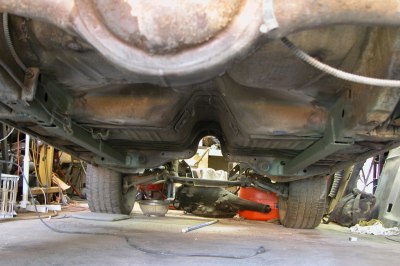
Getting my rear-end in gear
The way my entire Charger was sitting on jack-stands made it easy for me to prime. However, I noticed when block-sanding the car that the whole Charger would start to sway. This made me very nervous. I kept having terrible visions of my now-pristine quarter panels and fenders slamming on the ground. I decided I needed to stabilize the car better.
Since I had everything ready to go on the rear end, I decided I would put it under the car and put some junky tires on the car. The photos below chronicle the sequence I went through in this part of the project. One of the neatest things was, this was the first time that I was able to start emptying some boxes that had held new parts.
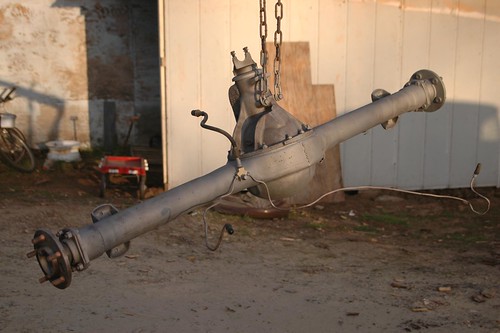
These first two pictures show the rear end stripped of its original 10-inch brake parts, with the axles put back in place. With it hanging from my engine hoist, I had just completed sandblasting the entire rear end.
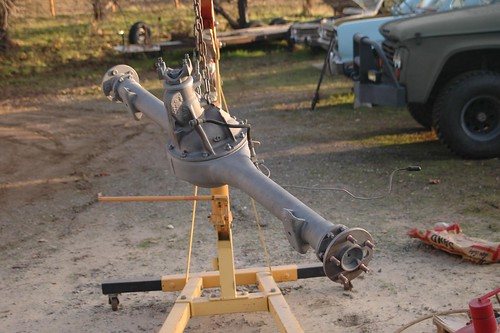
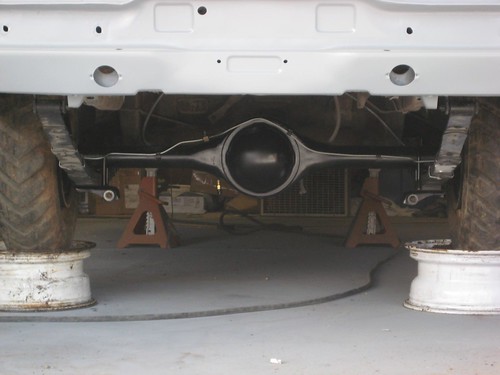
These two photos are of the assembled and painted rear end, with the 11-inch heavy-duty brake hardware, the Mopar Performance OEM-style 440/Hemi leaf springs, all-new bushings, new hard brake lines, and the new rubber brake line. The gears in the 489-cased third member are 3:55's with the large 440 yoke. All that is ready to be rolled under the car.

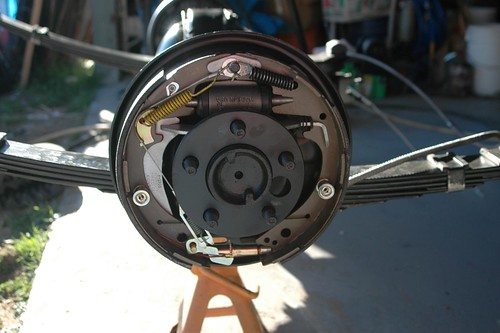
In this photo, you can see everything in the new 11-inch rear brake system has been replaced: wheel cylinders, all the springs, self-adjuster parts, brake linings, everything new and shiny.
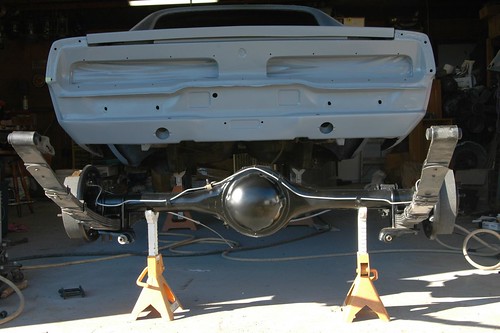
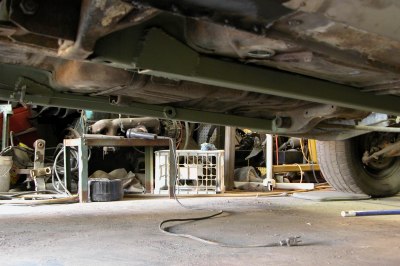
Here the rear end is all bolted in. The tires are tall, skinny 7.00-15 Bobcat tractor tires that I had from past projects. They allow plenty of room for me to work around the wheel wells, and I won't care if they get paint all over them. With the rear end in place and my stoutest jack-stands moved as far forward on the frame as I can get them, my Charger is now rock-solid, and I'll feel a lot better working those panels over as I block things out.
Posted in 2004-present | RESTORATION | sandblasting | suspension, brakes, tires, and wheels | link to this page | | Comments (1)
October 28, 2008
Removing the suspension
The following series of pictures shows my Charger starting out on jackstands with the tires and wheels removed, displaying, hopefully for the last time, its sad stock ten-inch drum brakes. I wanted to remove as many of these parts as possible prior to priming and painting.
Upgrading the brakes is not the only thing I have in mind for this phase of my project. When this goes back together, I will install Hemi .960 front torsion bars and stock XHD 440/Hemi leaf springs. I have all new polygraphite bushings to install throughout, a firm-feel steering box, 12-inch front rotors from a Chrysler Cordoba riding on disc-brake spindles from a '73 Valiant, and 11" HD drums out back. I will also upgrade to a 1 1/8" diameter front sway bar.
My son, just completing the removal of the steering column.
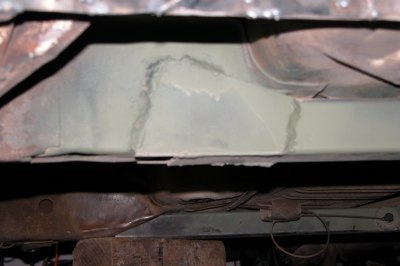
This picture, in addition to showing the absence of the suspension, shows fairly well what I have been doing these last months on my car. I have been working very hard to get my body lines straight and appropriately crisp. I think they show fairly well in this photo.
Rear view of the car; rear-end, springs and shackles all had to go as well.
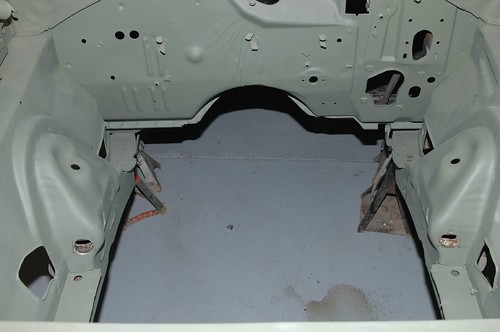
Having the engine bay this clear should make it extremely easy to get the primer and paint everywhere I need them to be, prior to reinstalling the restored and upgraded front suspension and K-member.
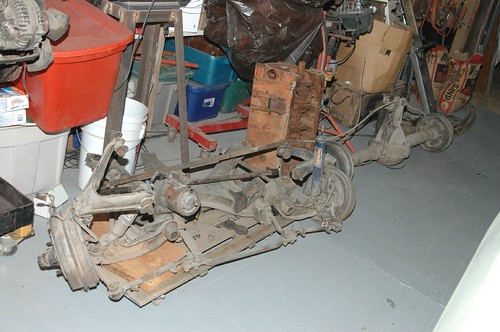

It is really something I thought I would never see, looking at this pile of parts in the side of my garage. It will be a lot of fun this winter to disassemble, clean, restore, and upgrade all of these assemblies prior to installation, after the paint goes on.
Posted in 2004-present | RESTORATION | body | disassembly | suspension, brakes, tires, and wheels | link to this page | | Comments (1)
October 20, 2006
Sub-frame connectors
One of the things it seems virtually all Mopar people agree with is that there are many huge benefits to stiffening up our old Mopar muscle cars. One of the best ways to do this has proven to be attaching what are called sub-frame connectors, which tie in the front and rear frames of the car. This relieves stress from the sheet metal during hard launches and extreme handling situations. There are numerous brands of these available, ready-made to go into a wide assortment of cars. However, I found a number of people who had fabricated their own quite successfully. I decided to take that approach and save some money. The material I used was 2x2 square tubing with a 1/8"-thick wall. The plates that attach to the forward frame were 1/4" thick 2"x4 1/2". The gussets for the rear were 1/16" mild steel.
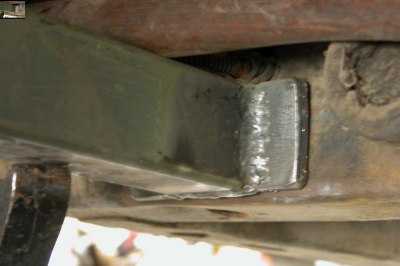
The first thing I did was weld the 4 1/2"-wide pads onto the front edge of each tube. The front subframe was cleaned with a wire wheel prior to welding, and the whole piece was fitted approximately in place in order to mark the angle at which the rear would have to be cut to meet the rear subframe.
I cut the rear of the tubes so that the bottom of the frame would be flush with the tube. This resulted in the tube being brought up exactly to the bottom of the rear floorpan. I did not want to cut into the floorpan, as I have seen some do on A- and E-body cars. This junction was completely welded off on both sides prior to being plated.
This is the finished view of the rear, with the plates welded over the top of the joint of frame and subframe connector, which was also welded. Each side of the subframe connector had one of these plates, and each plate was welded on all four sides.
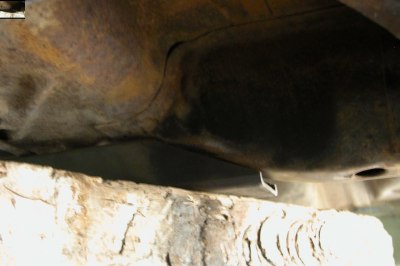
Here are both bars in place, painted with etching primer, as seen from the passenger side.
Both bars viewed from the rear.
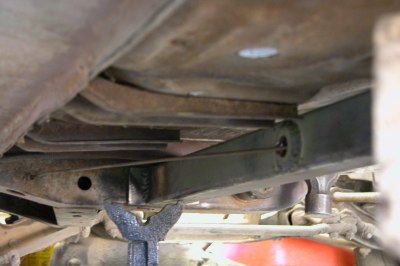
The only thing that prevented this from being a super-easy job was the fact that on the driver's side, the parking brake cable passed directly through the space where the subframe connector needed to be. After marking the location on the tubing where the cable would need to go through, I drilled large 3/4" holes on either side. Realizing that this could possibly weaken the subframe connector on that side, I chose to weld heavy washers on the outside of the hole on each side. I took a drill with a 5/16" bit at the same angle the cable would pass through the tubing and made a smooth, angled channel for the cable. I was very pleased with how well it turned out, and can't wait for the day when I can realize the benefit that these bars will provide.
Posted in 2004-present | RESTORATION | body | suspension, brakes, tires, and wheels | link to this page | | Comments (0)
October 18, 2006
Hubcaps
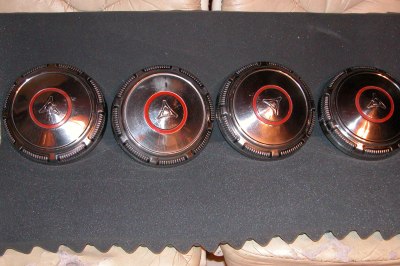
Some friends whom I have helped with some Charger items and issues over the last couple of years graciously gave me this set of four period-correct dog-dish-style hubcaps. These will look really great in the center of my police wheels. I have not yet decided if I will paint the wheels black, to complement but contrast with the car body color, or paint them body color. I have seen it done both ways, and like both.
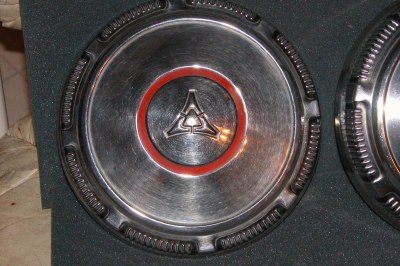
a closer view of one of the hubcaps.
Posted in 2004-present | RESTORATION | suspension, brakes, tires, and wheels | link to this page | | Comments (0)