


« September 2004 | Main | May 2005 »
March 10, 2005
Sail panels
The next time my friend and I work on the Charger, we will start out by replacing the flat panel that lives between the sail panels. Test fitting the Charger Specialties piece indicates that once our surface preparation is complete, it should be a perfect fit. I highly recommend this company if you happen to need the sheet metal pieces they offer.
--------
Posted in RESTORATION | body | rust & rust repair | sheet-metal replacement | link to this page | | Comments (0)
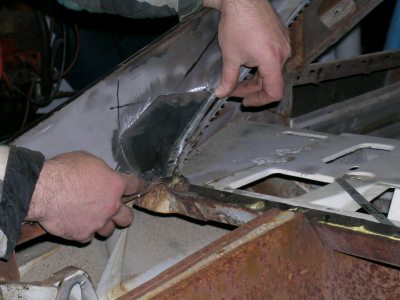
Passenger-side sail panel, repaired
The passenger side has much less rust and only a tiny 3" x 1.5" piece of the repair section was needed. The welding, grinding, and sanding went so well on this side that absolutely no filler will be needed at all.
--------
Posted in 2004-present | RESTORATION | body | rust & rust repair | sheet-metal replacement | link to this page | | Comments (1)
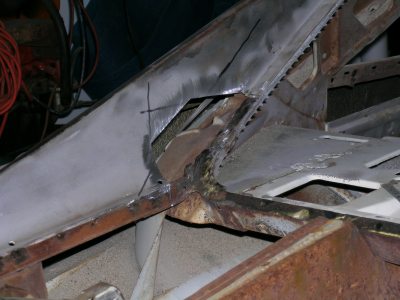
Sail-panel and window tray repair: complete
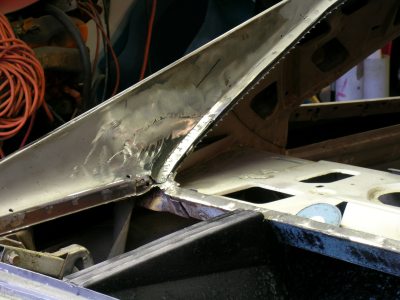
The final product: welded, ground, and high-speed sanded, looks stunning. Little or no filler will be required on the weld seam area. You will never know how great a job my friend did once this is covered up with a vinyl top again, so I'm glad I have pictures.
--------
Posted in 2004-present | RESTORATION | body | rust & rust repair | sheet-metal replacement | link to this page | | Comments (0)
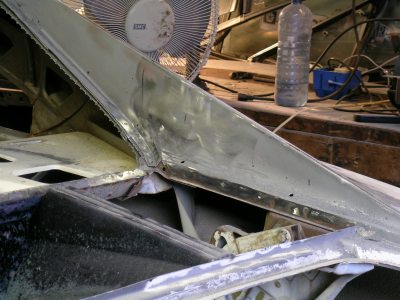
Sail panel repair: ready to weld
After the rusted material was removed, only a relatively small section of each of the repair panels I'd purchased from Charger Specialties was needed. The fit and form of the pieces was quite good, and required no exceptional massaging for a nice fit. Here, the trimmed and fitted repair piece is shown in place, ready for welding.
--------
Posted in 2004-present | RESTORATION | body | rust & rust repair | sheet-metal replacement | link to this page | | Comments (0)
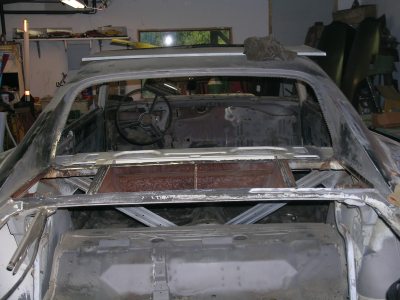
Sail-panel and window tray repair
(just as a reminder, a few entries before this one in the 'sheet-metal replacement' category, you'll find a shot of the rust in this area as we initially uncovered it.)
At long last, the exciting day arrived and my metal-wizard friend brought all his welding and fabricating equipment over to my garage. First step was to remove the large flat panel covering the area between the rear window and the trunk lid. Next the rusted-out areas of the sail panels had to be removed. The driver's side was much worse than the passenger side, so we started there.
--------
Posted in 2004-present | RESTORATION | body | rust & rust repair | sheet-metal replacement | link to this page | | Comments (0)
Grille
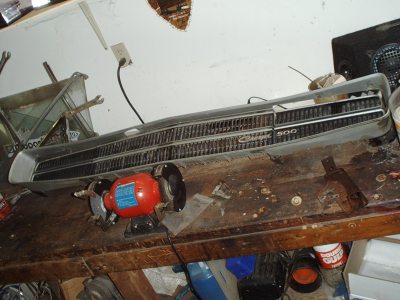
Another item I had been searching for for decades was an intact 70 Charger grille. I have come across very few over the years, many in worse shape than my original. Recently I was able to acquire this very nice Charger 500 grille. After a few years of seeing them go for unbelievable sums on eBay, I am delighted to finally have one of my own. Currently a company called Premiere Plastics is considering using this grille as a pattern for a future reproduction '70 Charger grille. Stay tuned on that.
--------
Posted in 2004-present | RESTORATION | trim | link to this page | | Comments (1)
500 finish trim

When I got my charger back in 1986, the finish trim that surrounds the taillights was crinkled up almost into a little ball in the trunk. I did a fairly decent job of getting it smoothed out, but never really good enough to ever be put on my finished car. I was delighted to come across this very straight original trim piece. Once repainted, it will really help set off those distinctive Charger taillights.
--------
Posted in 2004-present | RESTORATION | trim | link to this page | | Comments (0)
Refurbished center console: closer view
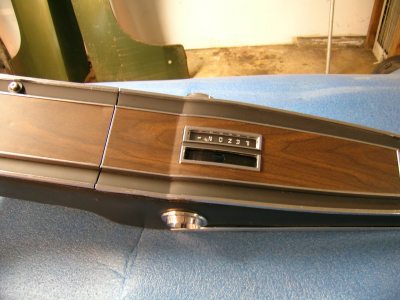
This closer view shows the corrected door alignment and the repainted border, the polished chrome bezels, and the new wood grain in place. I bought the wood grain kit from Performance Car Graphics. The kit was inexpensive and easy to use if you follow their detailed instructions.
--------
Posted in 2004-present | RESTORATION | interior | link to this page | | Comments (0)
Refurbished center console: closest
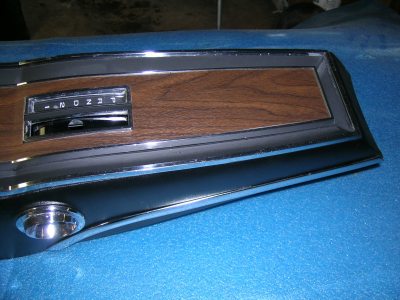
In this close-up, the grain and texture of the woodgrain material is evident. I also purchased a new filler piece for where the automatic transmission shift lever goes through. The look is complete and ready to go.
--------
Posted in 2004-present | RESTORATION | interior | link to this page | | Comments (0)
Refurbished center console
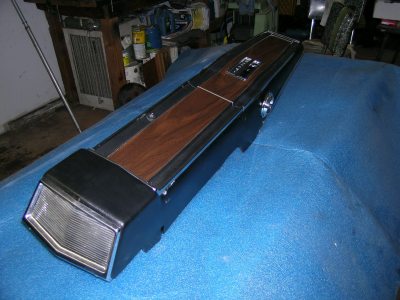
At long last, I had the materials and time to refurbish my center console. I repaired the broken parts of the plastic housing, using epoxy underneath where it doesn't show. The end product of that endeavor is nearly perfect. I refinished the console in black to match the new interior that will be installed one day.
--------
Posted in 2004-present | RESTORATION | body | interior | link to this page | | Comments (0)
Instrument Panel
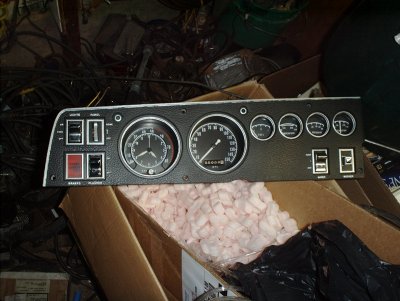
In rebuilding my instrument panel, I took all five or so instrument clusters I have accumulated over the years, set up a 5-volt tester, and selected the gauges with the best function. Then I used a kit from Performance Car Graphics to resurface the gauges once I had repainted them a flat black color. I do not have an unbroken 1970 cluster bezel, so I used one from a '69. Thus the panel I currently plan to put in my car has a dash-mounted hazard lights switch; if I find a 1970 bezel, I will install it and delete the hazard switch as would be proper. The bezel was repainted and relettered by hand, and detailing took me about a day and a half. I think the results will be very nice for my weekend cruiser of the future.
--------
Posted in 2004-present | RESTORATION | interior | link to this page | | Comments (0)
Prior to removal of
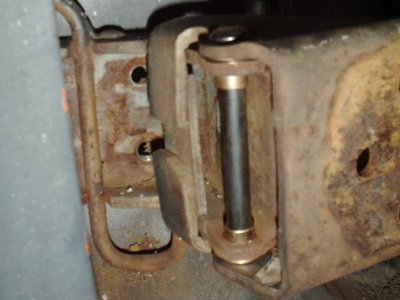
Prior to removal of the original quarter panels, it was deemed necessary that the doors be properly aligned. This required the rebuilding of the hinges. The upper door hinges seem to come from the factory with replaceable bronze bushings, so rebuilding them is easy. The lower hinges did not originally have bronze bushings; this allowed the steel of the hinge and the pin to wear against each other, causing an unacceptable amount of slop. By disassembling the hinge and making some changes, I was able to install bronze bushings in the factory hinge, restoring a nice, tight, smooth fit.
--------
Posted in 2004-present | RESTORATION | body | link to this page | | Comments (0)
New fenders
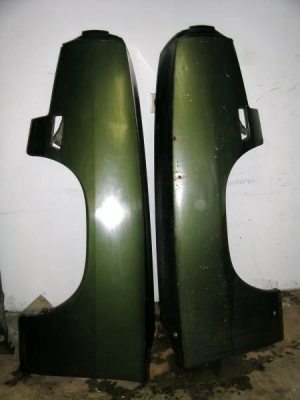
I was very happy to recently come by a pair of fenders for my Charger. I especially needed the driver's side fender, but both are better than my originals. These came off of a car that reportedly had been sitting since the early 80's. This means they have relatively little damage.
--------
Posted in 2004-present | RESTORATION | body | link to this page | | Comments (0)